1. Getting Started
In one sentence: What EZ Pool Biller does, how to set it up the first time, and what you're looking at when you log in.
Who needs this: Everyone
Where to find it: The Dashboard — the first screen after you log in.
1.1 What is EZ Pool Biller?
EZ Pool Biller runs the whole of your pool care business from one place. It was built by pool care professionals with over 70 years of combined experience in the trade.
Here's what it covers:
- Customers & Locations — every customer and every address you service, in one list.
- Schedule & Routes — plan the week and cut down driving time.
- Billing & Payments — bill customers automatically and take cards, bank payments, and PayPal.
- Mobile app — your technicians get a step-by-step job on their phone, with photos.
- Inventory — track supplies from the warehouse to the truck to the pool.
- Payroll — work out technician pay by the hour, by the stop, or by the job.
- Reports — see your revenue, your tax numbers, and how the team is doing.
- QuickBooks — keep your books up to date without typing anything twice.
- Customer portal — customers can see their bills, pay online, and read their pool service reports any time.
Every feature is included. What you pay depends on how many locations you service in a month — see Section 18.
1.2 Setup wizard — your first 30 minutes
The first time you log in, a 6-step setup wizard walks you through the essentials. You can come back to it any time from Settings > Setup Wizard.
Step 1 — Company profile
- Enter your company name, address, phone, and email.
- Pick your timezone. Every schedule and billing date uses it, so get this one right.
- Choose how you bill:
- Per-Service — a bill goes out each time a job is finished.
- Monthly Statement — everything for the month goes onto one bill.
Step 2 — Payment settings
- Connect Stripe to take card payments.
- Connect PayPal as well, if you want to.
- Choose Test Mode while you're learning, or Live Mode to take real money.
You can skip this and set it up later under Settings > Company.
Step 3 — Customer portal
Turn the customer portal on or off, and decide whether customers can manage their own saved cards.
Step 4 — pool service reports
Choose whether customers get an email after every pool service, and what goes in it: the technician's name, the address, photos, and the Chemistry readings.
Step 5 — Email
Set up the email account your messages are sent from, and the footer that goes at the bottom of every one.
Step 6 — Your first technician
Create your first technician. They get an email telling them how to log in to the phone app.
When the wizard is done, you're ready to add customers, set up your services, and start scheduling.
Watch out: the timezone in Step 1 affects every date in the system. Changing it later is possible but confusing, because past dates shift.
1.3 Finding your way around
The Dashboard is the first thing you see. It gives you today's numbers at a glance:
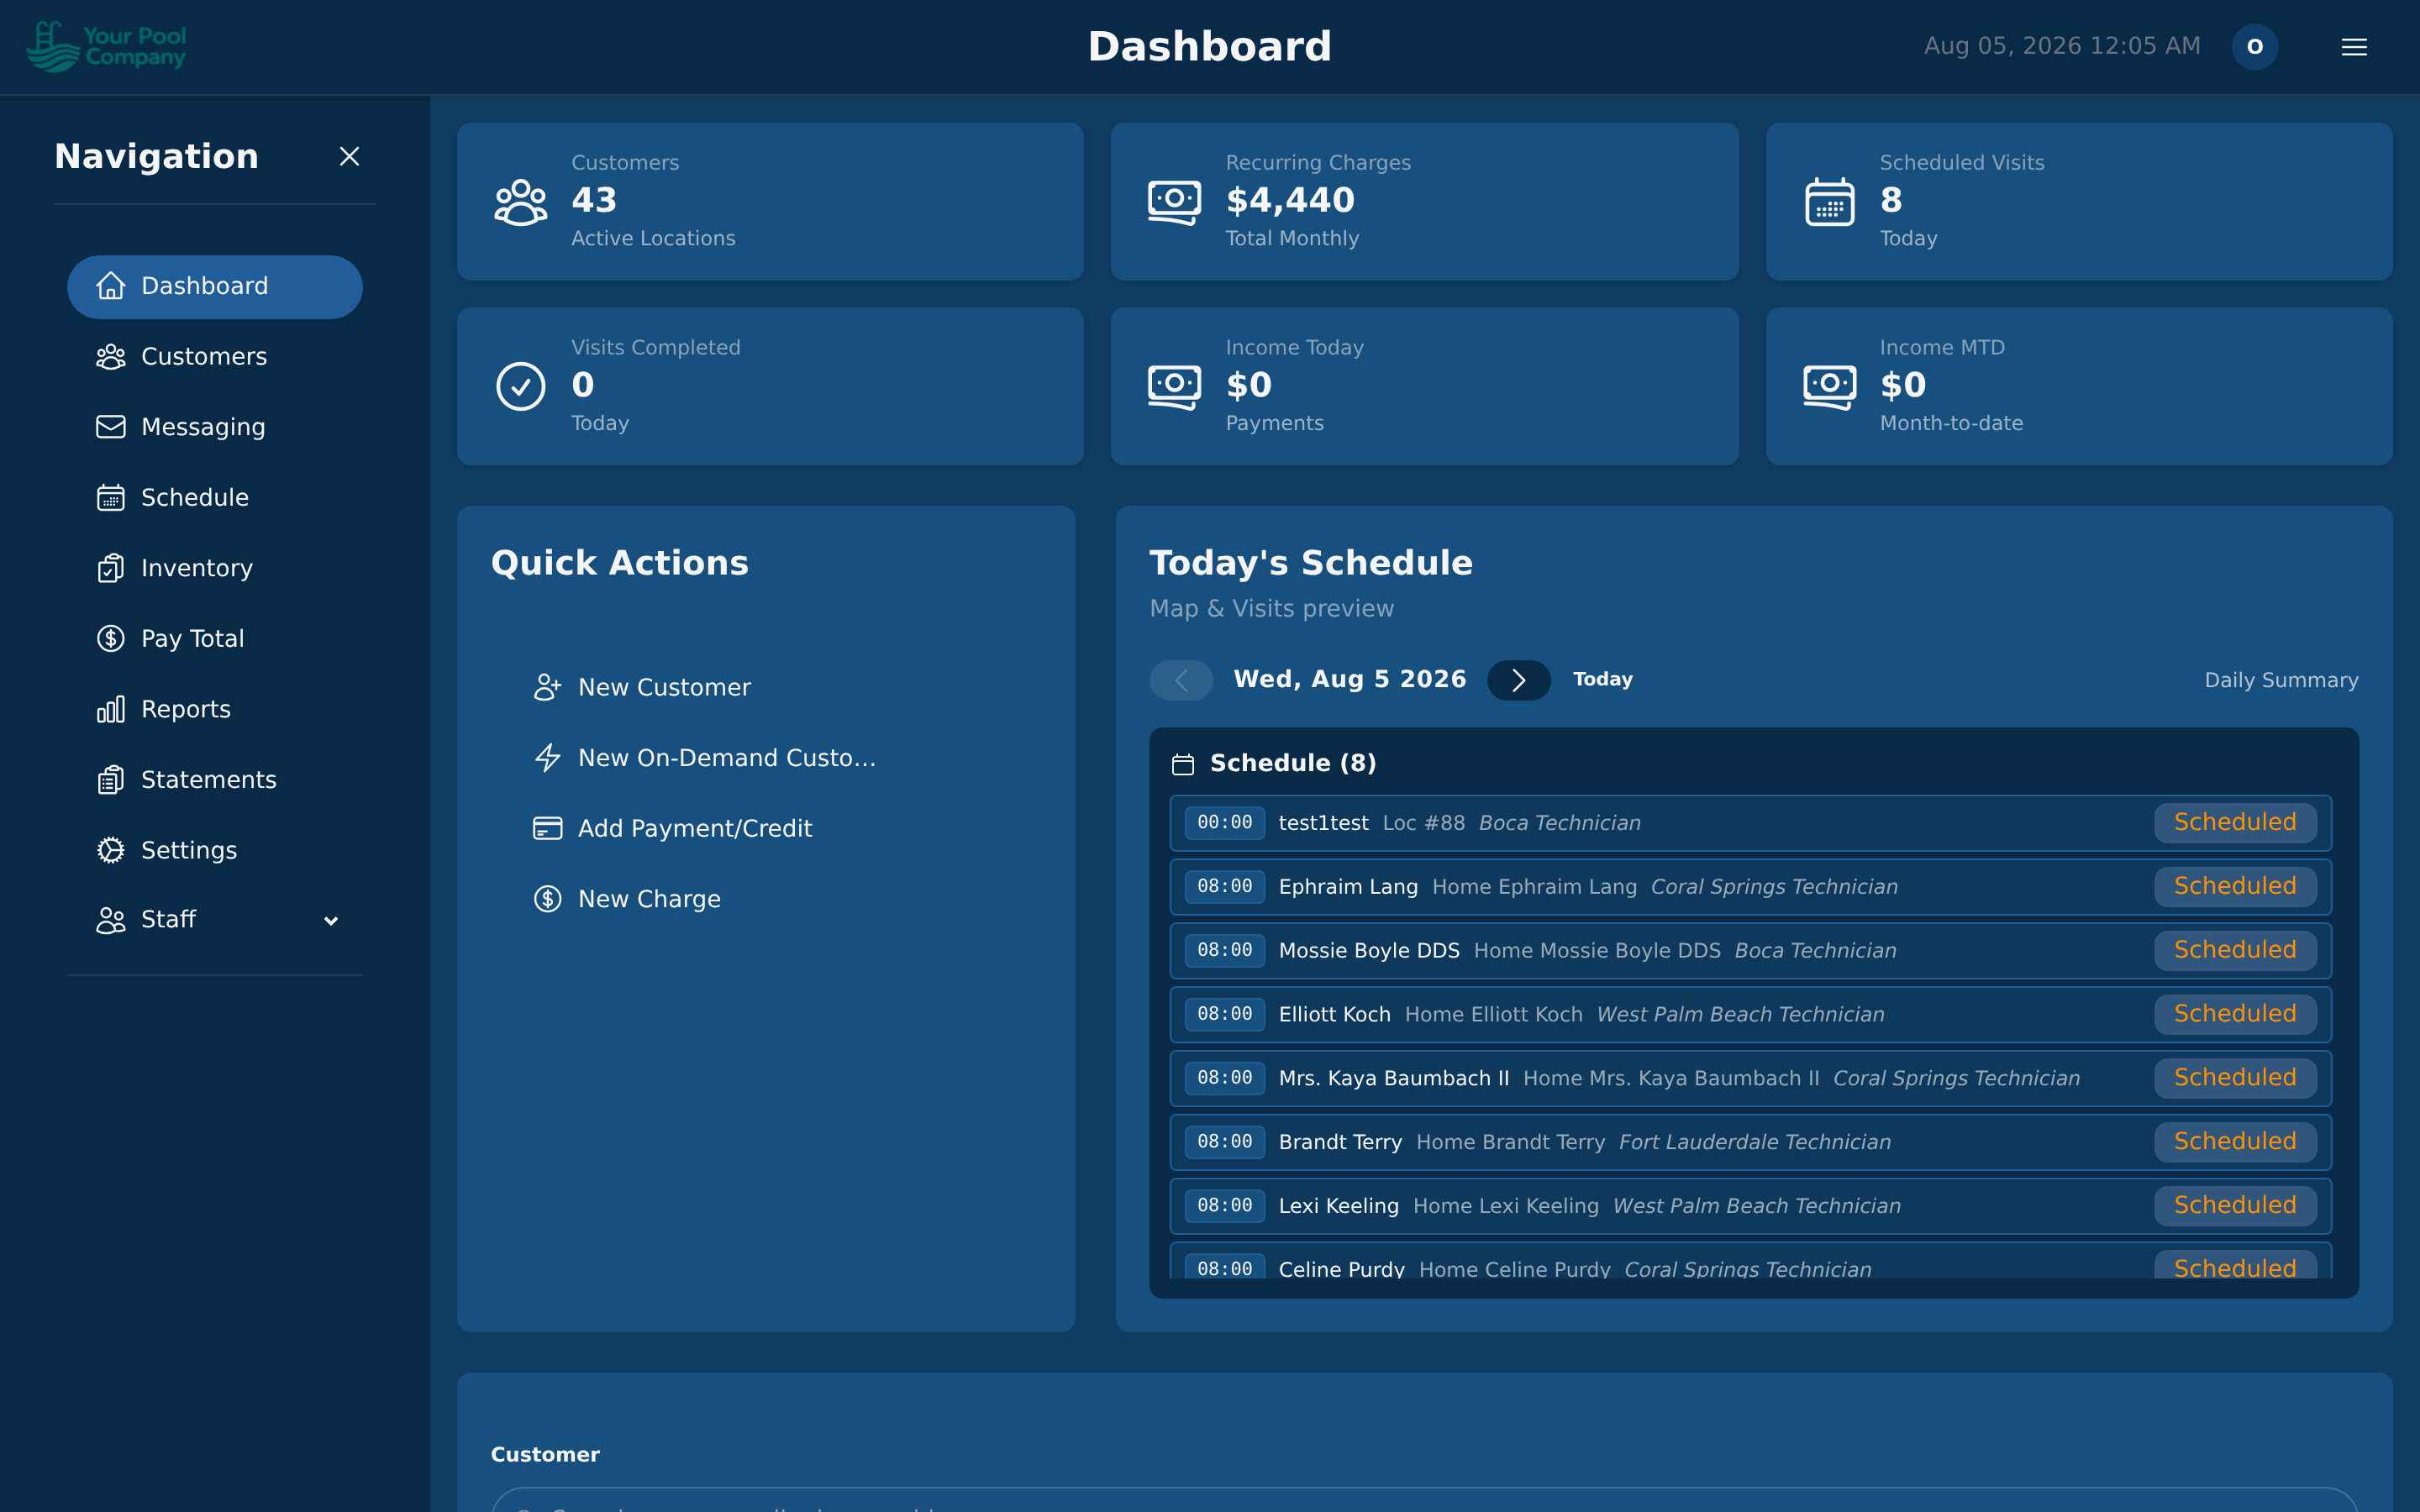
| Card | What it shows |
|---|---|
| Customers | How many active locations you're servicing |
| Recurring Charges | What your repeating services add up to each month |
| Scheduled Visits | Stops booked for today |
| Visits Completed | Stops finished so far today |
| Income Today | Money collected today |
| Income MTD | Money collected this month so far |
Below the tiles, Quick Actions gets you straight to the things you do most: New Customer, New On-Demand Customer (see Section 8), Add Payment/Credit and New Charge. Today's Schedule shows the day's stops beside it, and there's a customer search further down the page.
The menu down the left takes you everywhere else:
| Menu item | What's there |
|---|---|
| Dashboard | Today's numbers |
| Customers | Your customer list |
| Messaging | Emails and text messages |
| Schedule | The calendar and routes |
| Inventory | Supplies and truck stock |
| Pay Total | Payroll |
| Reports | Revenue, tax, and team reports |
| Statements | Monthly bills |
| Billing | Charges, payments, and credits |
| Settings | Company setup, technicians, services, integrations |
| Staff | The people who log in, and what each of them may do |
You may not see all of these. The menu only shows what your role allows. An office staff member with billing access won't see Pay Total unless their role includes it — that's normal, not a fault. See Section 3.
2. Company Settings
In one sentence: How your business is set up — your details, how you take money, and how EZ Pool Biller talks to your customers.
Who needs this: Owner, Office
You may not see this if: your role doesn't include settings. Each tab is permission-gated on its own.
Where to find it: Settings in the menu
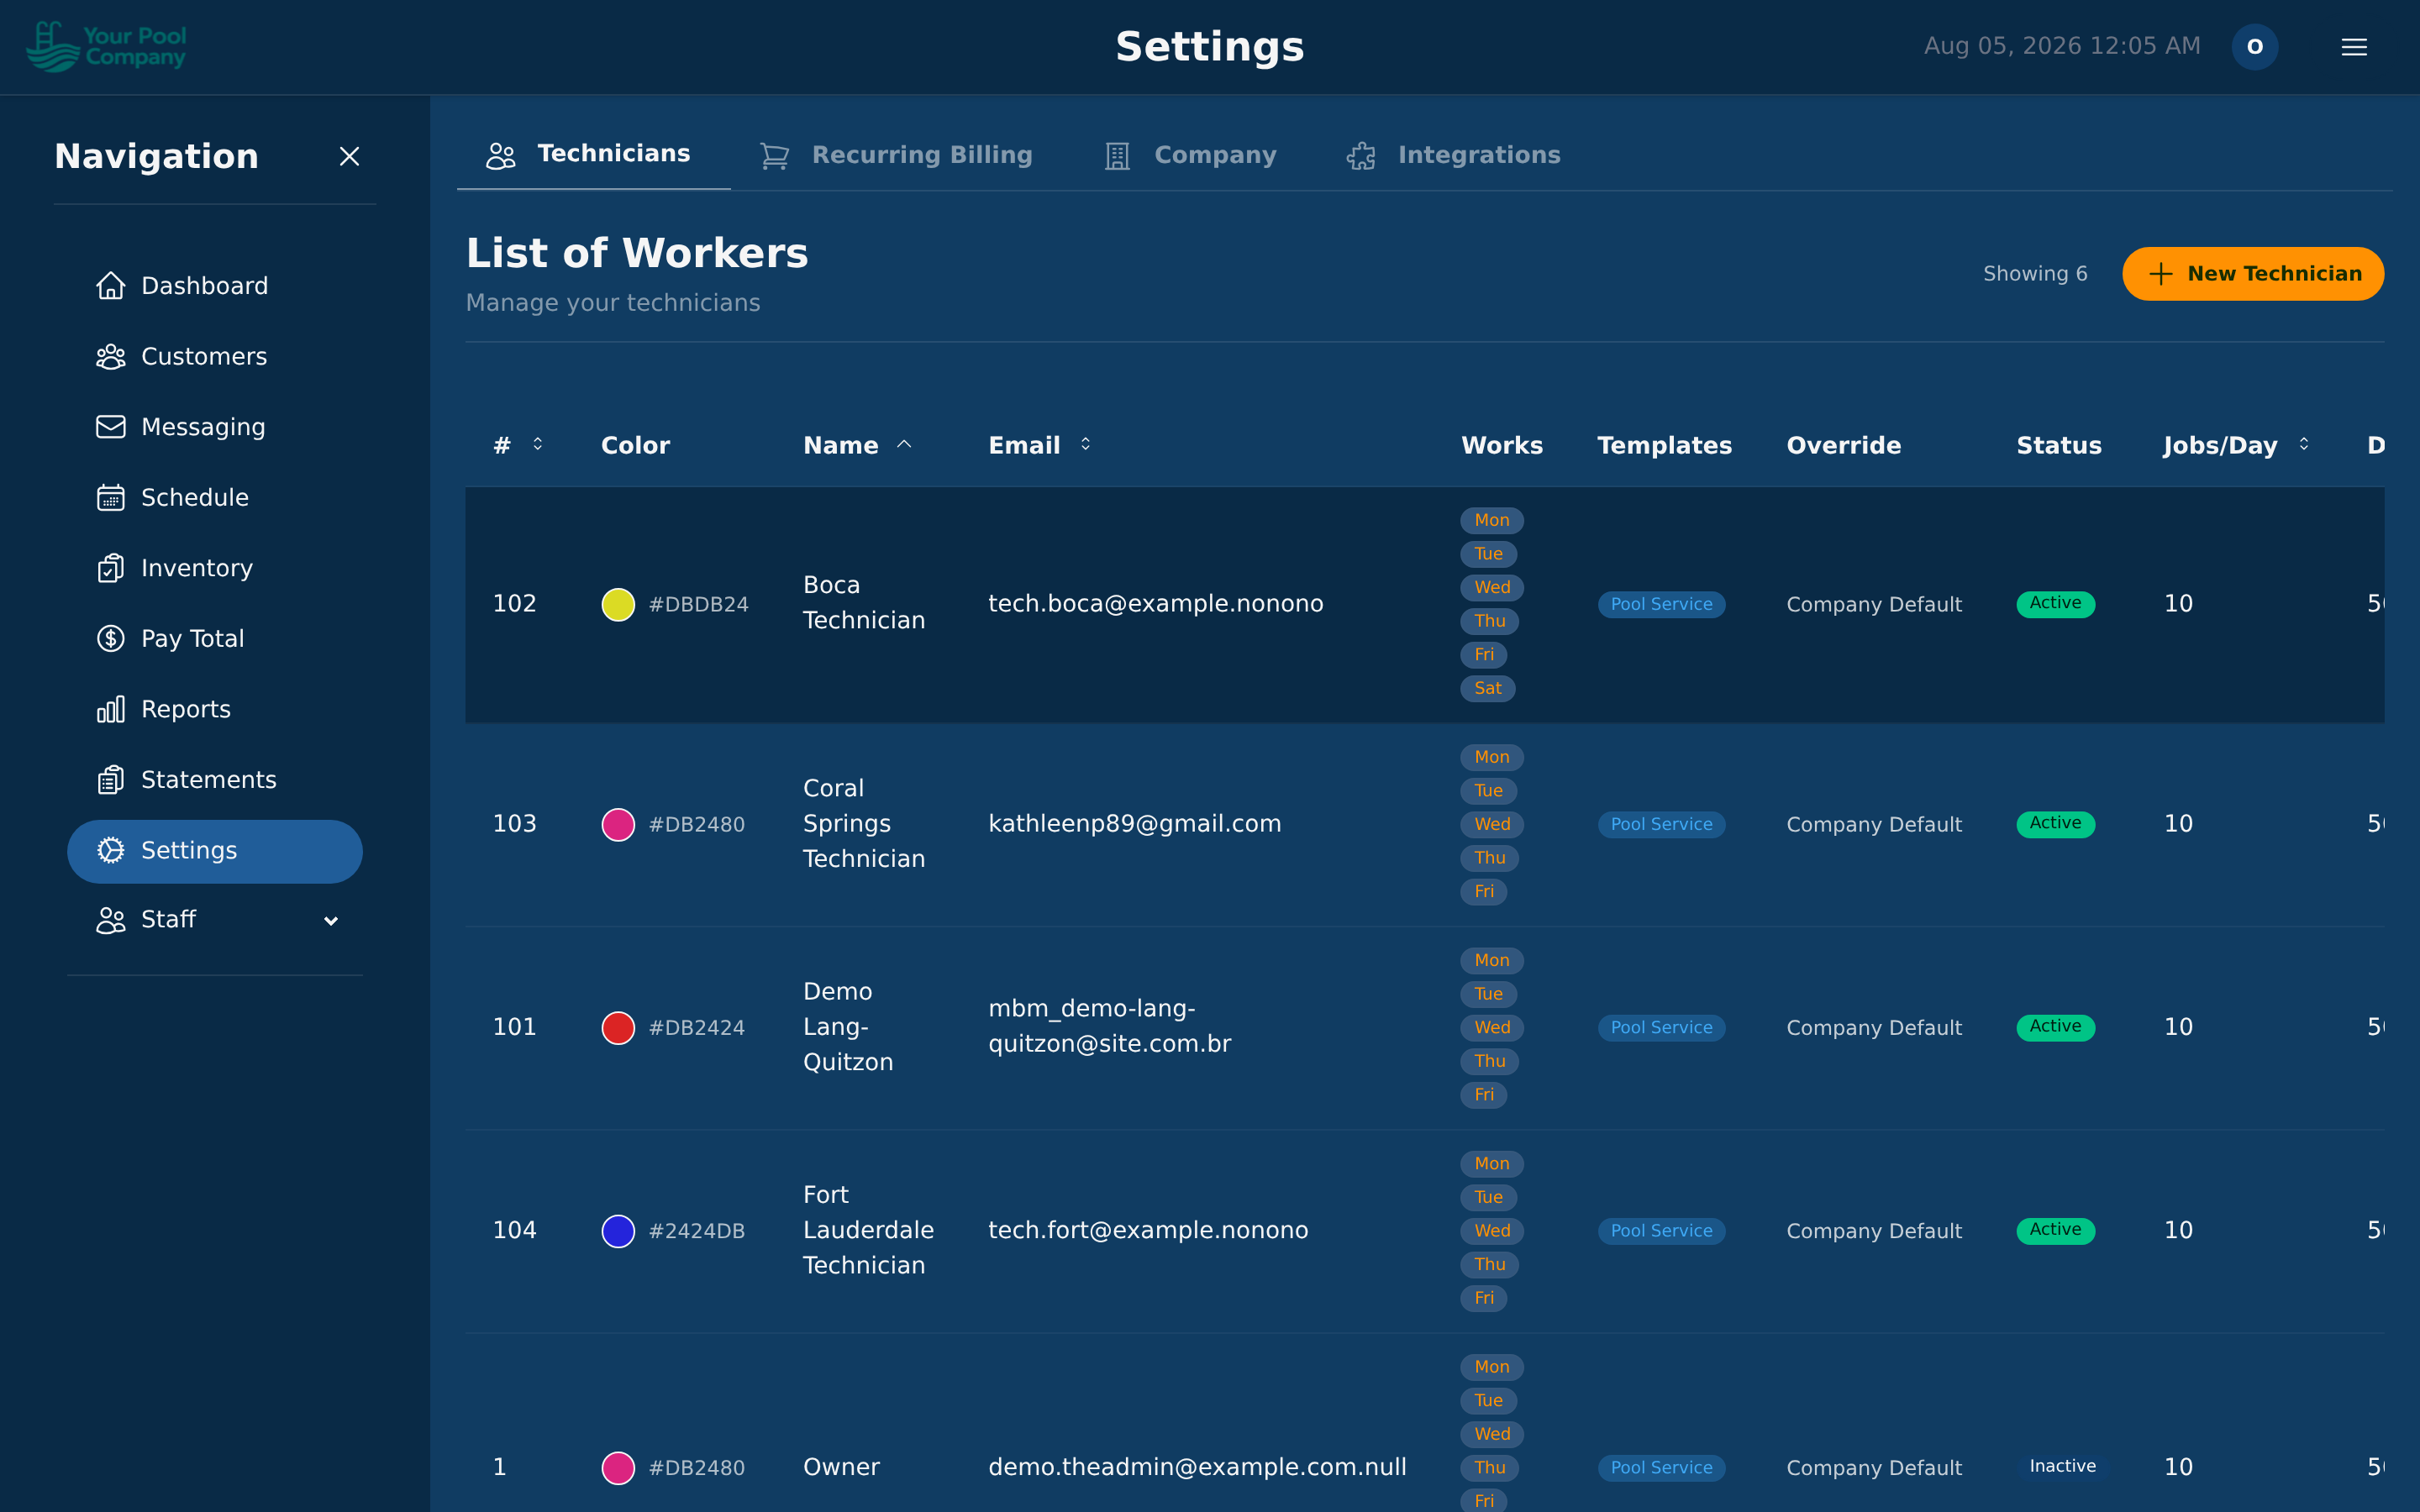
Settings has four tabs:
| Tab | What's in it |
|---|---|
| Technicians | Your technicians and their working hours |
| Recurring Billing | Your services — Recurring Billing Items and One-time Services (see Section 5) |
| Company | Everything on this page |
| Integrations | QuickBooks connection and export |
2.1 Company Profile
Under Settings > Company > General:
- Company Name — shown on invoices, statements, and the customer portal.
- Company Address, City, State, ZIP — appears on PDFs and messages.
- Company Phone & Email — how customers reach you.
- Time Zone — every schedule and billing date uses this. Set it once and leave it.
- Logo — upload it here. It appears on invoices, statements, PDFs, and the portal.
Watch out: changing the Time Zone later shifts how past dates are displayed. Get it right at the start.
Your brand colour is set in the Setup Wizard, not on this tab — open Settings > Company > Run the Setup Wizard to change it.
2.2 Payment Gateways (Stripe & PayPal)
EZ Pool Biller integrates with Stripe and PayPal to process customer payments.
Connecting Stripe:
- Go to Settings > Company and scroll to the Payments section.
- Enter your Stripe API keys (publishable key and secret key).
- Toggle between Test Mode and Live Mode.
- Use Test Mode during setup to verify everything works without charging real cards.
- Switch to Live Mode when you're ready to accept real payments.
Connecting PayPal:
- In the same Payments tab, enter your PayPal credentials.
- PayPal supports both one-time payments and vault-based recurring payments.
Gateway Order: If you have both Stripe and PayPal active, you can set the preferred order for autopay attempts.
Important: Keep your gateway in Test Mode while you're learning the system. Switch to Live Mode only when you're ready to process real payments.
2.3 Customer Portal Settings
The Customer Portal gives your customers 24/7 self-service access to their account:
- Enable/Disable Portal — toggle portal access for all customers.
- Payment Method Management — allow customers to save, update, or remove their payment methods.
- Show Login on Statements — include a portal login link on PDF statements.
More details on the portal in Section 13.
2.4 Communication Settings (Email & SMS)
Email (SMTP):
- Configure your SMTP server for outbound emails (statement delivery, visit reports, password resets).
- Set your From Name and From Email.
- Add custom email footer text that appears at the bottom of every email.
SMS:
- SMS messaging uses Twilio. Enter your Twilio Account SID, Auth Token, and sending phone number.
- Once configured, you can send text messages to customers and enable SMS appointment reminders.
2.5 Visit Report Settings
Visit reports are automatic email summaries sent to customers after each service visit. Configure:
- Enable/Disable visit report emails.
- Include Technician Name — show which technician performed the service.
- Include Service Address — show the location address in the report.
- Include Photos — attach service photos taken by the technician.
- Opt-Out Default — whether new customers are opted in or out by default.
Customers can unsubscribe from visit report emails at any time via a link in the email.
2.6 Late Fees
If late fees are switched on for your account, EZ Pool Biller adds them for you. Nobody has to remember.
A late fee is added when an invoice is past its due date, the grace period has run out, and there's still a balance owing. It lands on the customer's account as its own Late Fee line, so it's clear what it is.
How much it is depends on how your account is set up: either a flat amount (say $15) or a percentage of what's owed, optionally capped at a maximum. The grace period is how many days after the due date you allow before the fee is added.
Watch out: these settings aren't on the Settings menu at the moment. If you want late fees turned on, or the amount or grace period changed, contact support and they'll set it for you.
You can give an individual customer a longer grace period without changing your default — see Section 10.
2.7 Billing Method (Per-Service vs. Monthly Statement)
This is one of the most important settings for your pool care business. It determines how your customers are billed.
Per-Service Mode:
- An invoice is created each time a service is completed.
- Best for companies that bill on a per-visit basis or want immediate billing.
- Each completed service generates its own invoice and charge.
Monthly Statement (Per-Period) Mode:
- All charges in a month are collected into a single monthly statement.
- The statement period is anchored to a configurable Statement Day (e.g., the 1st of each month).
- At the end of each period, a statement is generated with all charges, payments, and credits.
- Best for companies that send monthly bills.
Choose the mode that matches how your customers expect to be billed. You can set this in Settings > Company under "Invoicing Method."
3. Your Team
3.1 Adding Staff & Technicians
Technicians are managed under Settings > Technicians tab. Office staff and roles are managed under the Staff menu in the sidebar.
Adding a Technician:
- Go to Settings > Technicians and click Add Technician.
- Enter their name, email, and phone number.
- They'll receive an email with instructions to set up their mobile app password.
- Once they log in to the mobile app, they'll need to accept the Terms of Service.
Adding Office Staff:
- Go to Staff in the sidebar.
- Click Invite Staff Member.
- Enter their name and email.
- Assign them a Role (see section 3.2).
- They'll receive a login link via email.
3.2 Roles & Permissions
EZ Pool Biller comes with six built-in roles that cover most pool care businesses:
| Role | Access |
|---|---|
| Admin | Full access to everything. Can manage settings, billing, staff, and all operations. |
| Manager | Operations oversight — scheduling, staff management, reports, and customer management. |
| Billing | Financial access — invoicing, payments, statements, credits/debits, and financial reports. |
| Operations | Field operations — scheduling, routing, services, and inventory management. |
| Support | Customer service — view customers, messaging, and handle day-to-day support tasks. |
| Technician | Mobile app only — sees their daily schedule, completes services, captures photos and readings. |
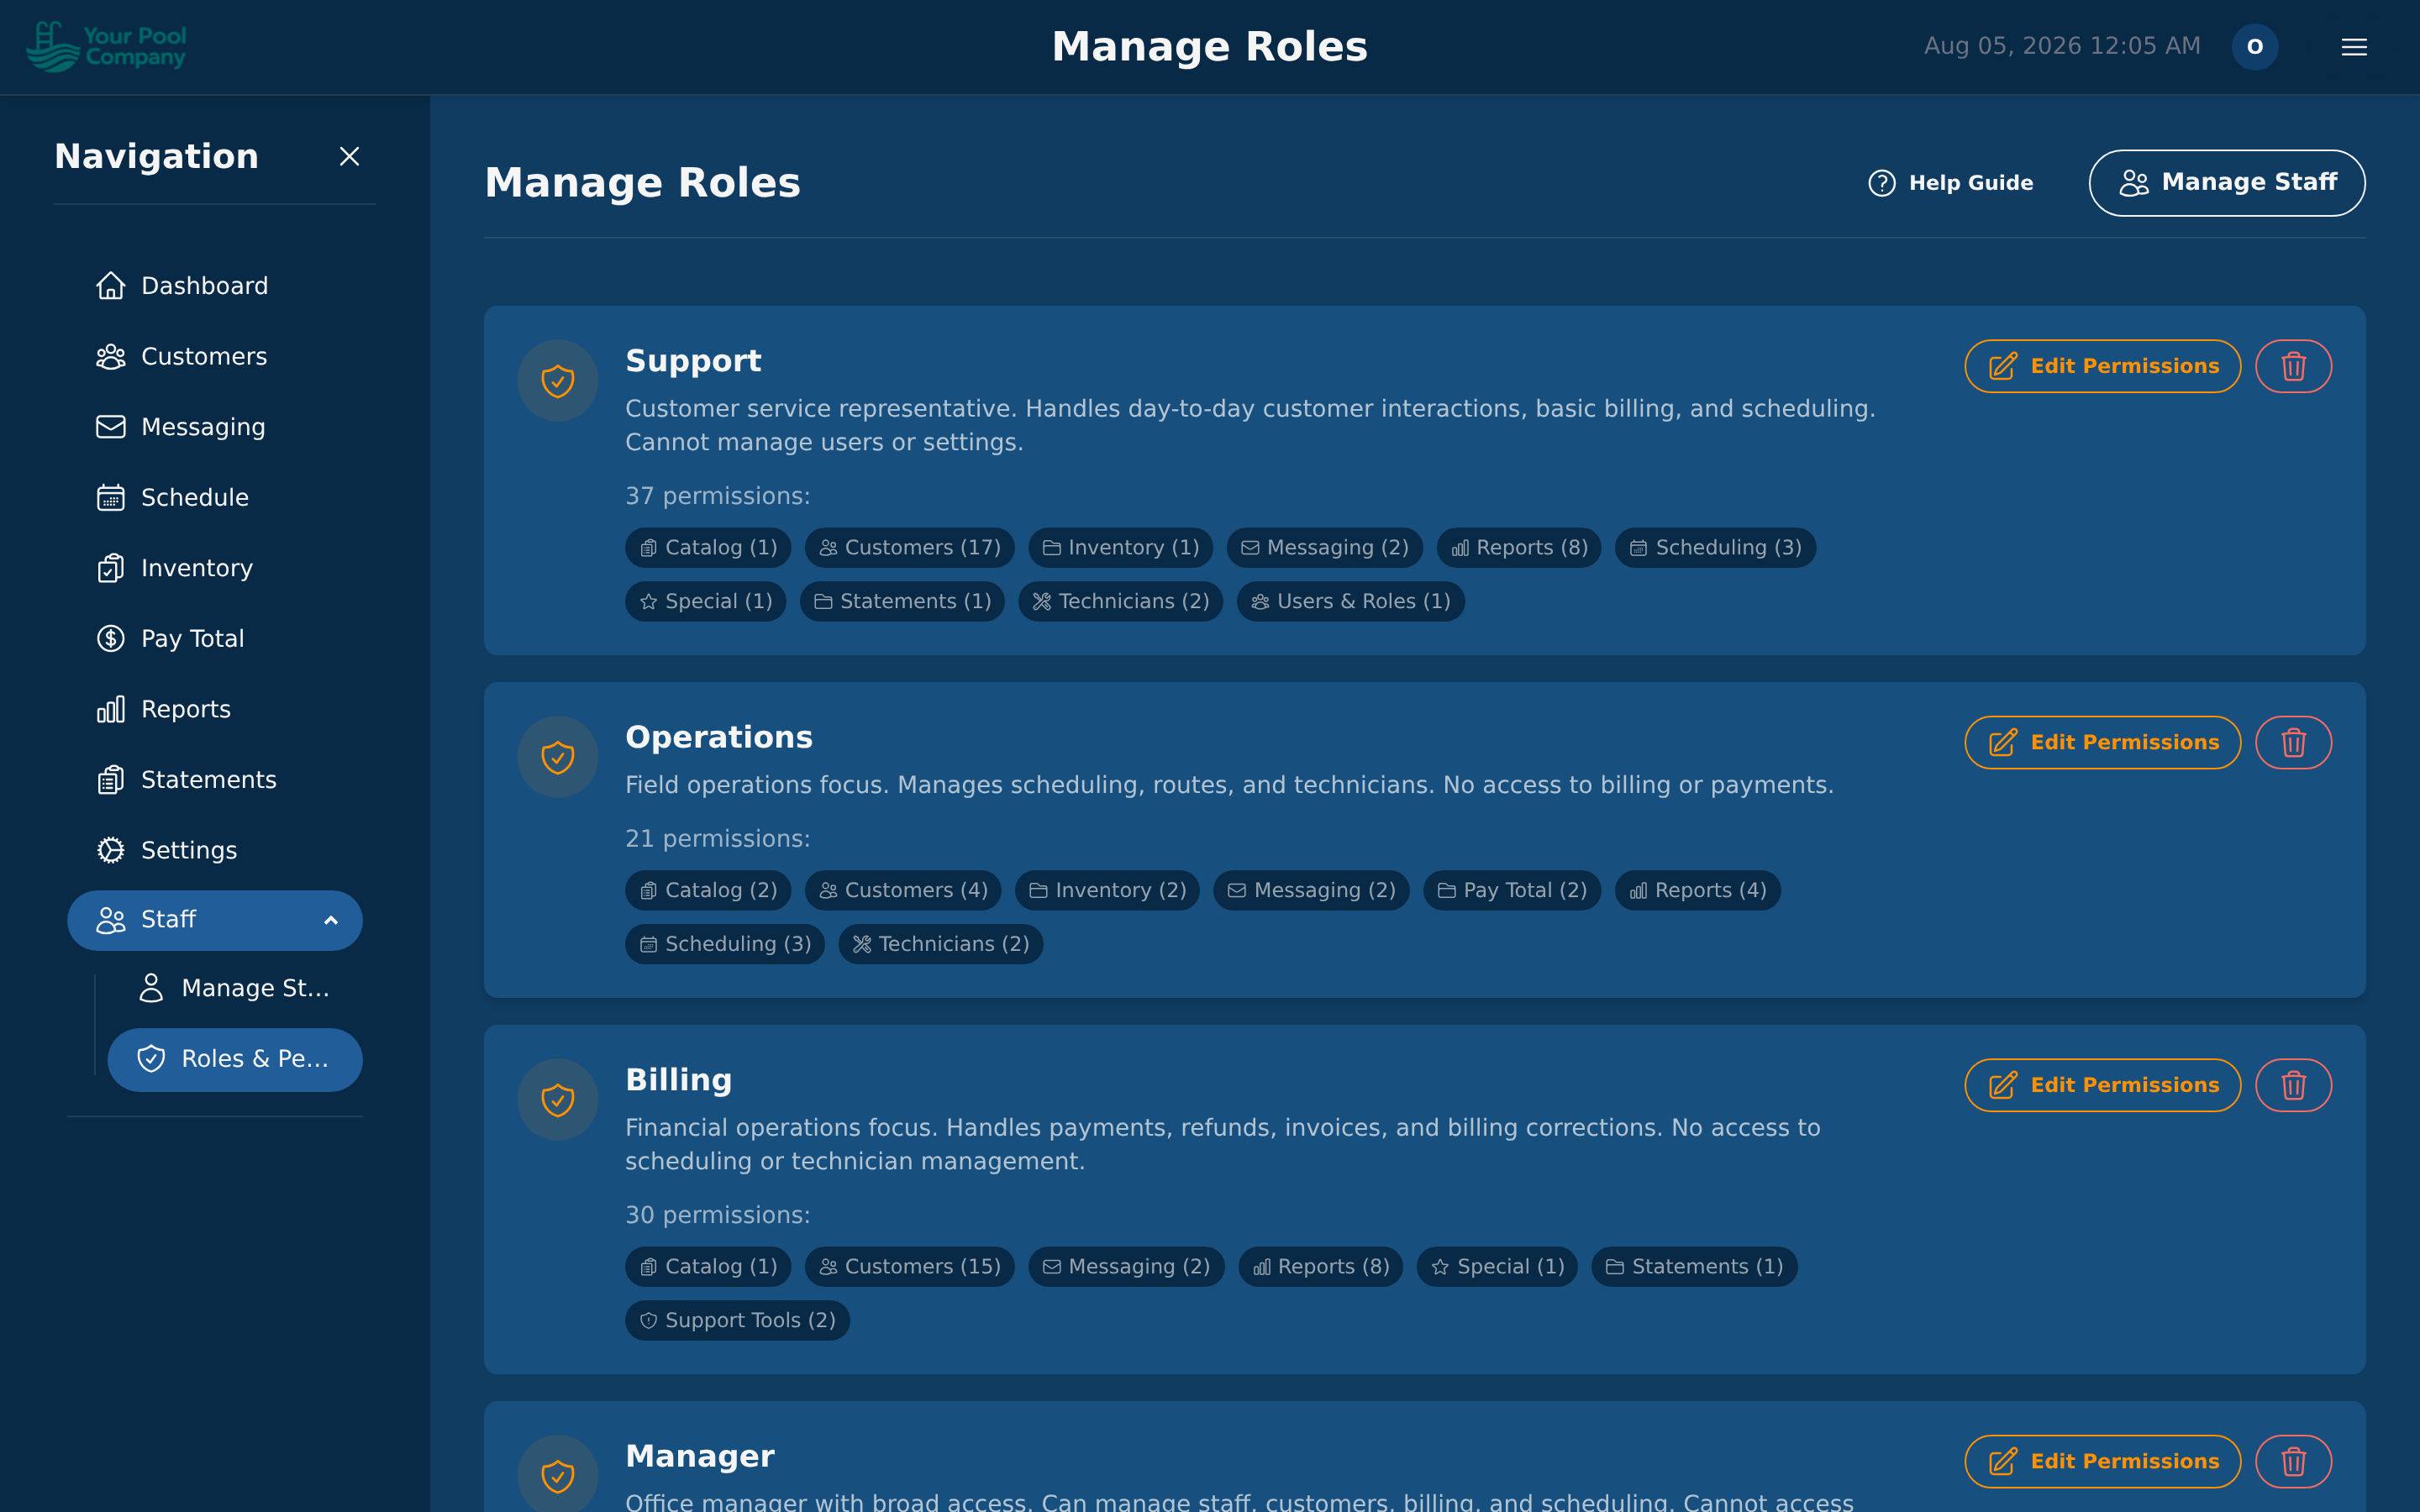
Custom roles: you can build your own with any mix of permissions. Go to Staff > Roles & Permissions.
What you can control:
- Customers — see them, add them, change them, remove them
- Billing — statements, charges, payments, credits
- Scheduling — see the calendar, change it, run the optimizer
- Inventory — see stock, change stock
- Payroll — see it, run it
- Reports — each report is granted separately
- Settings — company, payments, portal, messages, integrations
- Messaging — see messages, send messages
Look but don't touch. Charges, payments, credits and messaging each come in two strengths: one that lets someone see them, and one that lets them make them. So an office assistant can look up what a customer was charged without being able to charge them anything. Use the "view" version whenever someone needs the information but not the responsibility.
3.3 Technician Profiles & Work Schedules
Each technician has a profile that controls their scheduling and routing:
Home Base Address:
- Enter the technician's starting location (home or office). Route optimization uses this as the start and end point for their daily route.
Work Schedule (Per Weekday):
- Set start and end times for each day of the week (Monday through Sunday).
- Leave a day blank to indicate the technician is off that day.
- Set break windows (e.g., lunch from 12:00–12:30) so the optimizer respects breaks.
- Set break flexibility — how many minutes the break can shift to accommodate routing.
Capacity Limits:
- Max Jobs Per Day — prevents the optimizer from overloading a technician.
- Max Travel Distance — maximum miles the technician should drive in a day.
- Max Drive Time — maximum minutes of driving time per day.
Service Qualifications:
- Assign which Recurring Billing Items a technician is qualified to perform. The scheduler will only assign services to qualified technicians.
Color Code:
- Each technician is assigned a color that appears on the scheduling calendar and route map for easy identification.
3.4 Staff Impersonation (Support Tool)
Admins and managers can impersonate any staff member or customer to see exactly what they see. This is useful for:
- Troubleshooting — "I can't find the billing section" → impersonate them and check their permissions.
- Training — walk a new hire through the interface from their perspective.
- Customer support — see the customer portal as a specific customer sees it.
To impersonate, go to the staff or customer list and click the impersonate button next to their name. Click Stop Impersonating in the top bar to return to your own account.
4. Customers
In one sentence: Your customer list, their addresses, and everything you know about each of them.
Who needs this: Owner, Office
You may not see this if: your role doesn't include customers.
Where to find it: Customers in the menu
4.1 Adding a Customer
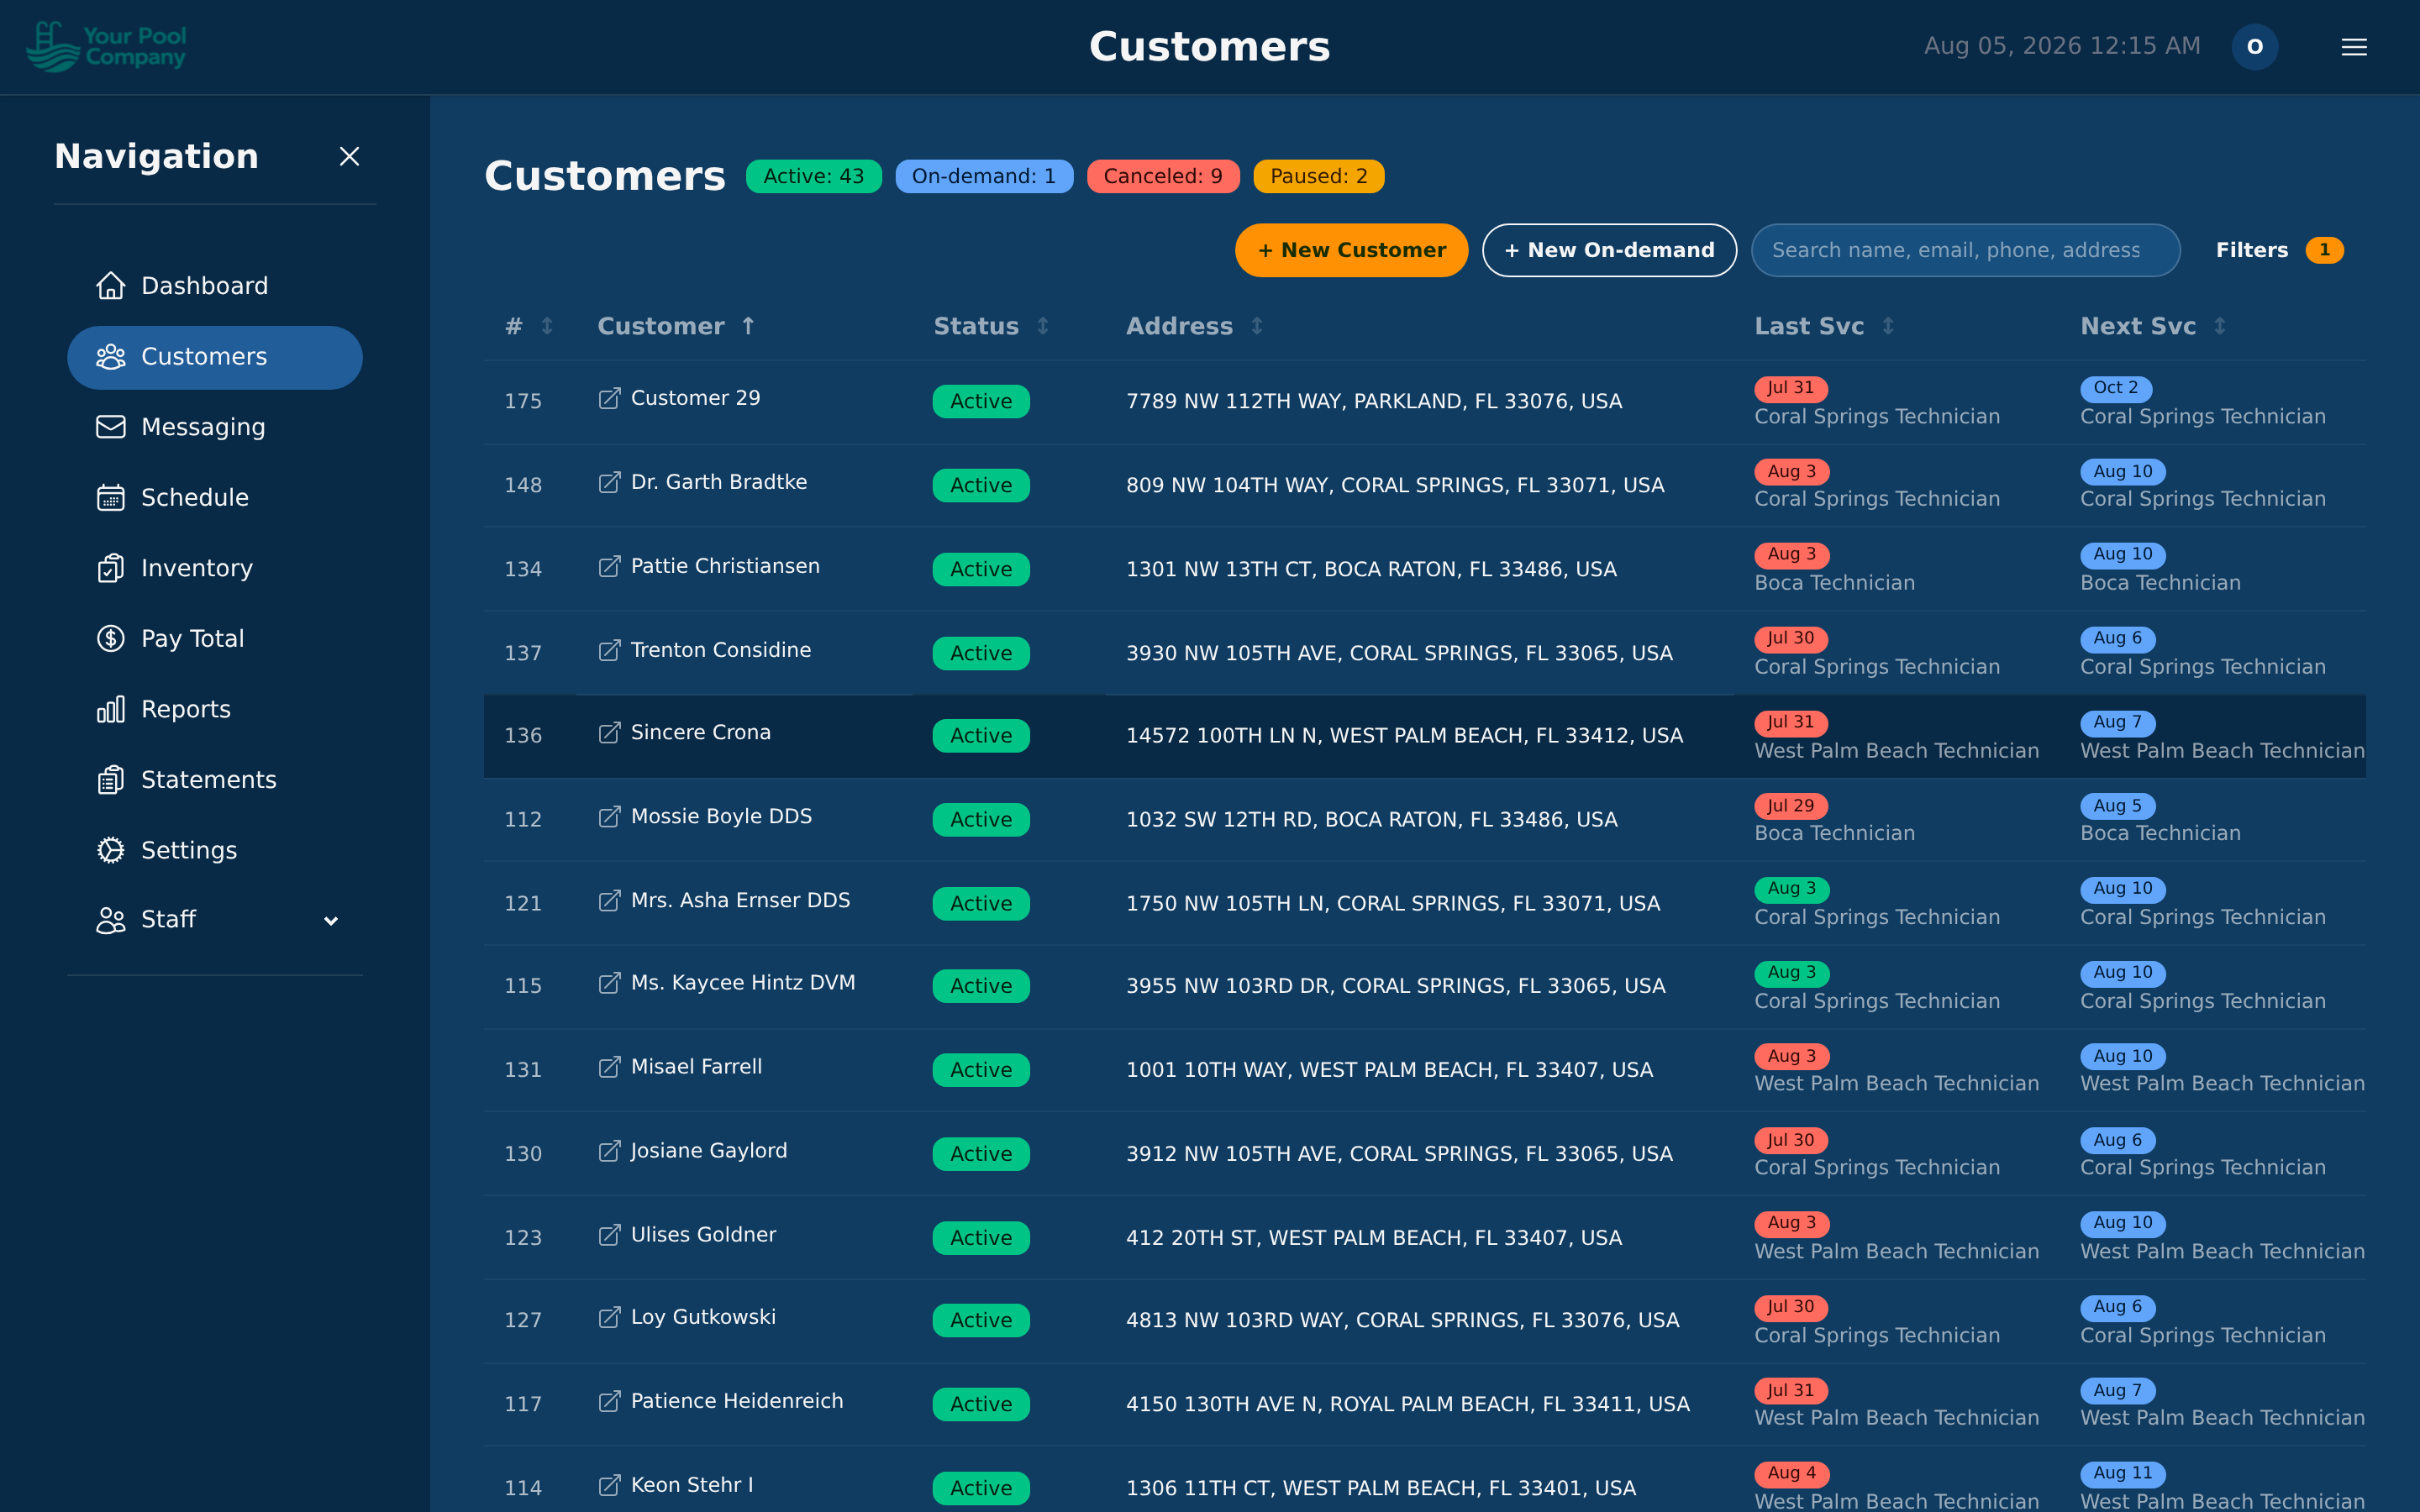
Go to Customers and click + New Customer. That opens a short wizard that sets up the customer and their first repeating service together.
If it's a one-off job rather than a regular customer, use + New On-demand instead — see Section 8.
Required Information:
- Name — the customer's full name (or business name).
- Email — their primary email address (used for invoices, statements, and portal access).
Optional Information:
- A second email address — see 4.2
- Phone number(s) — you can add multiple phone numbers with types (mobile, home, office)
- General notes
- Statement delivery preference (email or print)
- Autopay opt-in setting
After creating a customer, you'll add their service location(s) and set up a subscription.
4.2 Adding a second email address
Some customers want two people to get everything — a husband and wife, an owner and their property manager, a homeowner and their bookkeeper. You can give any customer a second email address.
Where it is: open the customer, click Edit, then click the small + Secondary email button under the email box. It stays hidden until you need it, so the form isn't cluttered for the customers who don't.
What it does: every email EZ Pool Biller sends that customer goes to both addresses — invoices, statements, pool service reports, payment receipts, reminders. You don't have to do anything else.
Watch out: the second address is for receiving email only. It cannot be used to log in to the customer portal. Because the same address can be shared across several customers, EZ Pool Biller can't tell which account someone means. If they try, they're told to sign in with their Account # and password instead. Their Account # is on their statement.
If a customer's main email is missing or was never a real address, the second one is used on its own — for sending, and everywhere their email is shown.
4.3 Customer Locations
A customer can have multiple service locations (e.g., a homeowner with a primary residence and a vacation property, or a property manager with several addresses).
Adding a Location:
- Open the customer's profile.
- Click Add Location.
- Enter the address (street, city, state, zip code).
- The system automatically geocodes the address (converts it to GPS coordinates) for route mapping.
- Add optional service instructions (e.g., "Gate code: 1234", "Dog in backyard", "Equipment is behind the shed").
Service Windows: For each location, you can set allowed service times per day of the week:
- Monday: 8:00 AM – 5:00 PM
- Tuesday: closed
- Wednesday: 8:00 AM – 12:00 PM
- etc.
This ensures the route optimizer only schedules visits during allowed hours. Leave a day empty if the location cannot be serviced that day.
Billing Address: Mark one location as the billing address. This appears on invoices and statements.
4.4 Contact Information & Notes
Phone Numbers:
- Add multiple phone numbers per customer.
- Mark one as primary.
- Indicate which numbers allow SMS (for text notifications).
CC emails — copies for other people:
Separate from the second email address in 4.2. A CC email is someone else who should get copies — a property manager, an accountant, a grown-up child handling their parent's account.
Find them on the customer's Details tab or Messages tab. For each address you add:
| Setting | What it does |
|---|---|
| Where the copy goes | |
| Label | A note for you, so you remember who it is |
| Message Types | Which emails this person gets |
The types are All Messages, Statements, Visit Reports, and Messages (the ones you send by hand from the Messages tab). Pick one or several — a bookkeeper might only want Statements.
You can switch a CC address off without deleting it, for someone who should stop getting copies for a while.
The customer's own address stays in the To field; CC addresses get a copy. Nobody is emailed twice — if a CC address is the same as the customer's own first or second address, it's skipped automatically.
Which should I use?
- The customer has two addresses of their own → second email address (4.2). They get everything, and it's one field.
- Someone else needs copies, or only needs certain emails → CC email.
Customer Notes:
- Add free-form notes to a customer's account.
- Pin important notes so they always appear at the top.
- Notes are visible to all staff with customer access but are never shown to the customer.
4.5 Finding customers in the list
The list shows Active and On-demand customers by default — the people you're actually working for. Use the status filter to include Paused or Canceled ones as well.
Watch out: if a customer seems to have vanished, they've usually been canceled or paused rather than deleted. Change the status filter before assuming anything is lost.
4.6 Changing a customer's status
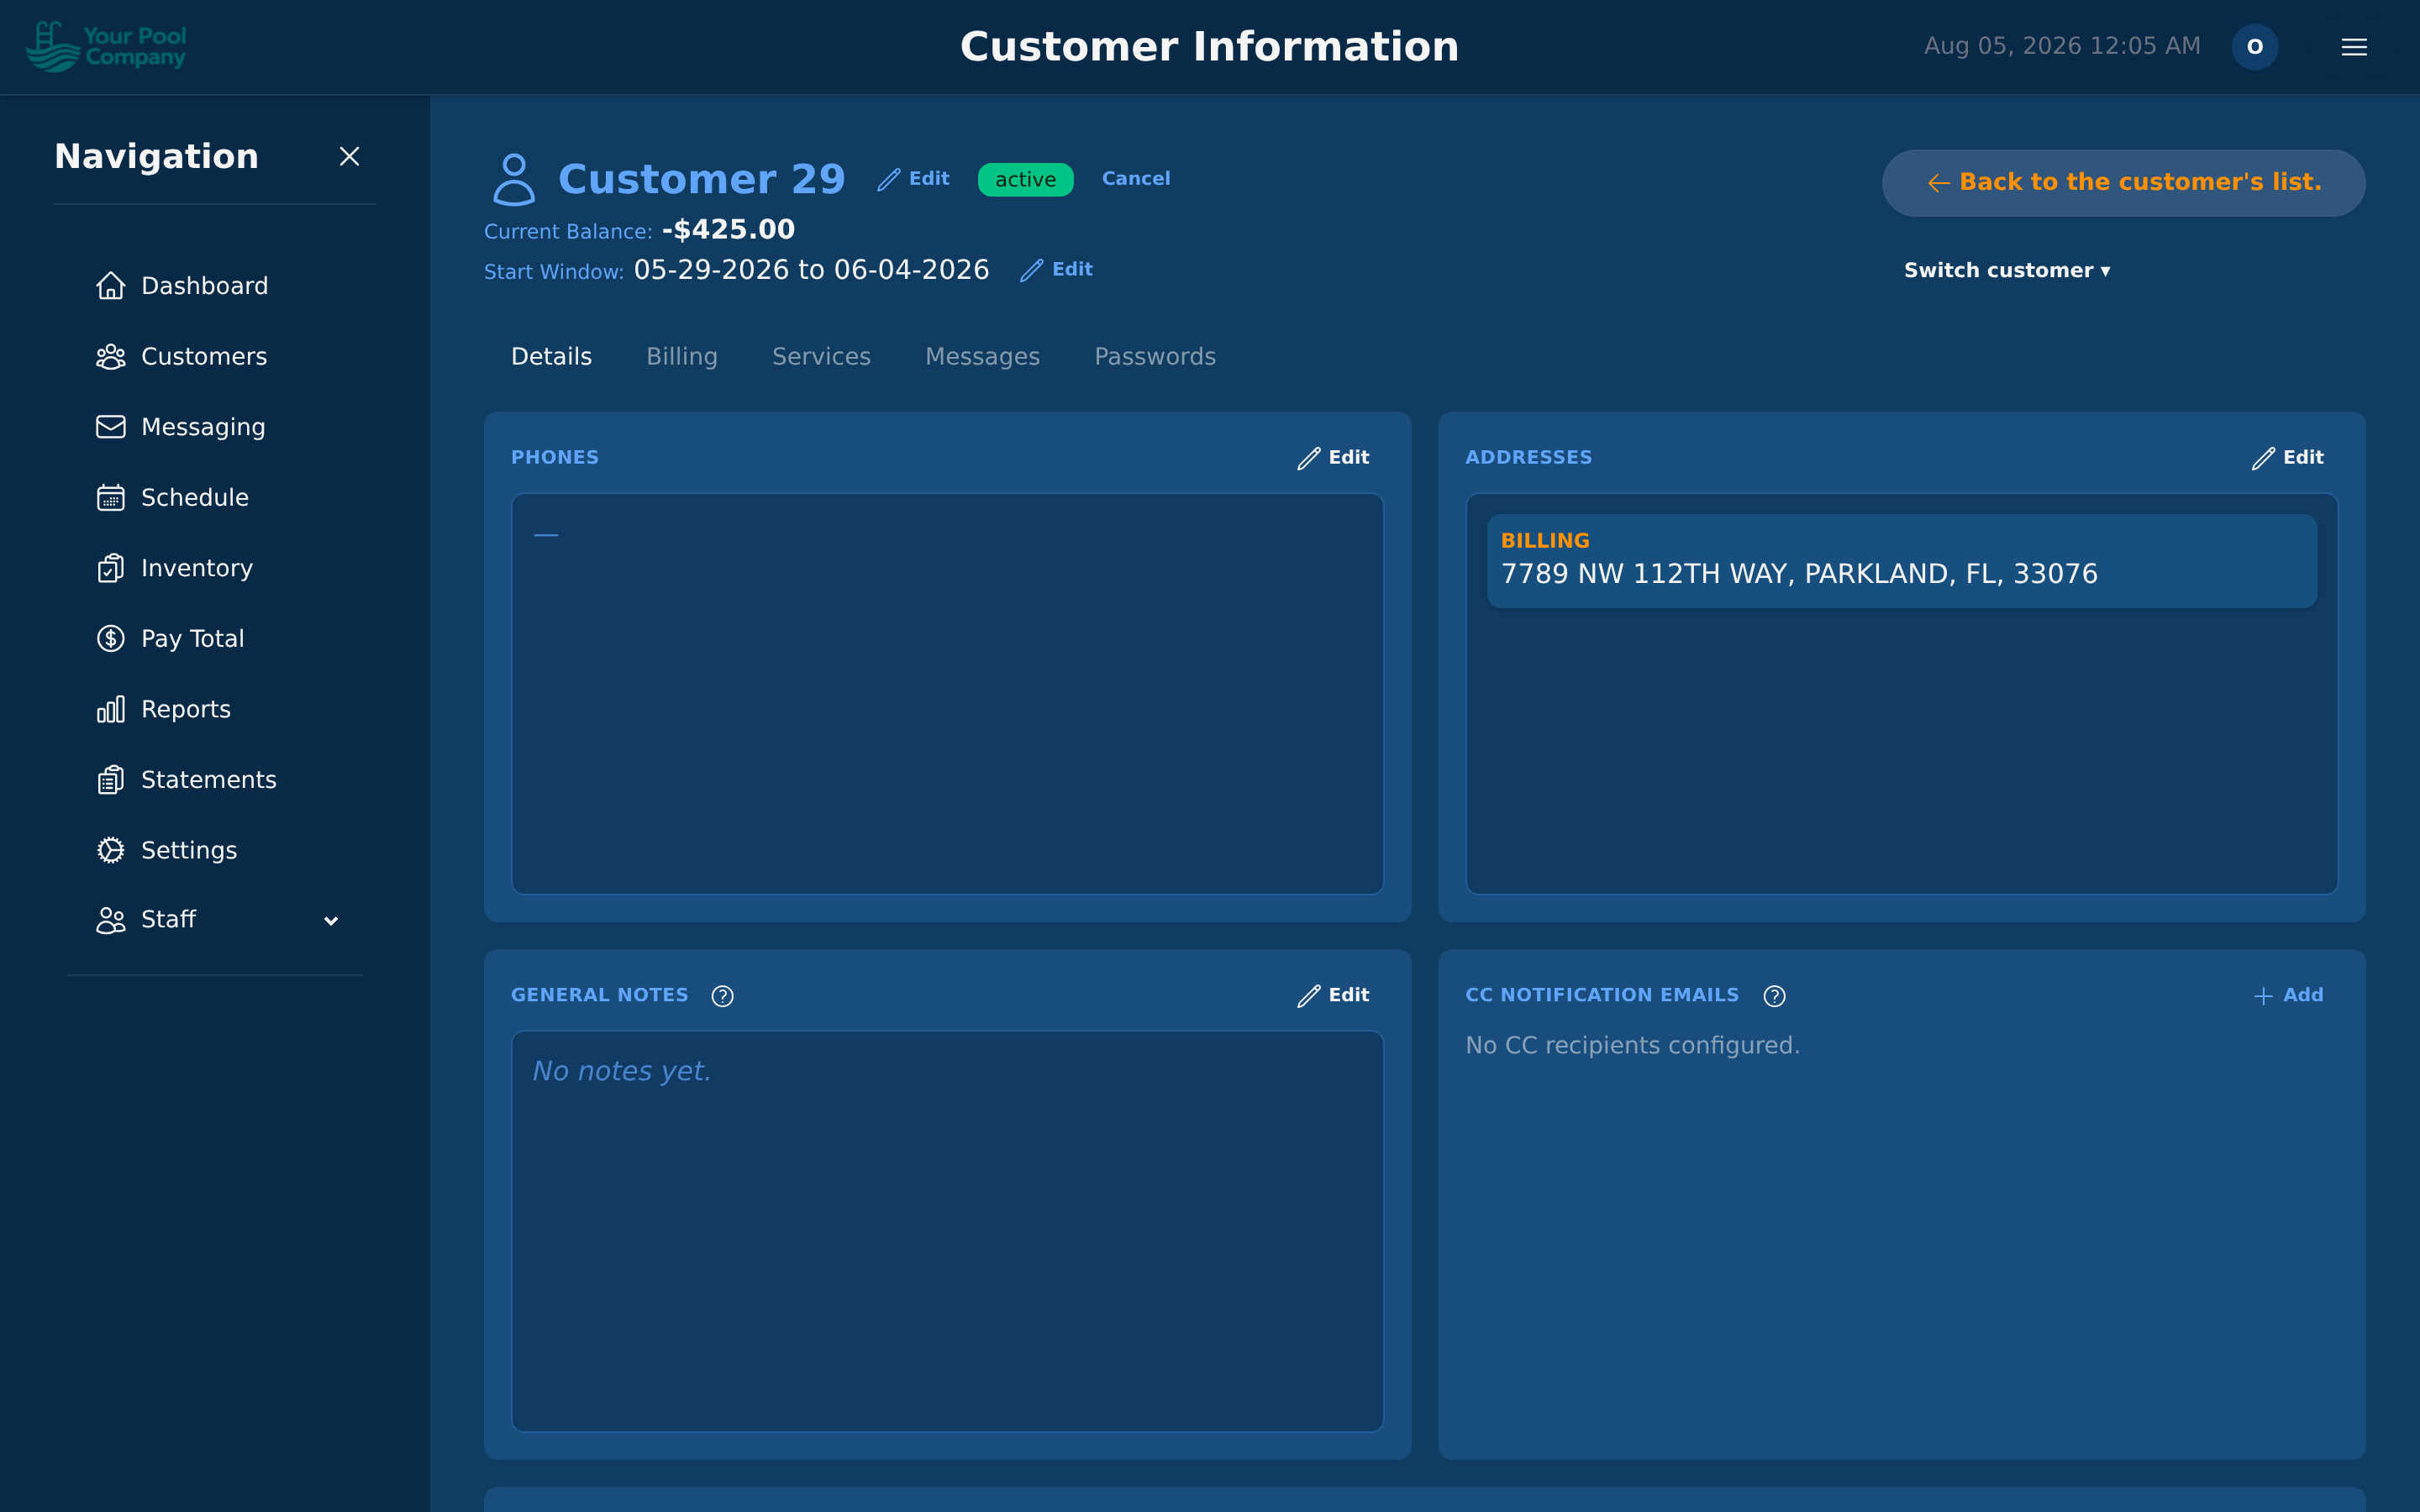
Open a customer and use the buttons at the top of their page:
| Button | What it does |
|---|---|
| Cancel | Stops their services. They stay in your records |
| Reactivate | Brings a canceled customer back |
| Convert to subscriber | Turns a one-off customer into a regular one — see Section 8 |
| Mark on-demand | Moves a customer to one-off work only |
You'll only see the buttons that make sense for that customer right now.
4.7 Customer Info Page
Clicking on a customer's name opens their Customer Info Page — a comprehensive view of everything related to that customer, organized into tabs:
- Details — name, email, phone numbers, addresses, locations, notes, and notification preferences.
- Billing — a tab with its own sub-sections:
- Billing History — all financial transactions (charges, payments, credits, fees).
- Recurring Billing — active, paused, and canceled subscriptions.
- Statements — monthly statements with opening/closing balances.
- Charge / Payment / Credit — quick actions to post charges, record payments, or issue credits directly.
- Status — current account status and payment method details.
- Services — history of all service visits (completed, pending, missed).
- Messages — communication history (emails and SMS sent).
- Passwords — manage customer portal access and reset credentials.
This is your one-stop view for everything about a customer.
5. Service Catalog
In one sentence: The list of services you sell — the repeating ones, the one-off jobs, and what the technician is asked to do on each.
Who needs this: Owner, Office
You may not see this if: your role doesn't include managing the catalog.
Where to find it: Settings > Recurring Billing and Settings > One-time Services
Set this up once and you stop rebuilding the same service for every customer. Your account already comes with a starter catalog, so nothing here starts from an empty page.
5.1 Repeating services
A repeating service is one a customer is signed up for on a schedule — the weekly or monthly work that makes up most of your round. In the app these are called Recurring Billing Items.
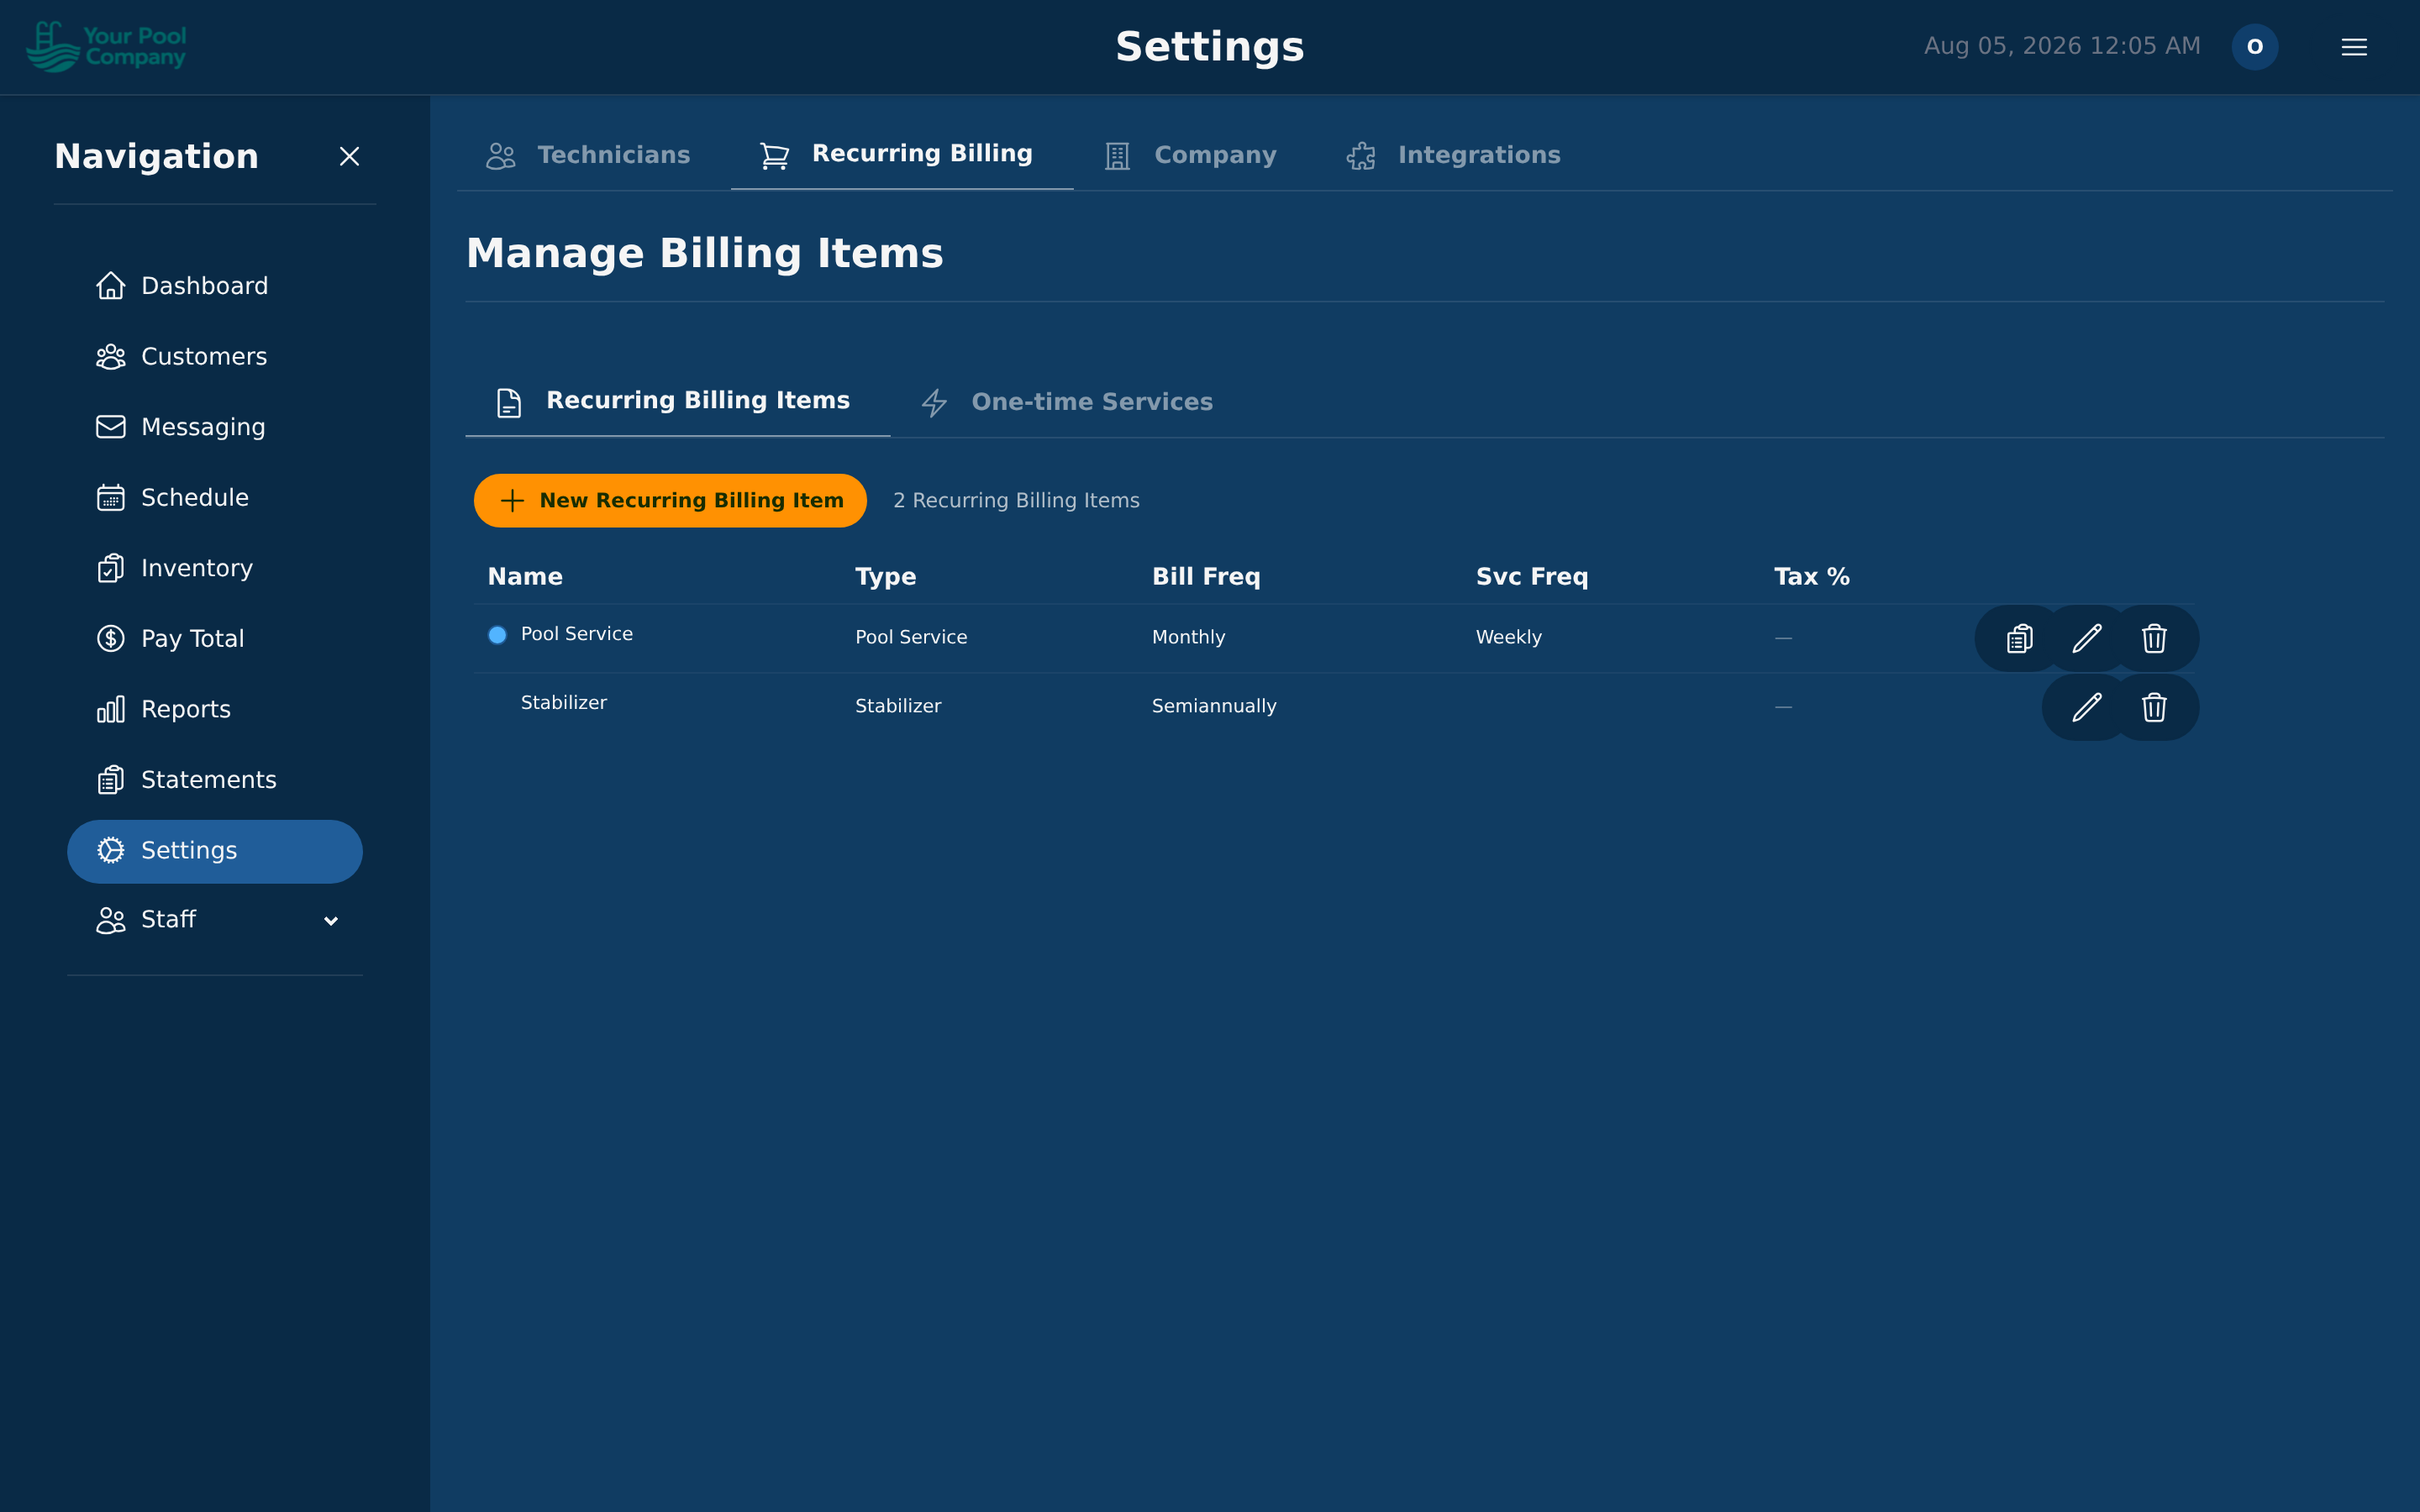
To create one, go to Settings > Recurring Billing and click New:
| Field | What it means |
|---|---|
| Name | What you and the customer call it (for example, "Weekly Pool Maintenance") |
| Service Type | The category it belongs to — see 5.2 |
| Price | What you charge |
| Tax Rate | Sales tax to add, if any |
| Billing Frequency | How often the customer is charged — see Section 6 |
| Billing Cycle Mode | Calendar month, or counted from the customer's start date |
| Proration | What to charge when someone starts partway through a period |
| Has Scheduled Visits | Whether this puts a stop on the calendar |
| Duration Override | How long this job takes, if it differs from the type's usual |
| Start Charging Offset | Days to wait before the first charge |
Watch out: only one of a customer's services can be the one that puts stops on the calendar. That's the service the technician actually drives to. The others are billing only.
5.2 Service types
A service type is the category a service belongs to. It sets the default length of the job and the colour it shows in on the calendar, so you can read the week at a glance.
There is no separate Service Types tab. You edit types inside the service form — open a Recurring Billing Item, and the Service Type field lets you pick, add, or edit one on the spot.
Watch out: deleting a type that services are still using is blocked. Move those services to another type first.
5.3 One-time services
A one-time service is a job you sell once — no schedule, no repeating charge. These live under Settings > One-time Services.
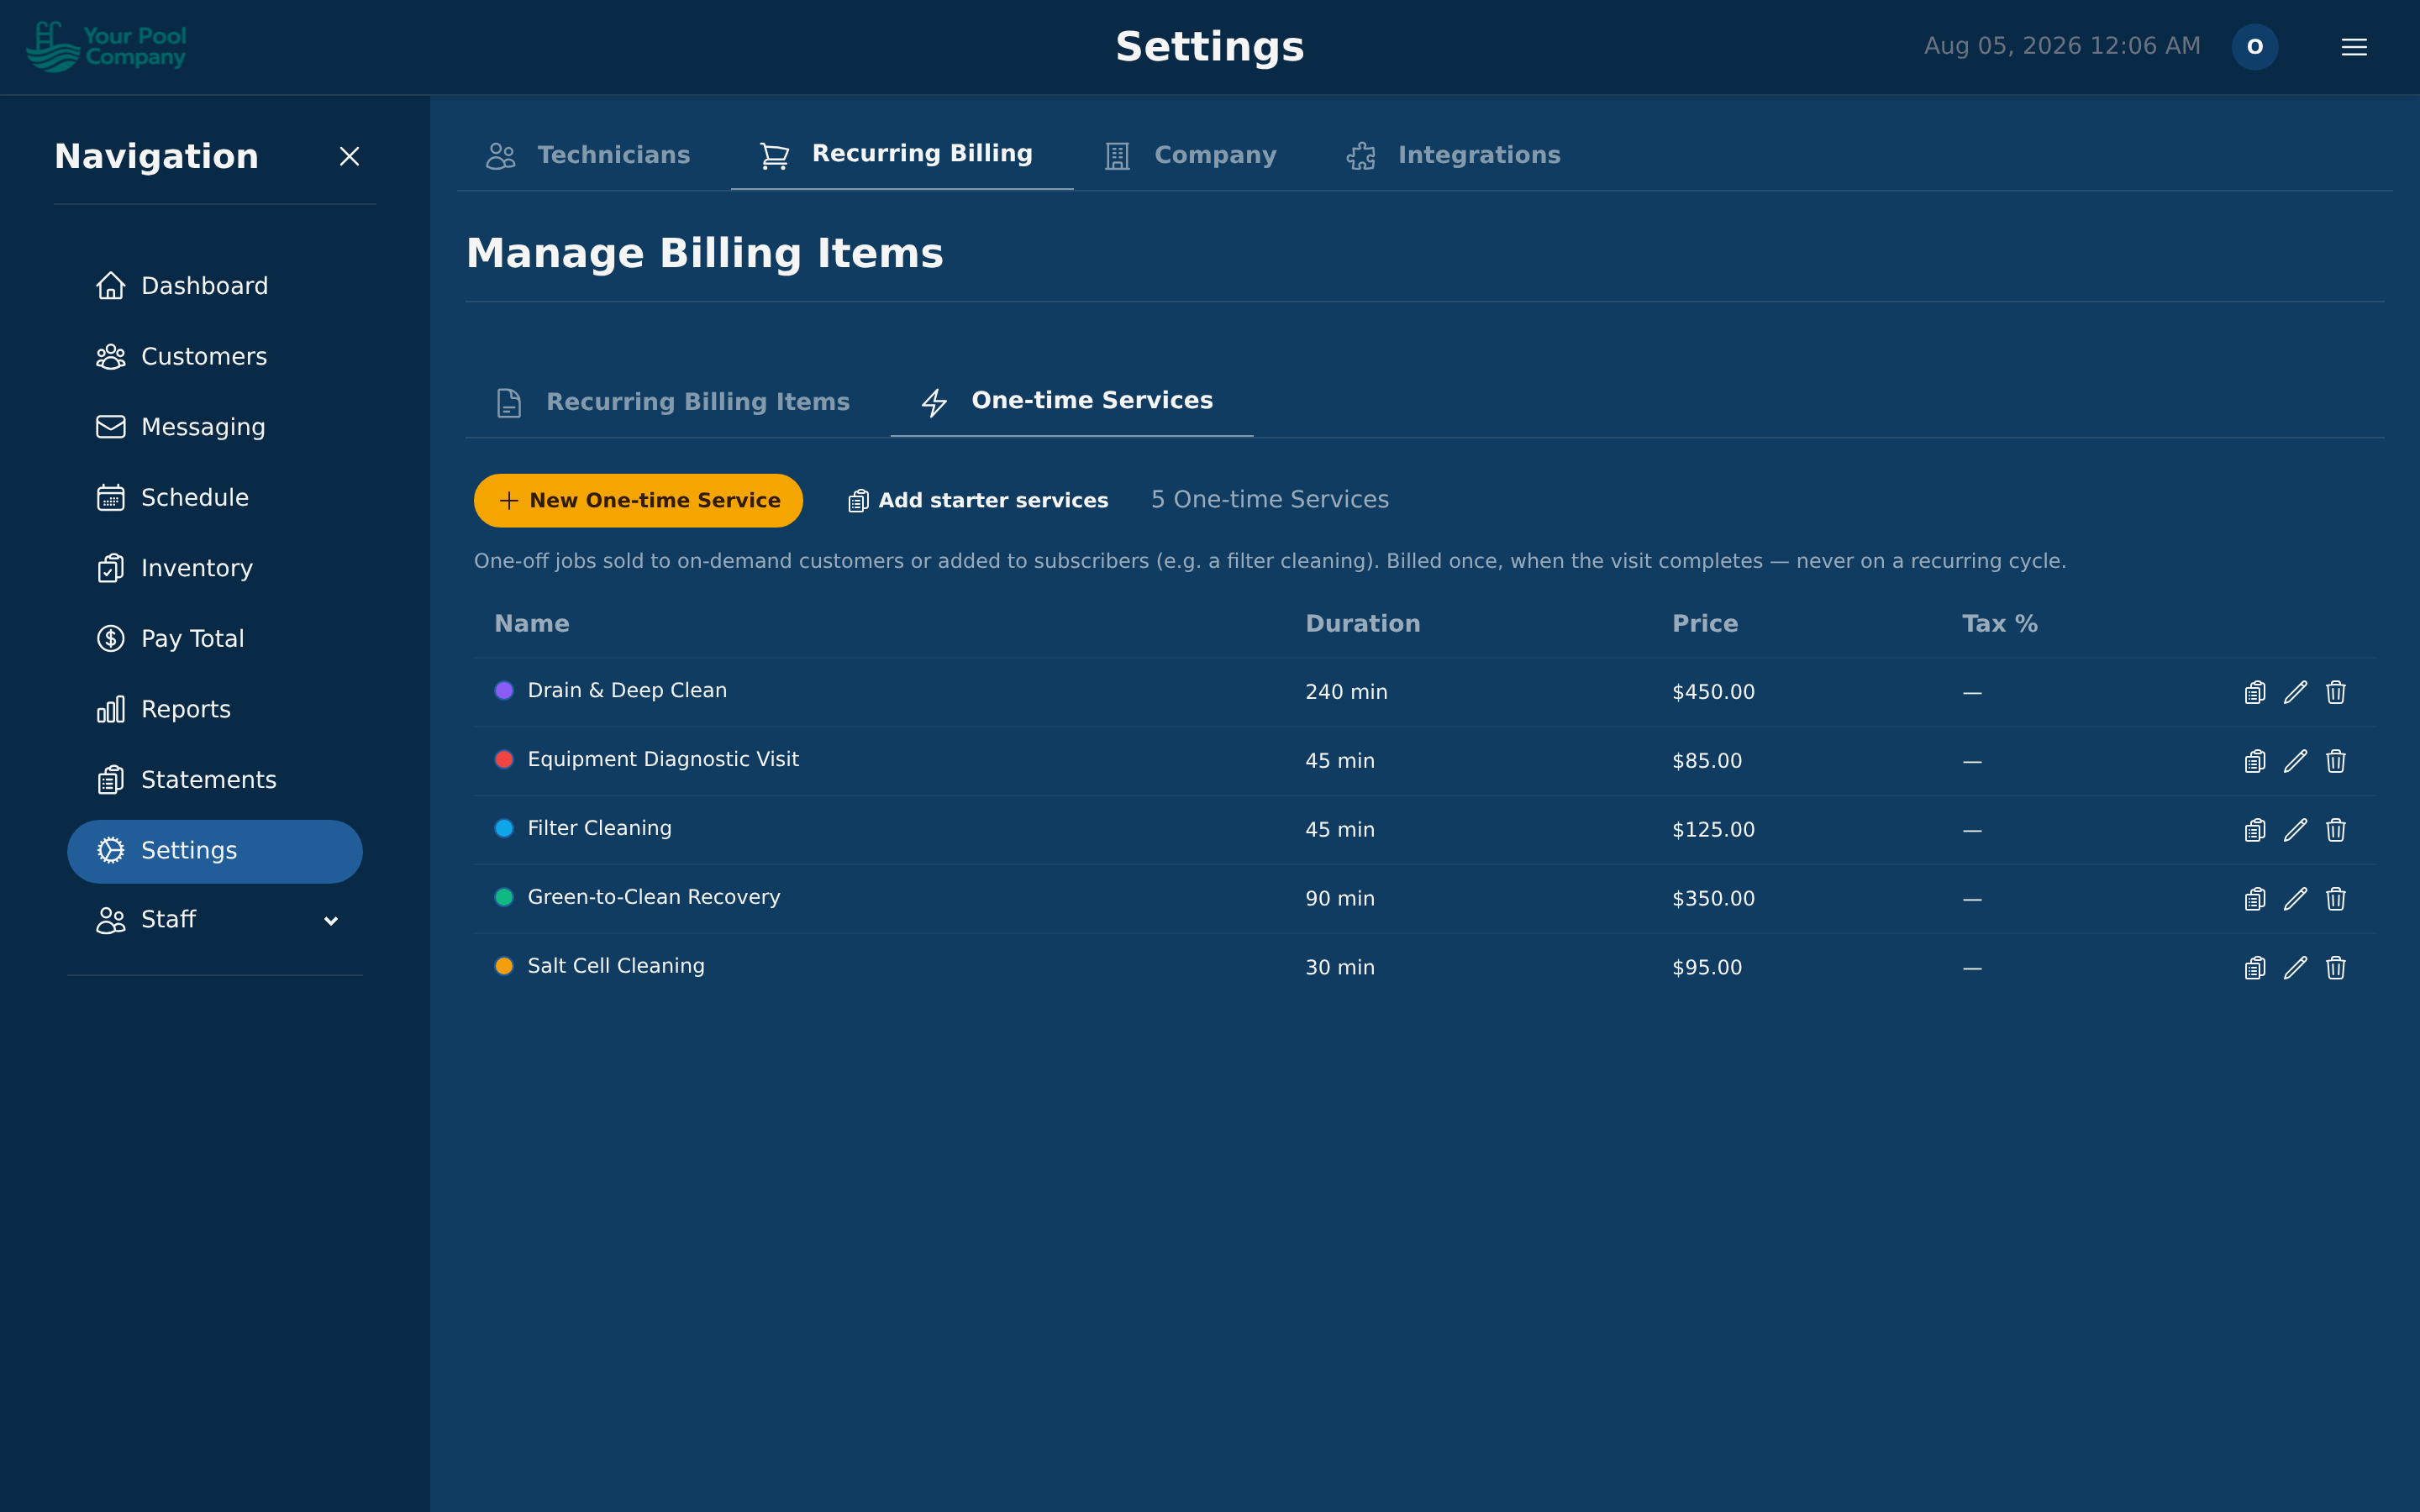
Each one carries its own price, how long it takes, and its own colour on the calendar, so a one-off job is easy to spot among the regular round.
Your account starts with a set of common jobs for your trade. They're listed in Section 8, along with how to sell one.
5.4 Checklists — what the technician is asked
Every service can carry a checklist: what the technician fills in on their phone during the pool service. It's also what feeds the customer's pool service report.
To set one up:
- Open the service.
- Click the checklist icon on its row.
- Add the items you want recorded.
- Mark each one required or optional. Required items must be filled in before the technician can finish the job.
Checklists come already filled in, and they differ by the kind of job:
- Repeating services get the standard checklist for your trade. For a pool that's the water chemistry — chlorine, pH, alkalinity — plus what was done and any notes.
- One-time services get a checklist matched to that particular job. A drain and deep clean asks about refill level, not the weekly readings.
Here's what your starter repeating service asks for:
| Asks for | Kind |
|---|---|
| Chlorine (ppm) | a number |
| pH | a number |
| Alkalinity (ppm) | a number |
| Stabilizer (ppm) | a number |
| Calcium (ppm) | a number |
| Algae Free | pick one |
| Services Completed | tick any that apply |
| Notes to Customer | notes |
If you edit a checklist and want the original back, use Restore default. It brings back the checklist for that job, not a generic one.
5.5 Inventory checklists
You can also tell a service which supplies it normally uses — for example, "Chlorine Tablets — 3 tabs". When the technician finishes the job, that stock comes off the truck automatically. See Section 11.
5.6 Packages
Note: Packages are not available yet. When they are, they'll let you bundle several services and sell them as one.
6. Subscriptions
Subscriptions are the core of your recurring revenue. A subscription links a customer + location to one or more service templates with a recurring billing schedule.
6.1 Creating a Subscription
Quick Subscription Wizard:
- Navigate to Customers and open a customer's profile.
- Click Add Subscription.
- Select the Service Location.
- Choose a Recurring Billing Item.
- Confirm the price, billing frequency, and start date.
- Optionally assign a payment method for autopay.
- Click Create.
The subscription is now Active. If the service template has scheduled visits, services will be generated and appear in the scheduling calendar.
6.2 Subscription Lifecycle (Active, Paused, Canceled)
A subscription moves through these states:
Active → Paused → Active (resumed)
Active → Pending Cancellation → Canceled
Active → Scheduled Pause → Paused
| Status | What It Means |
|---|---|
| Active | The subscription is live. Services are generated and billing occurs on schedule. |
| Paused | On hold — no new charges or services. Can be resumed at any time. |
| Scheduled Pause | A pause is set for a future date (e.g., "Pause starting November 1"). |
| Pending Cancellation | Marked for cancellation but still active until the termination date. |
| Canceled | Fully terminated. No further charges or services. Historical data is preserved. |
To pause a subscription: Open the subscription and click Pause. Optionally set a resume date so it reactivates automatically.
To cancel a subscription: Click Cancel and provide a reason. You can set a termination date (e.g., end of the current billing period) so the customer receives service through their paid period. Future pending services are automatically canceled.
6.3 Billing Frequencies
EZ Pool Biller supports a wide range of billing frequencies:
| Frequency | Description |
|---|---|
| Per-Service | Charged each time a service visit is completed |
| One-Time | A single charge (not recurring) |
| Weekly | Charged every week |
| Biweekly | Charged every two weeks |
| Monthly | Charged once per month |
| Bimonthly | Charged every two months |
| Quarterly | Charged every three months |
| Every 4 Months | Charged every four months |
| Semiannually | Charged every six months |
| Annually | Charged once per year |
| Biennially | Charged every two years |
| Triennially | Charged every three years |
| Quinquennially | Charged every five years |
| Decennially | Charged every ten years |
The last few are rare, but they're there for long-term agreements.
The frequency is set on the service, and you can override it for one customer without changing the service itself.
6.4 Proration
When a customer starts (or stops) mid-billing-period, proration determines how the first or last charge is calculated:
| Method | Behavior |
|---|---|
| None | Full charge regardless of start date |
| Daily | Charge is adjusted proportionally based on the number of remaining days in the period |
| Weekly | Charge is adjusted proportionally based on the number of remaining weeks in the period |
| Next Month | No charge for the partial period; billing starts on the next full period |
Example: A $120/month subscription starting on the 15th:
- None → Customer is charged $120 for the partial month.
- Daily → Customer is charged ~$60 (roughly half the month, calculated by day).
- Weekly → Customer is charged based on the number of full weeks remaining.
- Next Month → No charge until the 1st of the next month.
6.5 Auto-Pause & Auto-Resume
You can configure the system to automatically manage overdue subscriptions:
Auto-Pause (Settings > Company):
- Enable automatic pausing of subscriptions when customers are overdue.
- Grace Days — number of days past due before pausing (e.g., 30 days).
- Minimum Overdue Amount — only pause if the balance exceeds this threshold.
- Notify Customer — send an email when their subscription is paused.
Auto-Resume:
- Enable automatic resuming when payment catches up.
- Resume Threshold — the balance must drop below this amount to resume.
- Resume Delay — wait this many days after payment before resuming (avoids reactivating from a partial payment).
- Notify Customer — send an email when their subscription resumes.
7. Scheduling & Routes
In one sentence: Plan who visits which pool on which day, and put the stops in a sensible driving order.
Who needs this: Owner, Office
You may not see this if: your role doesn't include scheduling.
Where to find it: Schedule in the menu
7.1 How it works
- Your repeating services create stops automatically — a weekly service makes one stop a week.
- Those stops appear on the calendar.
- You put each one on a technician and a day, or let EZ Pool Biller work it out.
- You publish the week, and technicians see it on their phones.
7.2 Week and month views
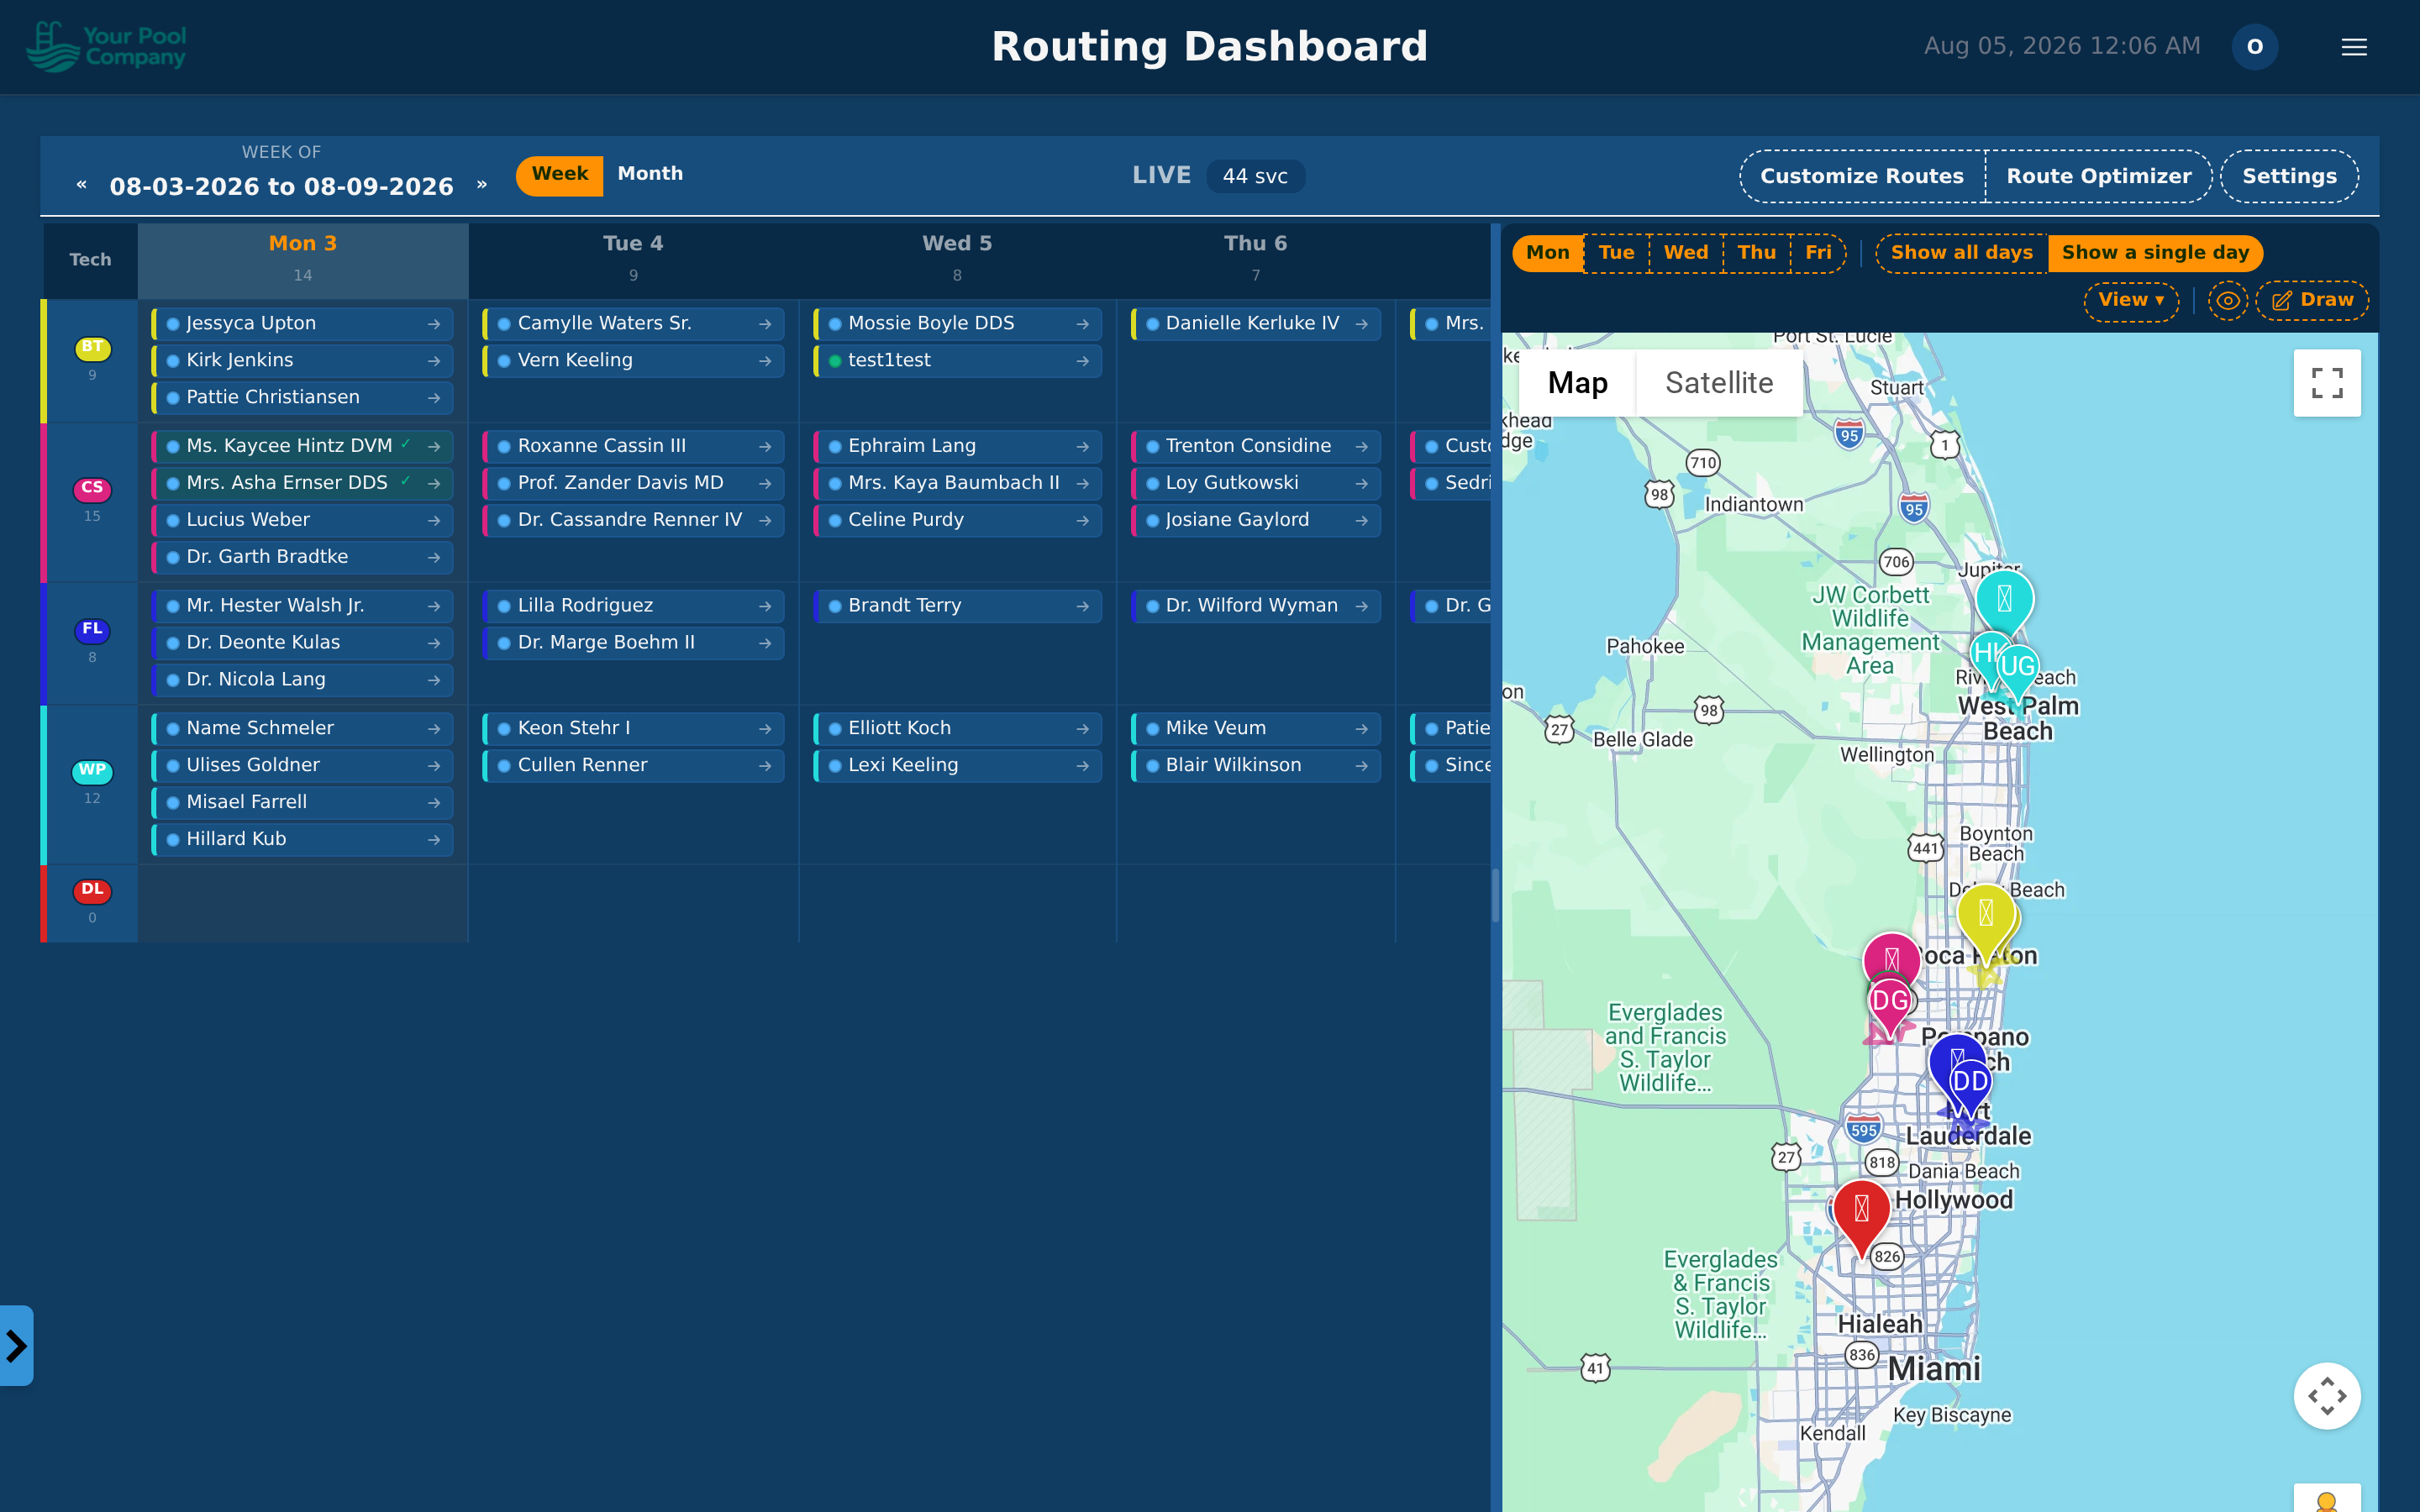
The calendar opens on the week view:
- Columns are the days.
- Rows are your technicians.
- Each stop is a small card showing the customer, the place, and the service. A coloured dot tells you which service it is at a glance.
There's also a month view for seeing the shape of a whole month. Use the arrows to move between weeks or months.
Click a day to open it and see everything booked that day. Hover a stop to see its details without opening anything.
7.3 Draft and LIVE
Two words matter on this page:
| What it is | |
|---|---|
| LIVE | What your technicians can see on their phones right now |
| DRAFT | Your private copy for making changes |
Nothing you do in a DRAFT reaches anybody until you publish it. Move stops around, change your mind, start over — technicians in the field see none of it.
To make changes safely:
- Click Create a Draft.
- Make your changes.
- Click Apply Draft to LIVE when you're happy.
Return to LIVE throws the draft away and puts you back to what technicians can see. Use it when you've made a mess and want to start again.
Watch out: changes only reach technicians when you click Apply Draft to LIVE. If you've been editing for an hour and haven't clicked it, nobody has seen anything.
7.4 Moving stops around
- Drag a stop from one day or technician to another.
- Click a stop for its details, where you can change the technician, the day, and its place in the driving order.
- Stops that aren't on anybody yet sit in Overflow. Drag them onto a technician's day.
If a move breaks a rule — outside the technician's hours, or outside the hours that location allows — EZ Pool Biller stops and tells you which rule. You can go back, or choose Force anyway if you know something it doesn't.
Changing future weeks too: when you move a stop, you can tick to apply the same change to future weeks. Handy when a customer permanently switches from Tuesdays to Thursdays — you change it once instead of week by week.
7.5 Letting EZ Pool Biller plan the route
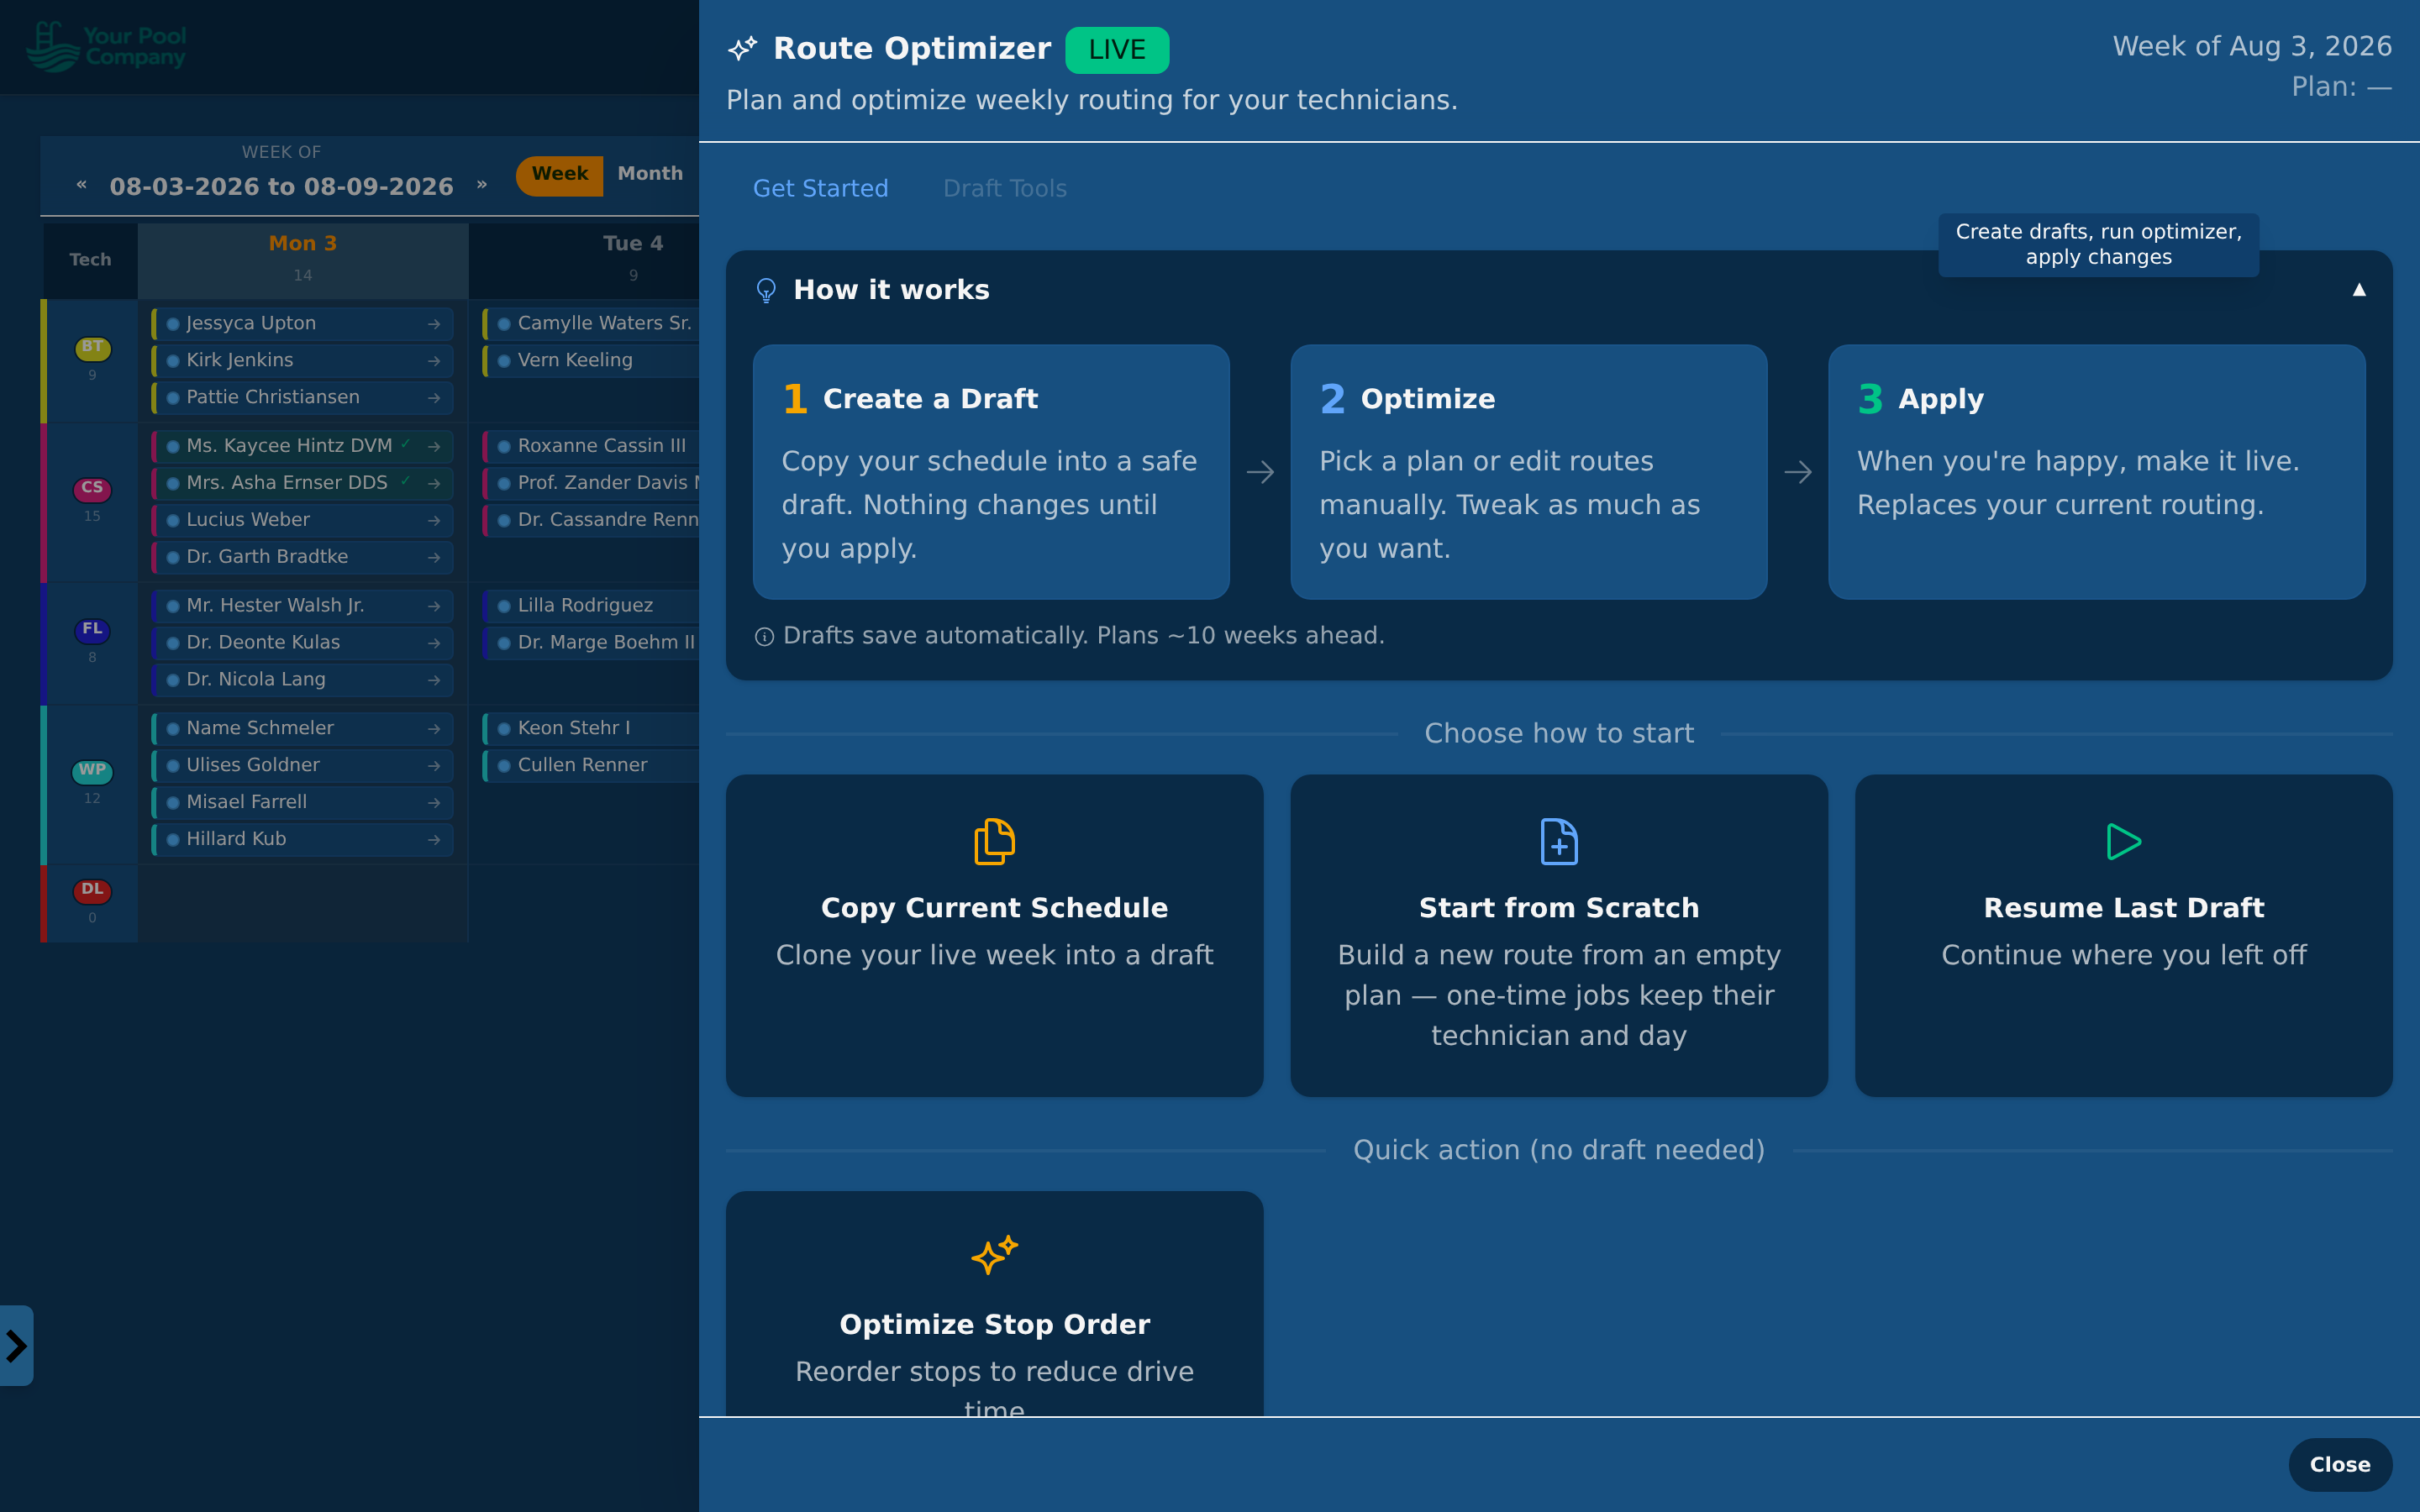
Open the Route Optimizer to have the driving order worked out for you.
- Make a Draft first (7.3).
- Open Route Optimizer.
- Choose how you want the week arranged:
| Mode | What it does |
|---|---|
| Concentrate (fill early week) | Fills the earlier days first and leaves later days lighter, so you keep room to move |
| Even out workload | Spreads the work evenly across the week |
| Equal distribution (balance across techs) | Balances the load between technicians so nobody is buried |
| Single split route (contiguous days) | Keeps each technician's work in blocks of days, cutting back-and-forth |
- Run it, then look at the calendar and the map.
- Publish with Apply Draft to LIVE when it looks right.
Optimize Order is the smaller version: it leaves who-does-what alone and only fixes the driving order within each day.
Two ways to affect more than this week:
- Apply To All Weeks — the optimizer covers the whole term, not just the week you're looking at.
- Copy to Future Weeks — mirror this week's technician-and-day assignments onto every future week.
Locking a stop: if a customer can only be done on a Tuesday, lock that stop first. The optimizer works around anything locked.
It also respects technician hours and breaks, how much each technician can take on, the hours each location allows, and who's qualified for the work.
7.6 The map
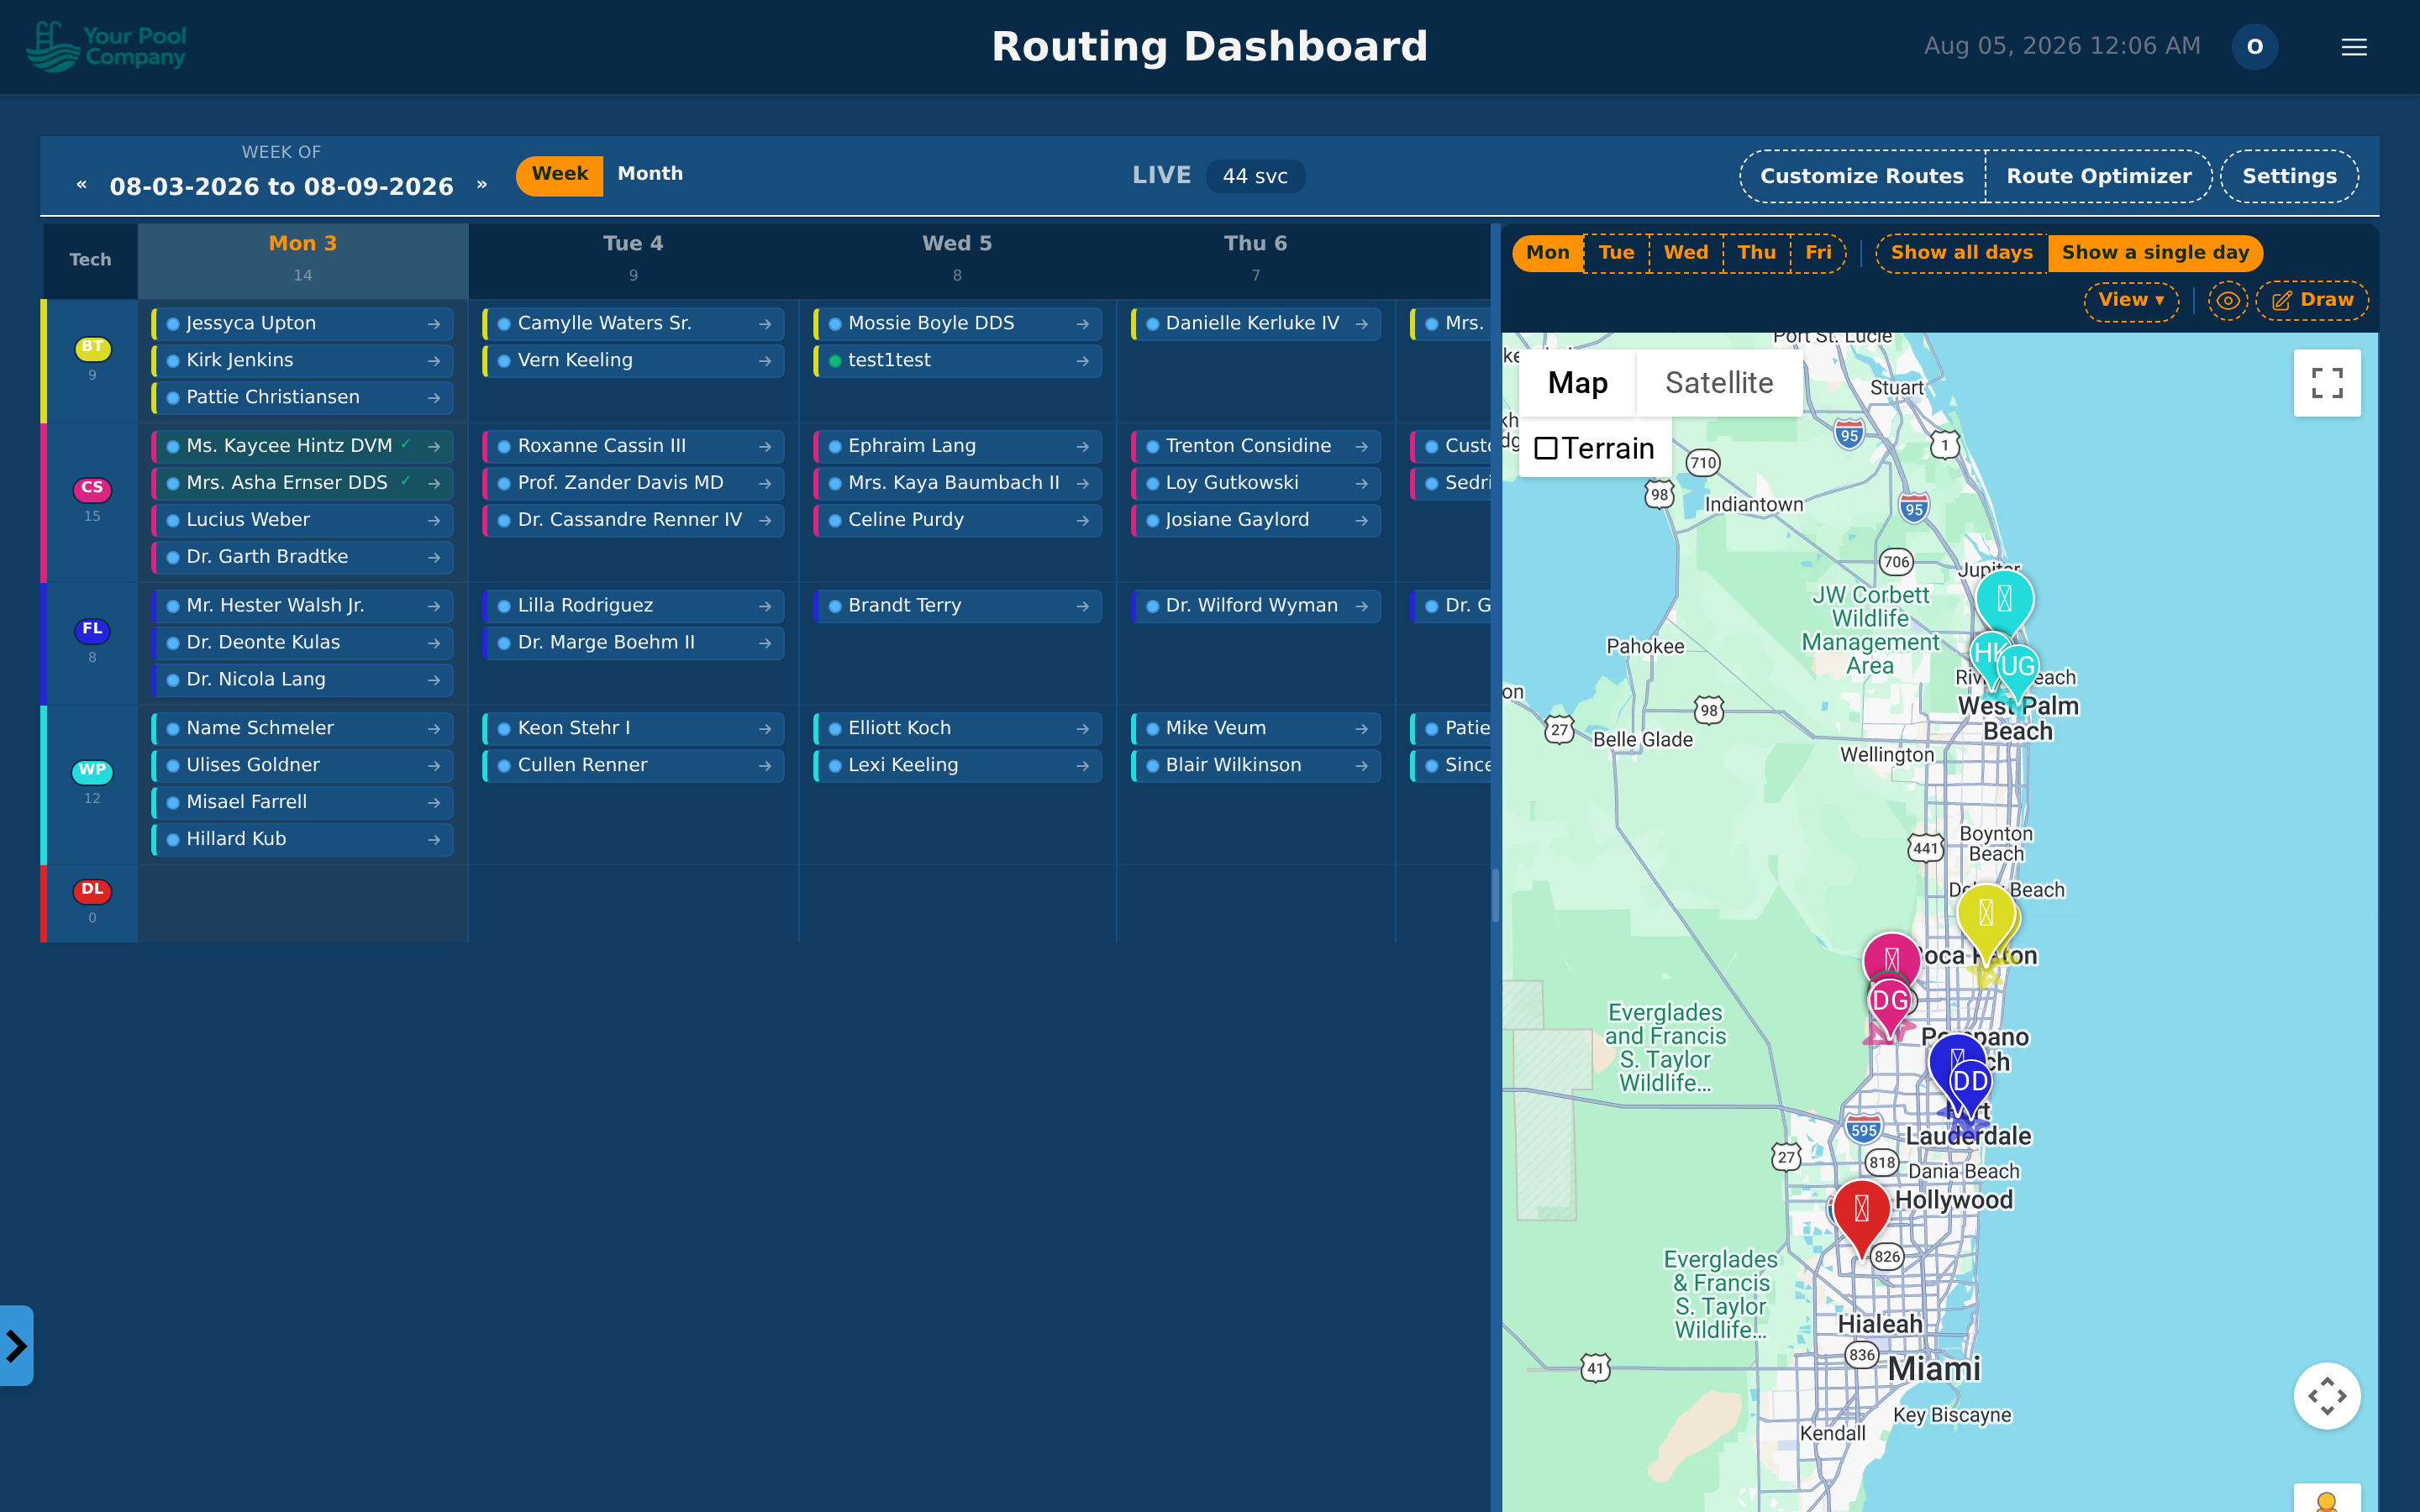
Switch to the map to see the stops as pins.
- Pin colours match the technician.
- Click a pin for the customer and address.
- Lines show the driving order.
- You can show your technicians on the map as well.
This is the quickest way to spot a stop on the wrong route — one pin miles from the rest usually means it's on the wrong person.
7.7 Changes during the week
Someone reschedules, a technician calls in sick, a one-off job comes in.
- Create a Draft for this week.
- Make the changes.
- Apply Draft to LIVE.
Technicians' phones pick it up straight away — nobody has to log out or refresh.
7.8 Marking work done from the office
If a job was finished but never closed on the phone, open the service and choose Mark completed. Useful for tidying up at the end of the week.
8. One-Off Jobs & On-Demand Customers
In one sentence: Sell and schedule a single job for someone who isn't on a regular pool service plan.
Who needs this: Owner, Office
You may not see this if: your role doesn't include adding customers or selling services.
Where to find it: Dashboard > New On-Demand Customer, or Customers > + New Customer
Not every job is a repeating one. Someone calls, wants one pool job done, and may never call again. An on-demand customer is built for exactly that: you take their details, sell the job, and put it on the calendar in one go — without setting up a recurring plan you'd only have to cancel later.
8.1 Creating an on-demand customer
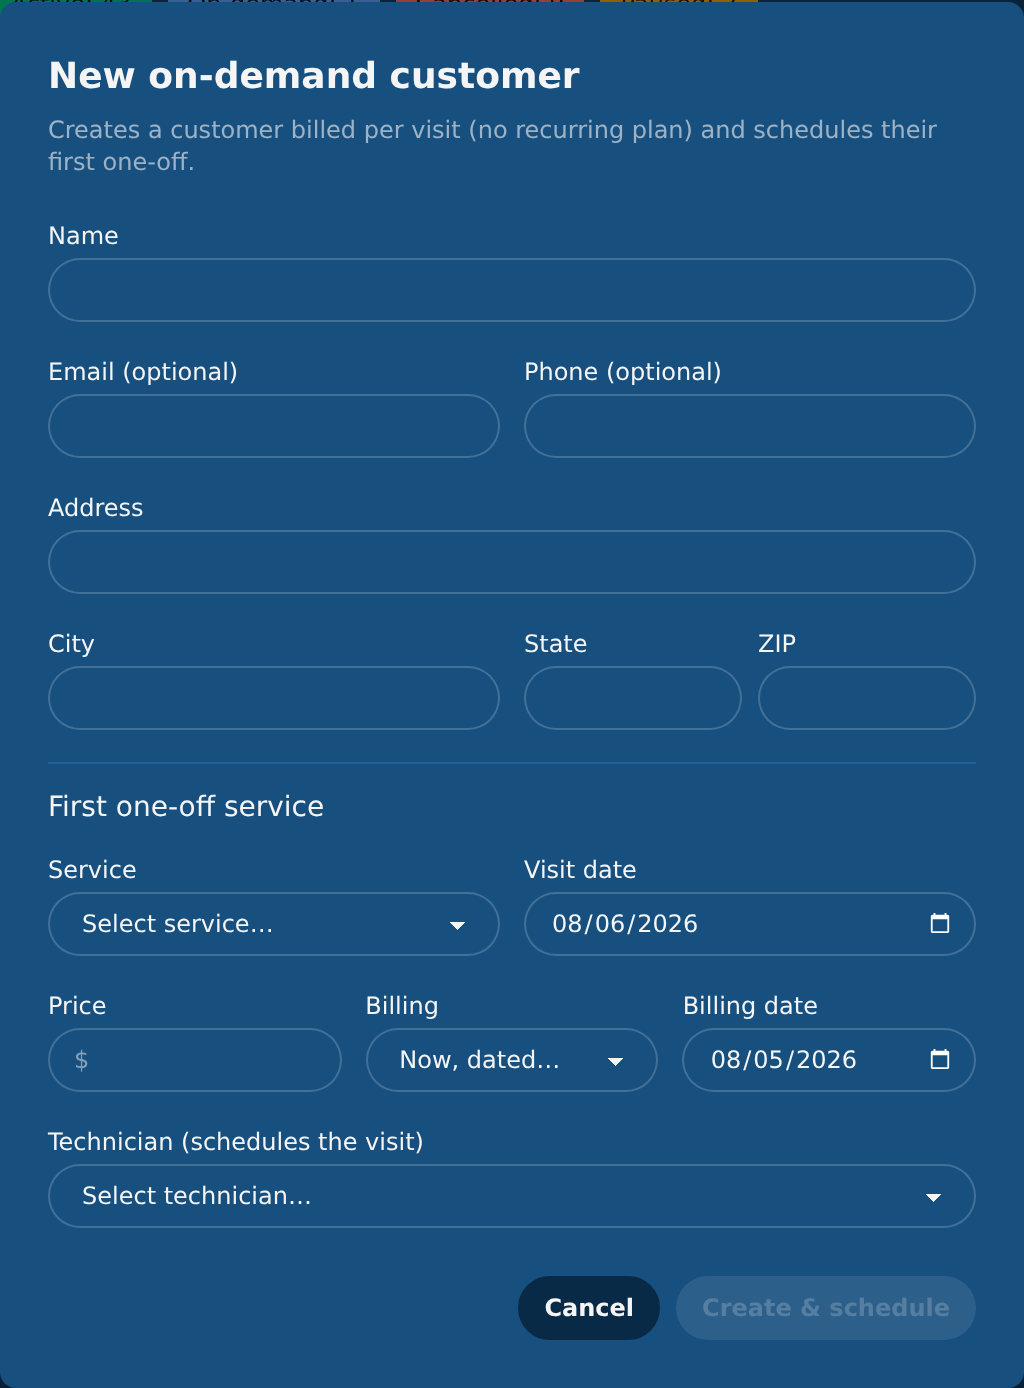
- On the Dashboard, click New On-Demand Customer.
- Fill in the customer's name, address, phone, and email.
- Pick the job from the one-time services list (see Section 5).
- Pick the technician and the date.
- Click Save.
The customer, the job, and the calendar stop are all created together.
Watch out: the technician field is required. The job has to belong to someone, or it won't appear on anyone's route.
8.2 When the customer gets charged
When you sell a one-off job you choose when the charge happens, using the Billing box on the form:
| Choice | What happens |
|---|---|
| On completion (the usual one) | Nothing is charged until the technician finishes the job. If it never happens, nothing is ever billed. |
| Now, dated… | The charge is posted straight away, dated the day you pick. |
Pick Now, dated… when the customer is paying up front, or when you've agreed a date for the money to land regardless of when the work gets done.
If you choose a date in the future, the charge appears on their account marked Scheduled — see Section 10.
Watch out: if you cancel a job whose charge was posted early and not yet earned, EZ Pool Biller takes the charge back off the account for you. You don't need to issue a credit.
8.3 If the email already exists
If you type an email that another customer already uses, the form doesn't just refuse it. It offers to use that existing customer instead, so you add the new job to the person already in your system rather than creating a duplicate.
Take that offer whenever it's really the same person. Duplicates split someone's history across two records, and the billing gets confusing fast.
8.4 How on-demand customers show up in your lists
On-demand customers appear in your customer list with the status On-demand, and that status is included in the default filter — so they're visible without you changing anything.
8.5 Marking the job done from the office
You don't have to wait for the technician to close the job on their phone. Open the service row and choose Mark completed. Useful when a job was finished but not recorded, or when you're tidying up at the end of the week.
8.6 The jobs you start with
Your account comes with a starter list of common one-off jobs, so the list isn't empty on day one:
| Service | Example price | Time |
|---|---|---|
| Filter Cleaning | $125.00 | 45 min |
| Green-to-Clean Recovery | $350.00 | 90 min |
| Drain & Deep Clean | $450.00 | 240 min |
| Salt Cell Cleaning | $95.00 | 30 min |
| Equipment Diagnostic Visit | $85.00 | 45 min |
Watch out: those prices are examples, not recommendations. Change them to your own prices before you sell anything. You can also rename or delete any of them.
If you delete one by mistake, Settings > One-time Services > Add starter services puts the missing ones back. It only fills in what's missing — jobs you've already set up or renamed are left alone. If nothing is missing it tells you so and changes nothing.
8.7 What the technician is asked on their phone
Each starter job has its own checklist, matched to that job — a drain job doesn't ask for the weekly readings:
| Job | Asks for |
|---|---|
| Filter Cleaning | Filter type, Work performed, Filter pressure after (psi), Notes to Customer |
| Green-to-Clean Recovery | Chlorine (ppm), pH, Water clarity, Treatment performed, Notes to Customer |
| Drain & Deep Clean | Work performed, Refill level (%), Notes to Customer |
| Salt Cell Cleaning | Salt level (ppm), Work performed, Cell condition, Notes to Customer |
| Equipment Diagnostic Visit | Equipment checked, Outcome, Findings & recommendation |
You can edit any of these, and Restore default brings back that job's own checklist.
8.8 Turning a one-off customer into a regular one
Sometimes a one-off job goes well and the customer wants you back every week. You don't start again from scratch — you convert them.
- Open the customer.
- Click Convert to subscriber in the buttons at the top of their page.
- Pick the location, the repeating service they're signing up for, and the start date (tomorrow by default).
- Click to confirm.
From then on they're an ordinary customer on a repeating plan, and they show up in your schedule like everyone else.
Two things worth knowing:
- Only repeating services are offered here. One-time jobs aren't plans, so they don't appear in the list. If the service you want isn't there, set it up first under Settings > Recurring Billing — see Section 5.
- If they still have one-off jobs booked, you'll be told. EZ Pool Biller shows you exactly which jobs are on the calendar and asks whether to go ahead. Saying yes cancels those bookings, because the repeating plan takes over from that date. Nothing is canceled without you agreeing to it.
Watch out: if those booked jobs should still happen, let them run first and convert the customer afterwards.
8.9 What this costs you
A one-off job counts the customer's location toward your plan for that month. See Section 18 for the full picture.
10. Billing & Payments
10.1 How Billing Works
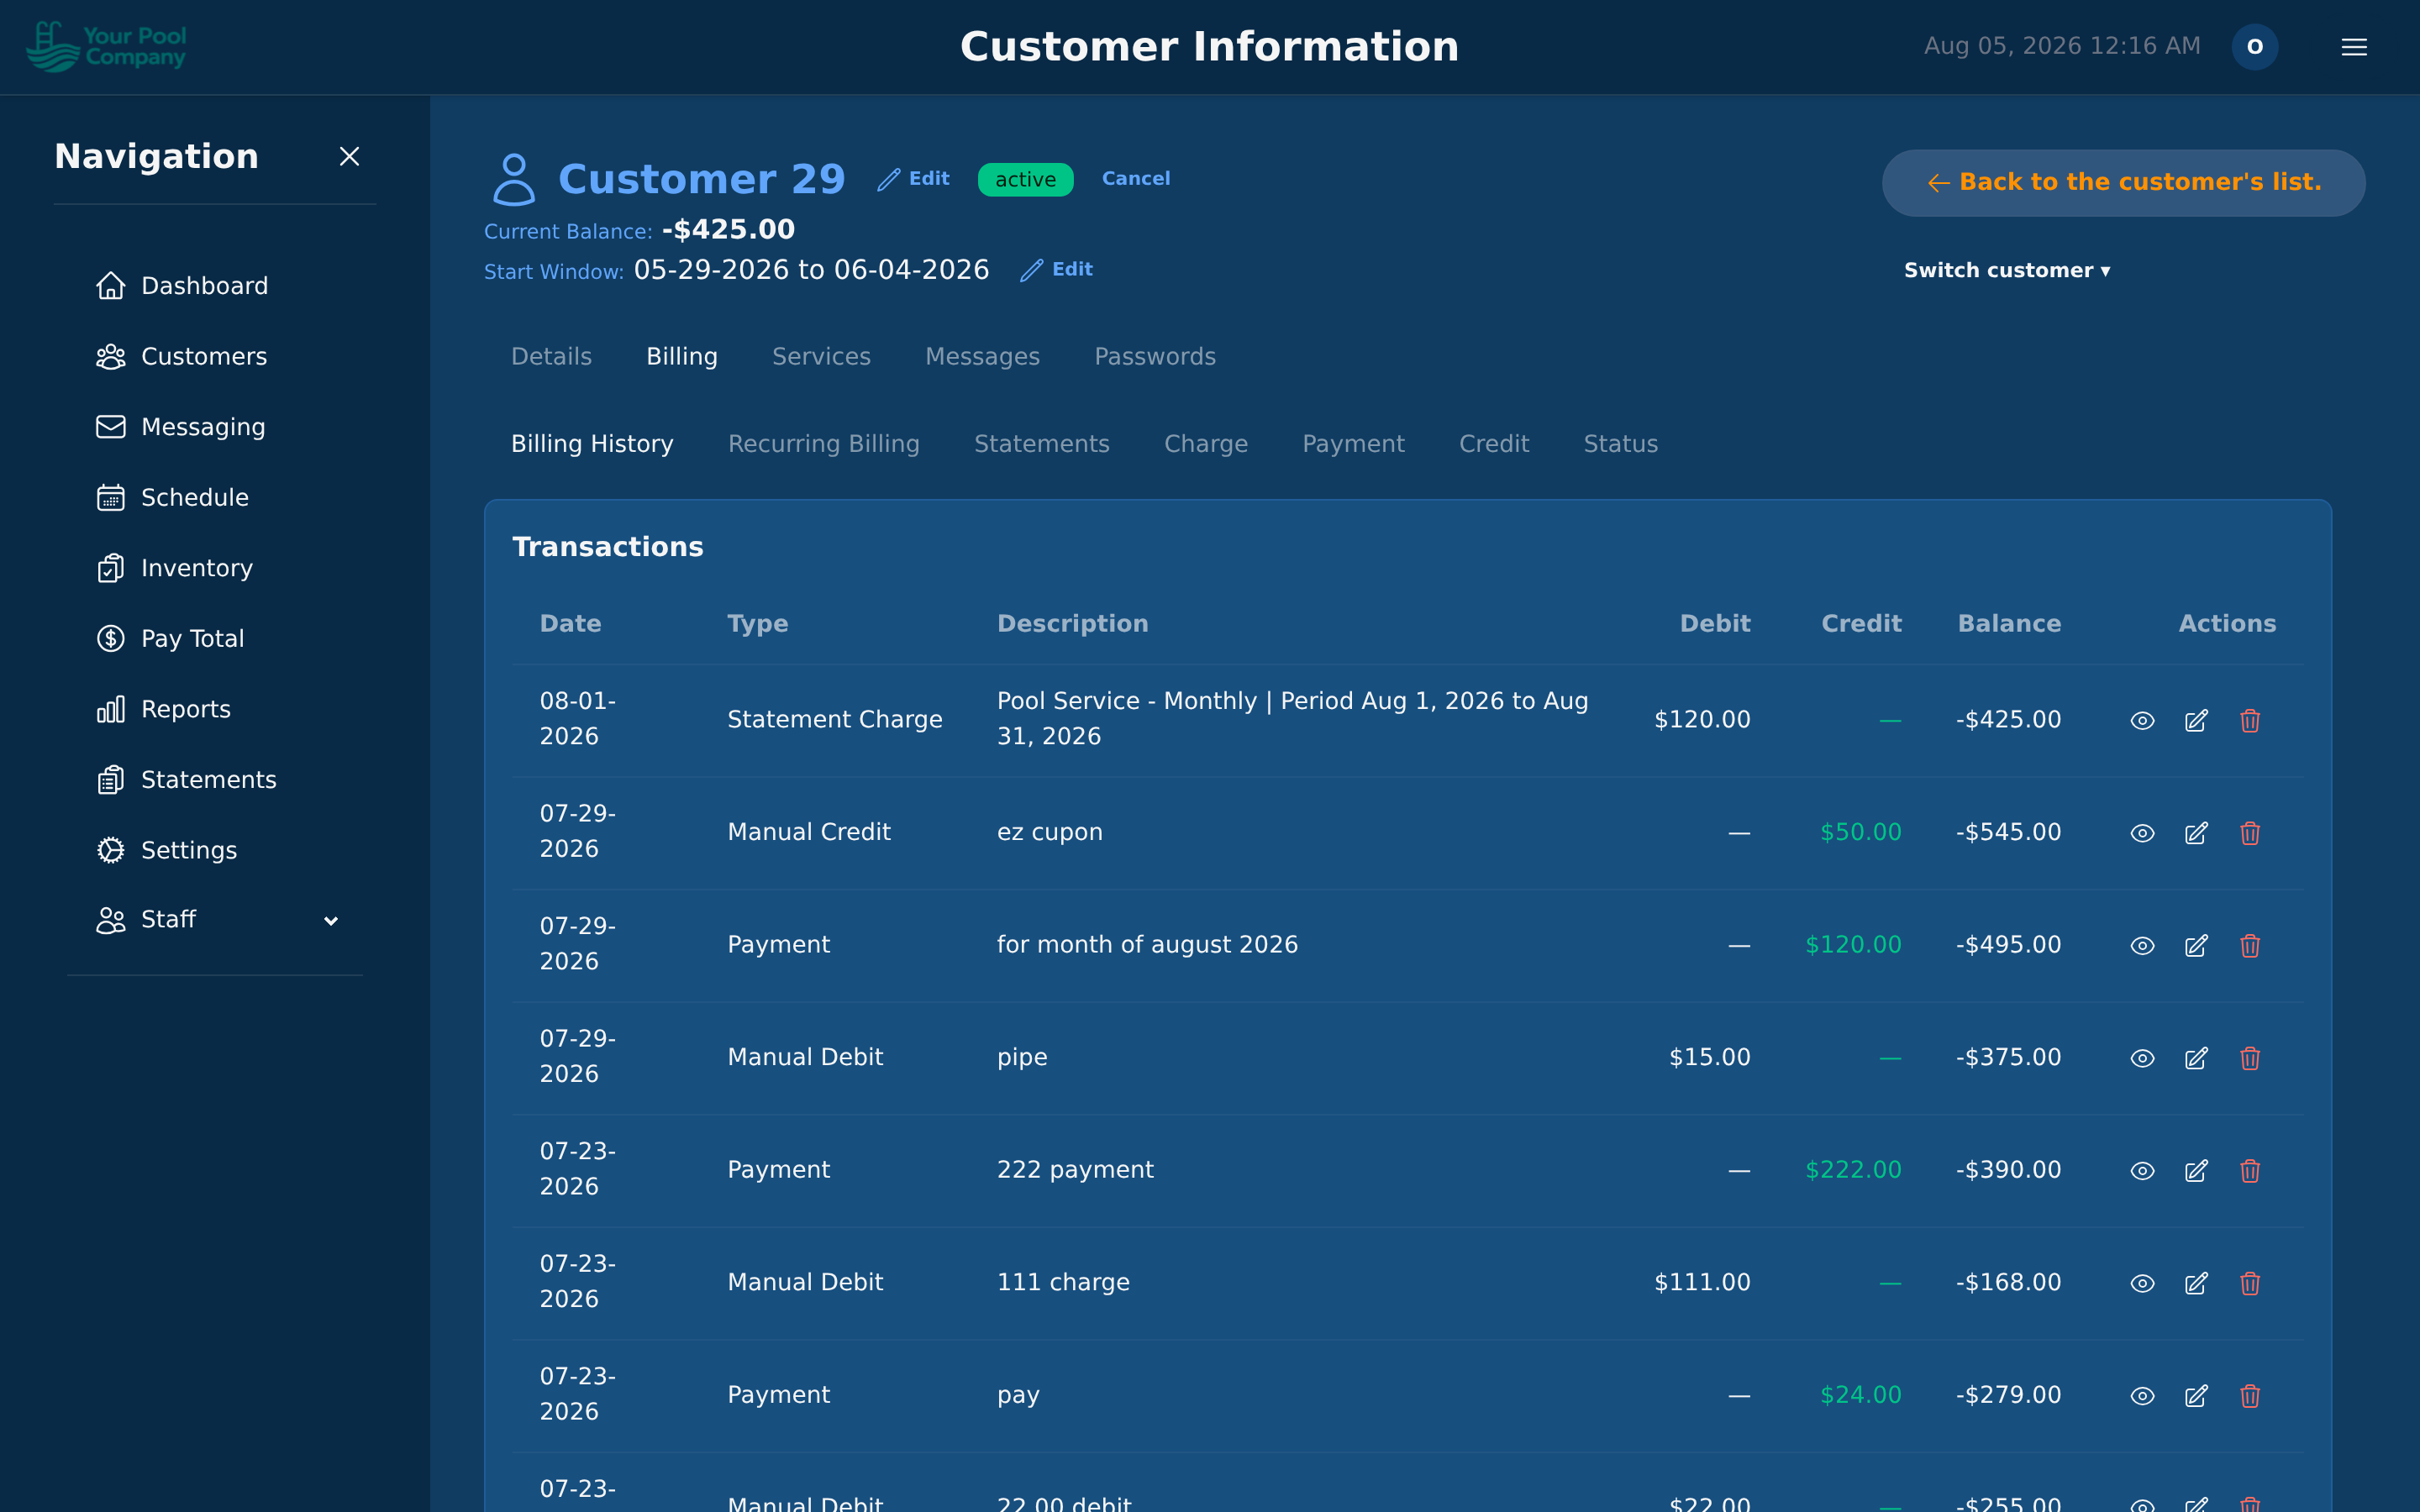
The billing system operates on a ledger model. Every financial event creates an immutable financial transaction on the customer's ledger:
- Service charges (positive — customer owes more)
- Payments received (negative — customer owes less)
- Credits (negative — customer owes less)
- Late fees (positive — customer owes more)
- Refunds (negative — reduces a previous payment)
- Sales tax (positive — added to charges)
The customer's current balance is the sum of all their financial transactions. A positive balance means they owe money; a negative balance means they have a credit.
10.2 Invoices
In Per-Service Mode:
- An invoice is automatically generated when a service is completed and charged.
- Each invoice has a unique number (e.g., INV-2026-0042), line items, subtotal, tax, and total.
- Invoices can be downloaded as PDF or viewed in the customer portal.
In Monthly Statement Mode:
- Invoices are generated from closed monthly statements (see 10.4).
Invoice Status:
- Draft — created but not yet sent.
- Open — sent to the customer, awaiting payment.
- Paid — full payment received.
- Partial — a partial payment has been applied, but a balance remains.
- Overdue — past the due date with an outstanding balance.
- Refunded — the invoice payment has been refunded.
- Canceled — the invoice has been voided.
10.3 Charges dated in the future — the "Scheduled" badge
Some charges are posted before the money is due. That happens when you sell a one-off job and choose Now, dated… with a date still to come (see Section 8), or when you post-date a charge yourself.
A charge like that sits on the customer's account marked Scheduled. It means: this is agreed, but it isn't due yet.
While a charge is Scheduled:
- It shows on the customer's Billing page so you and your staff can see it's coming.
- It is not counted in their current balance.
- It does not appear on their statement, so the customer isn't billed for it early.
On the date you set, it stops being Scheduled and behaves like any other charge — it joins the balance and appears on the statement covering that date.
Changing the date: open the charge and edit its date. Useful when a customer asks to be billed later.
Watch out: Scheduled is not the same as unpaid. A Scheduled charge isn't overdue and shouldn't be chased — it simply hasn't come due yet.
10.4 Statements (Monthly Mode)
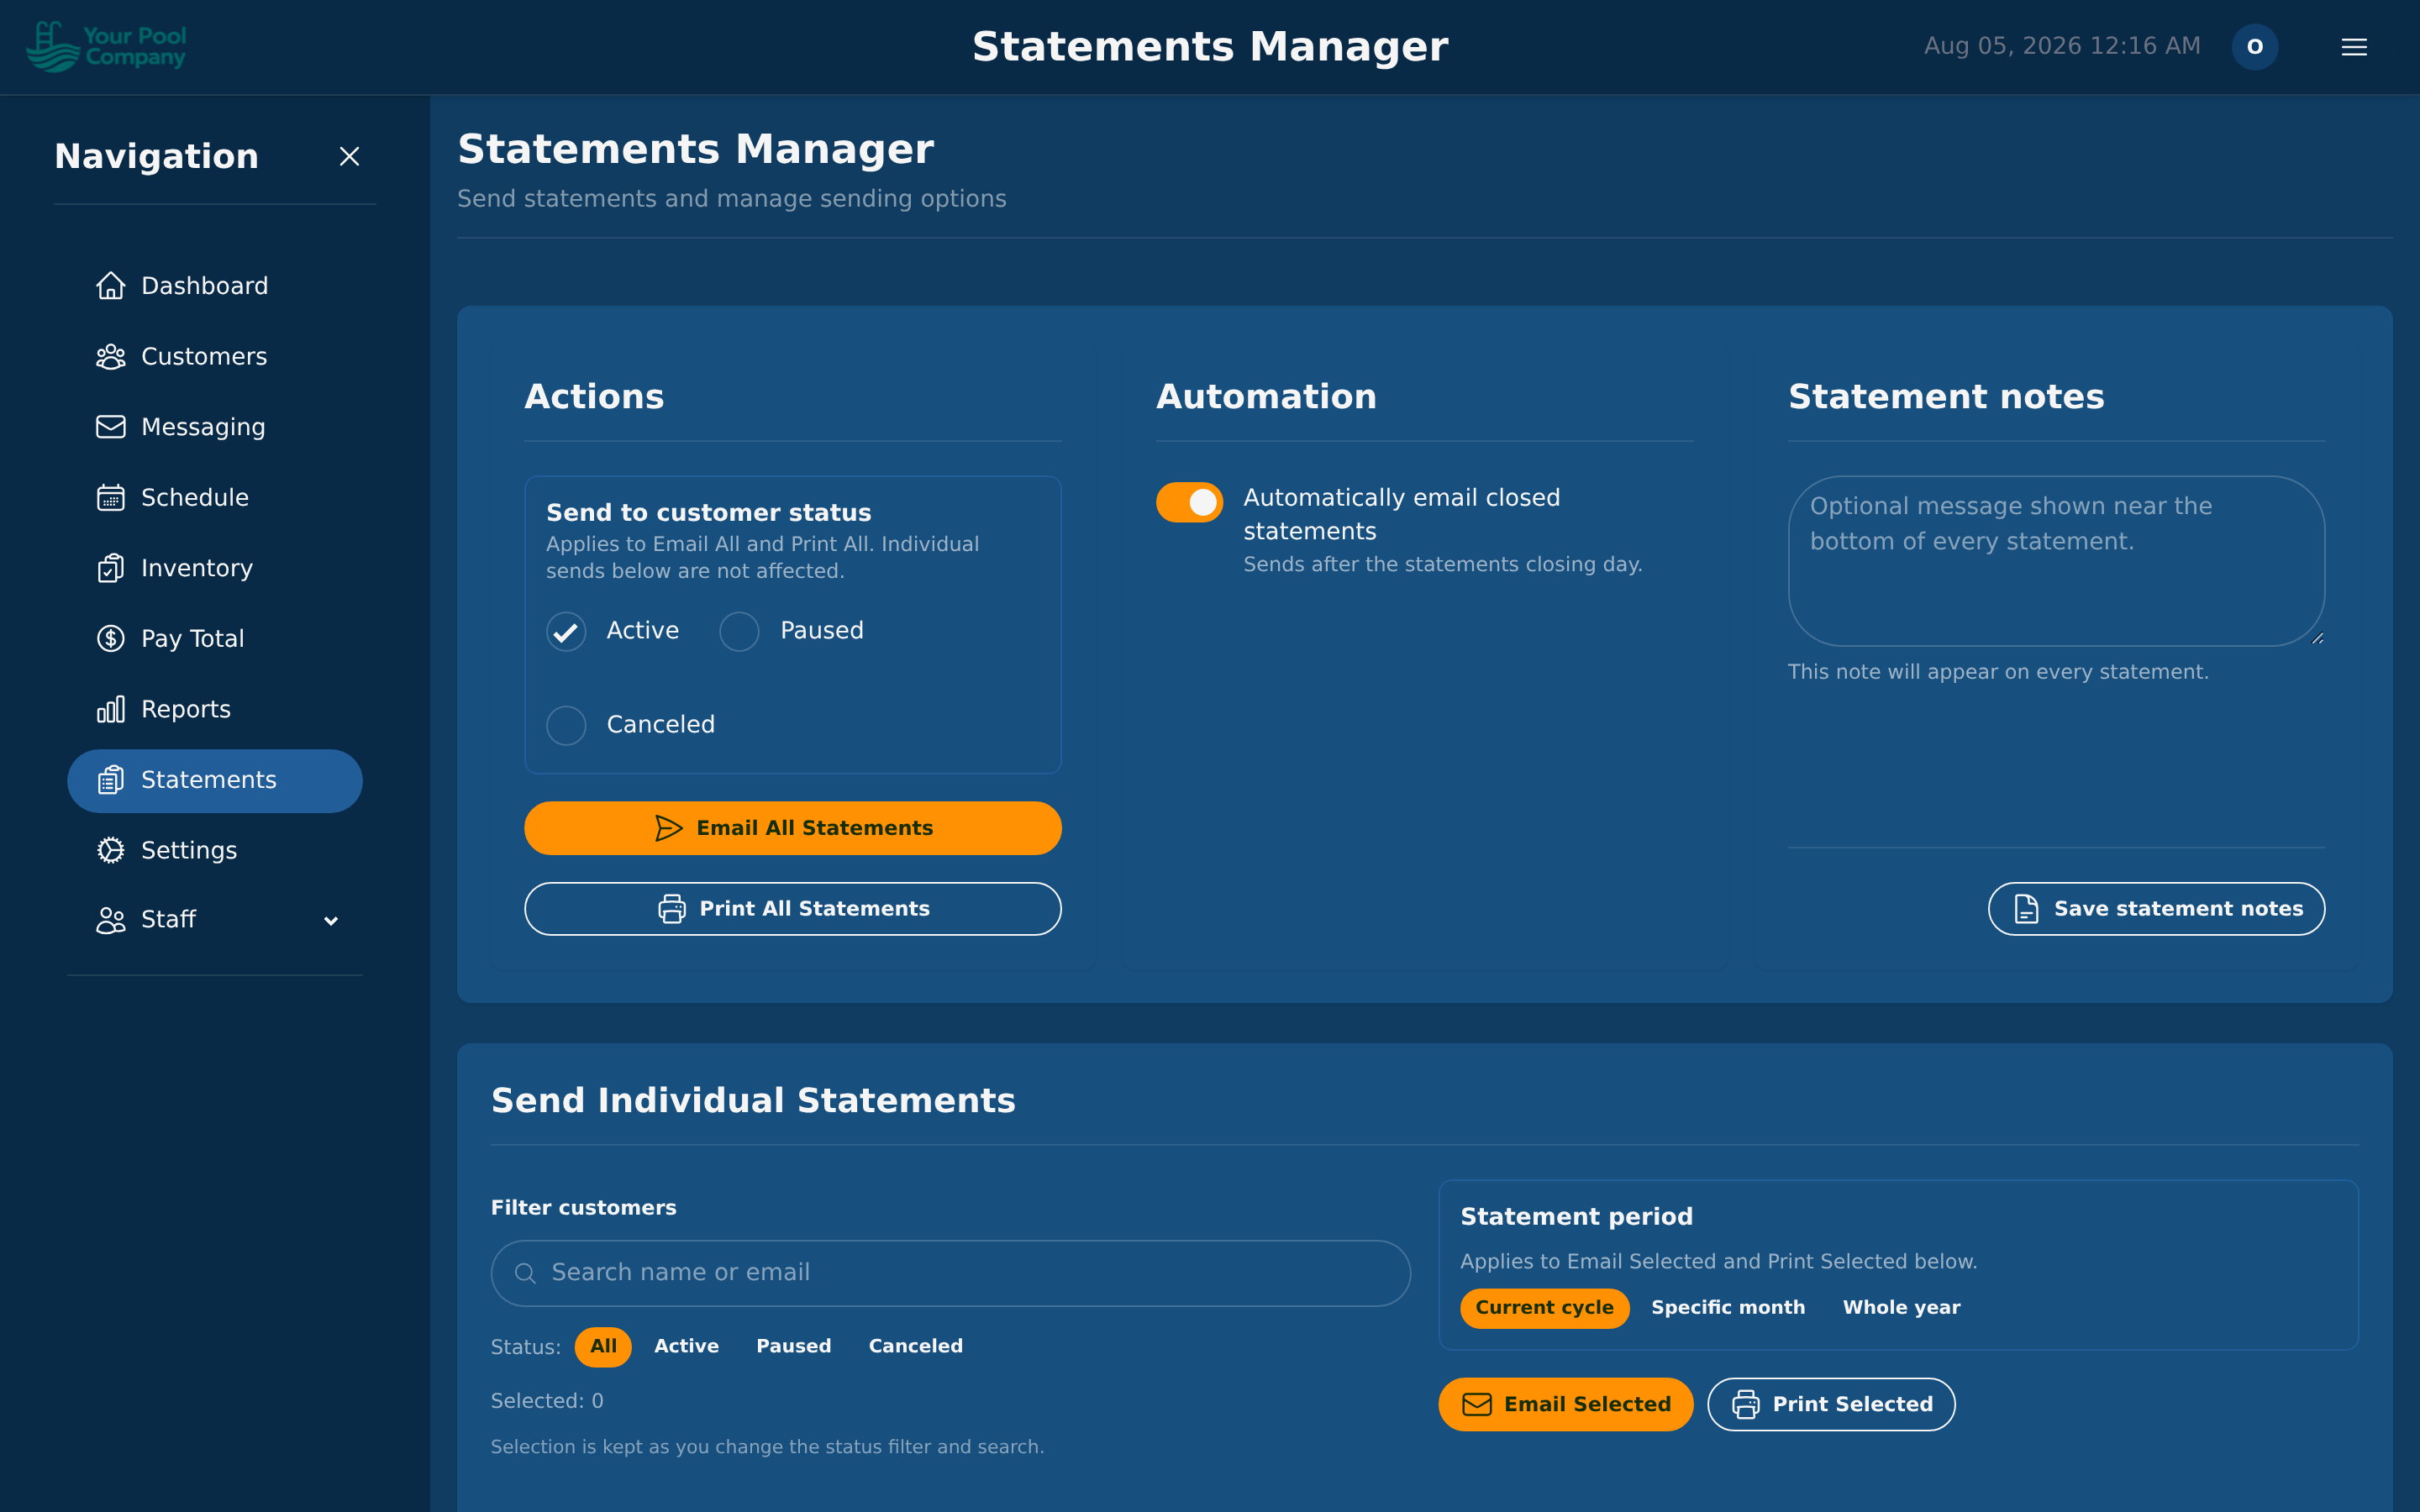
If you're using the Monthly Statement billing method:
- Each statement covers a period (e.g., March 1–31).
- During the period, all completed services, credits, payments, and fees are recorded as financial transactions.
- At the end of the period, the statement is closed with:
- Opening balance (carried from previous statement)
- All transactions for the period
- Closing balance
- The statement can be:
- Emailed to the customer automatically.
- Downloaded as PDF.
- Viewed in the customer portal.
Statement Day: Set the anchor day of the month for statements and due dates (1–28). Configure this in Settings > Company.
Statement Integrity: Each statement has a cryptographic signature to ensure transaction data hasn't been altered.
10.5 Autopay
Autopay automatically charges a customer's saved payment method when an invoice is due.
Enabling Autopay for a Customer:
- The customer saves a payment method (credit card or bank account) — either through the portal or you can add it on their behalf.
- The customer opts in to autopay.
- Mark one payment method as the default autopay method.
- When an invoice is due, the system automatically charges the default method.
Autopay Retry Schedule: If a payment fails (e.g., declined card), the system retries according to your configured retry schedule. For example:
- Retry 1: 3 days after failure
- Retry 2: 7 days after failure
- Retry 3: 14 days after failure
After all retries are exhausted, the system can optionally disable autopay for that customer and send a notification.
10.6 Manual Payments
You can record payments made outside the system:
- Open the customer's billing tab.
- Click Record Payment.
- Enter the amount, date, and payment method:
- Cash
- Check (enter check number)
- Venmo
- Wire transfer
- Other
- The payment is posted to the customer's ledger and reduces their balance.
10.7 Credits & Debits
Issuing a Credit:
- Use credits for adjustments, goodwill discounts, or promotional offers.
- Open the customer's info page, go to the Billing tab, then click the Credit sub-tab.
- Enter the amount, reason, and description.
- The credit is posted as a negative transaction, reducing the customer's balance.
Issuing a Debit (Manual Charge):
- Use debits for one-time charges outside of regular services (e.g., repair charges, supply fees, service call fees).
- Open the customer's info page, go to the Billing tab, then click the Charge sub-tab.
- Enter the amount, customer, and description.
- The charge is posted as a positive transaction, increasing the customer's balance.
Confirmation Thresholds: To prevent accidental large credits or refunds, you can set a confirmation threshold (e.g., require confirmation for credits over $500) in Settings.
10.8 Refunds
To refund a payment:
- Open the customer's billing tab and find the payment.
- Click Refund.
- Enter the refund amount (full or partial).
- Select a reason: Duplicate, Service Not Rendered, Goodwill, Pricing Error, or Other.
- Add optional notes.
- The refund is processed through the original payment gateway and recorded on the ledger.
10.9 Late Fees
If late fees are enabled (see 2.6), they are automatically applied when:
- An invoice is past its due date.
- The grace period has elapsed (e.g., 15 days after due date).
- The invoice still has an outstanding balance.
Late fees appear as a separate Late Fee transaction on the customer's ledger. The fee amount depends on your configuration (flat amount or percentage of balance, with an optional maximum cap).
Per-Subscription Override: You can override the late fee grace period on individual subscriptions. For example, give a long-standing customer a longer grace period without changing the company-wide default.
10.10 Failed Payments & Retry Logic
When an autopay charge fails:
- The payment is recorded with a Failed status.
- The customer's autopay failure count is incremented.
- The system schedules a retry based on your retry schedule (Settings > Company, Payments section).
- If configured, the customer receives a notification about the failed payment.
- If all retries are exhausted:
- Autopay can be automatically disabled for the customer.
- An admin alert is generated so your team is aware.
- The subscription may be auto-paused if you've enabled that feature.
11. Inventory
Track your supplies from the moment you buy them to the moment they're used on a pool.
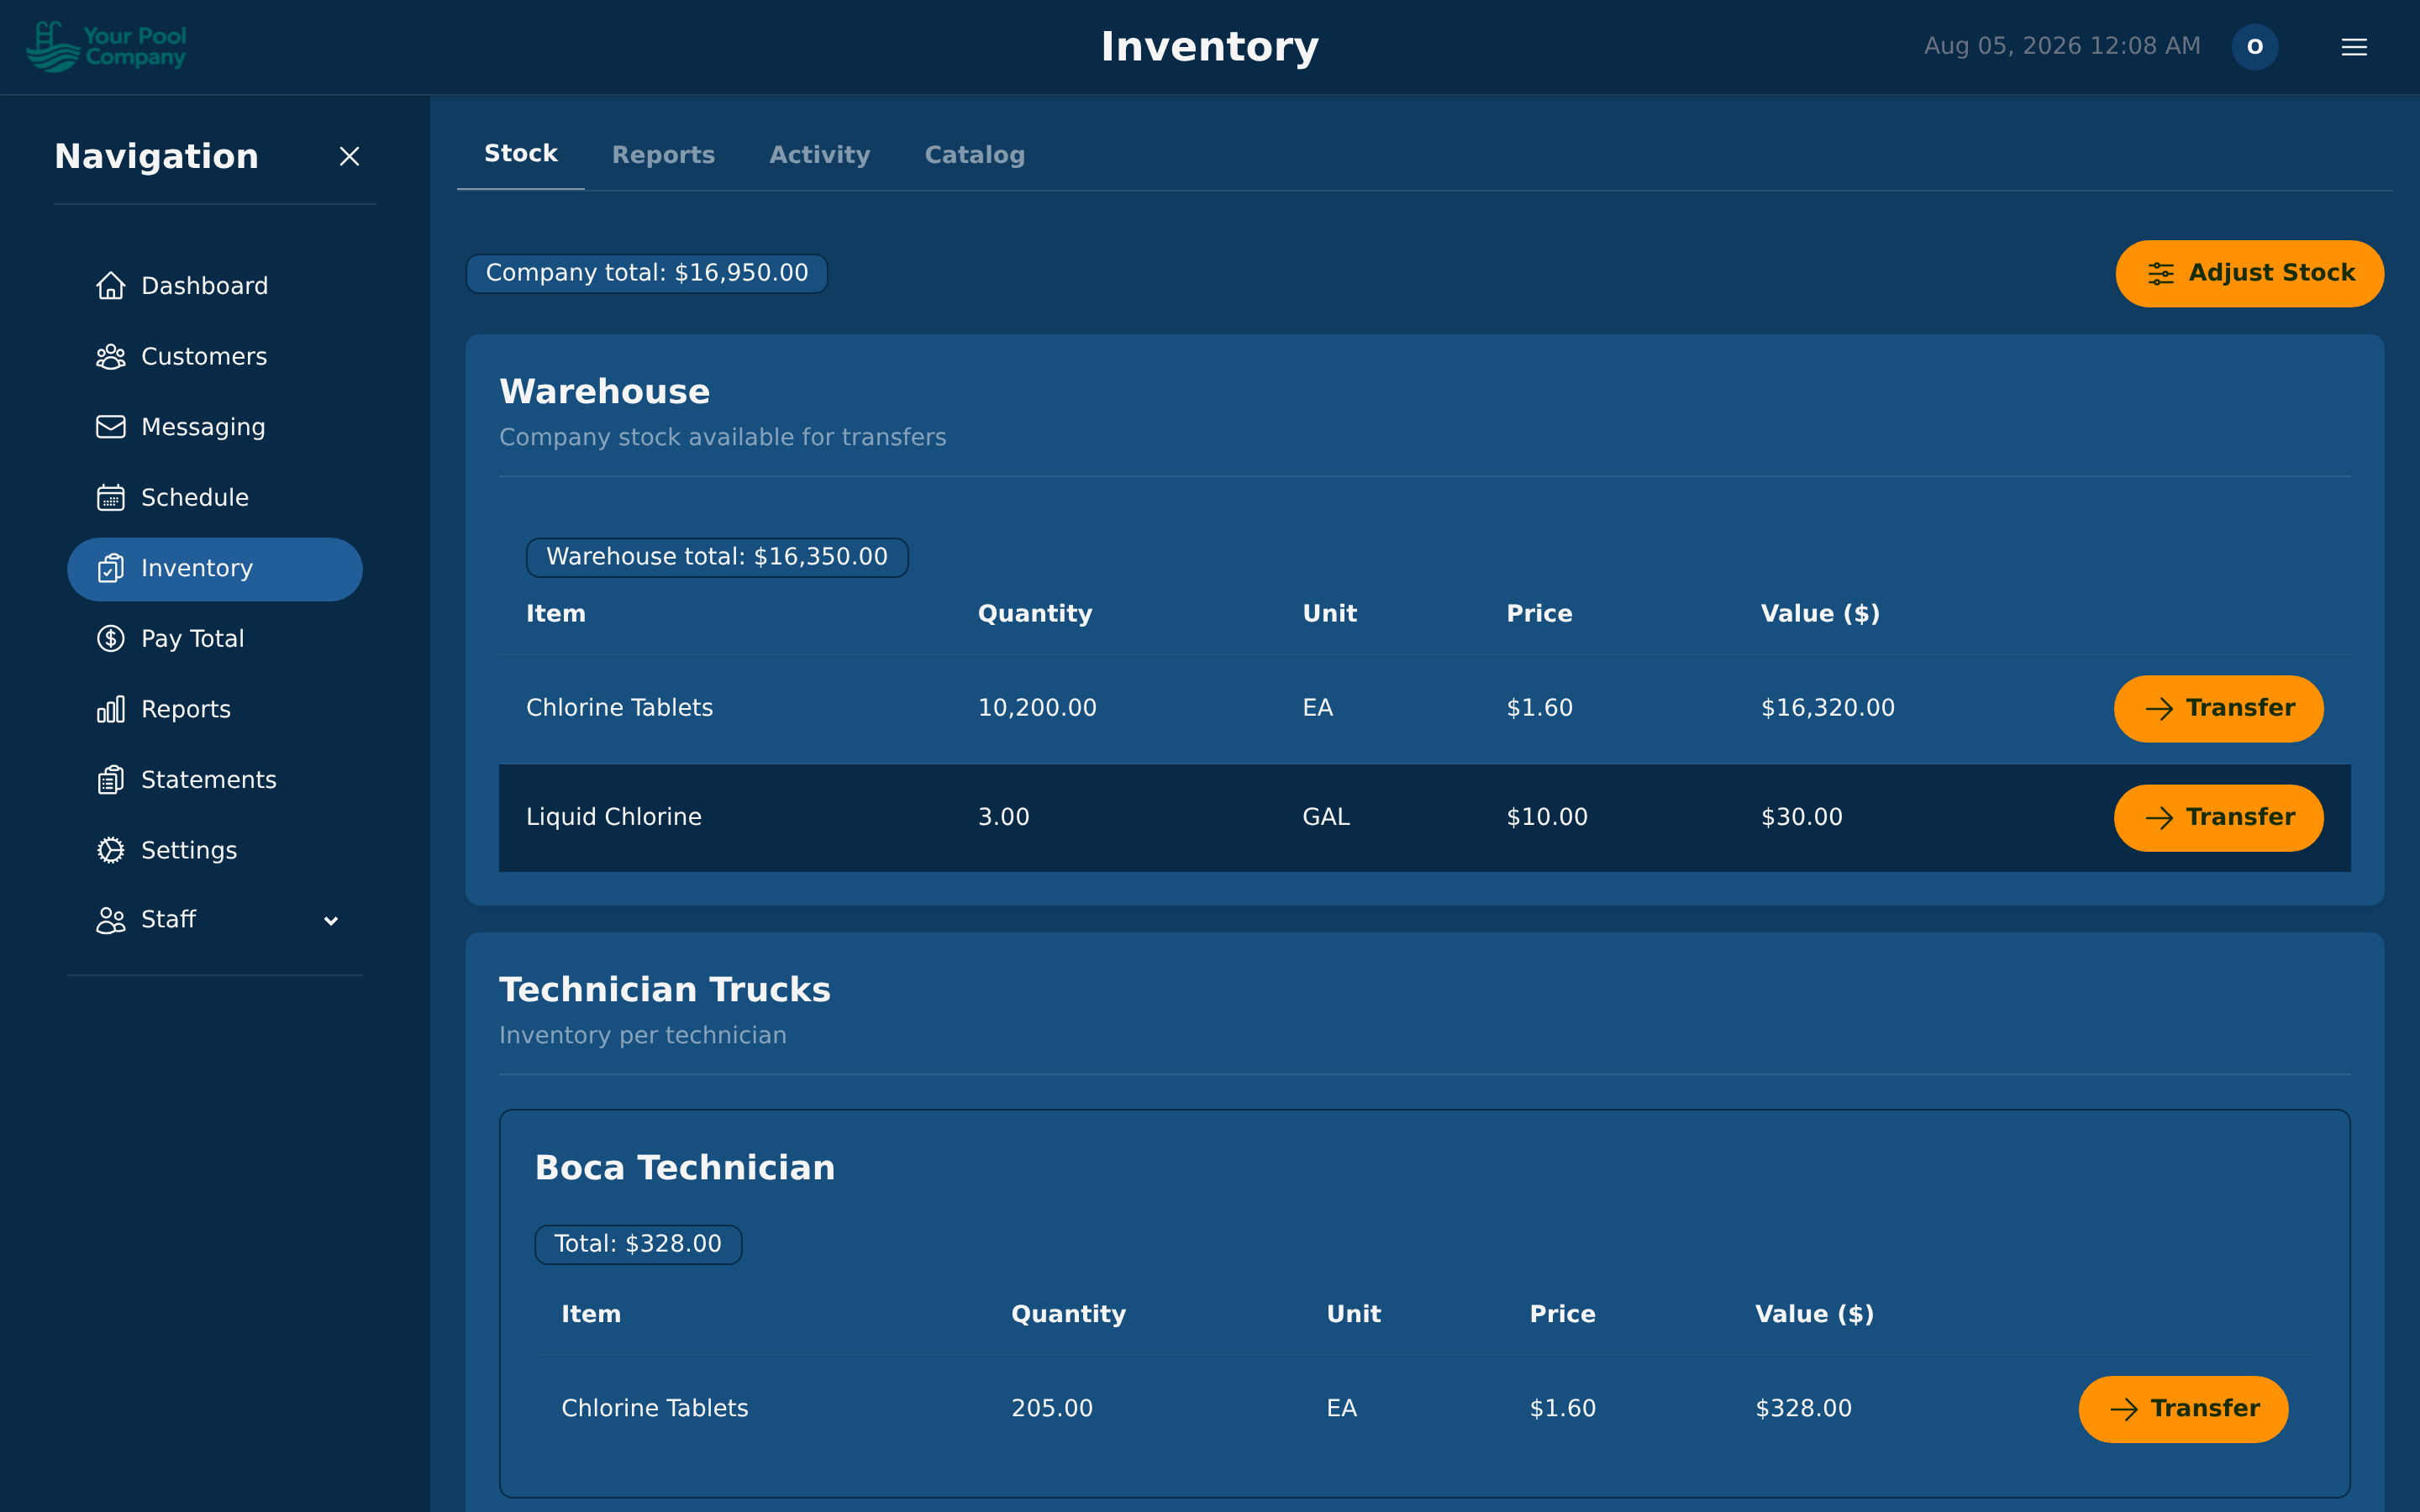
The Inventory page is organized into four tabs: Stock, Reports, Activity, and Catalog.
11.1 Setting Up Your Inventory Catalog
Navigate to Inventory > Catalog to define your inventory items.
Creating an Inventory Item:
| Field | Example |
|---|---|
| Name | Liquid Chlorine |
| Unit | Gallons |
| Cost per Unit | $3.50 |
| Category | Chemicals |
Common units include: gallons, ounces, pounds, liters, tablets, bags, or custom units.
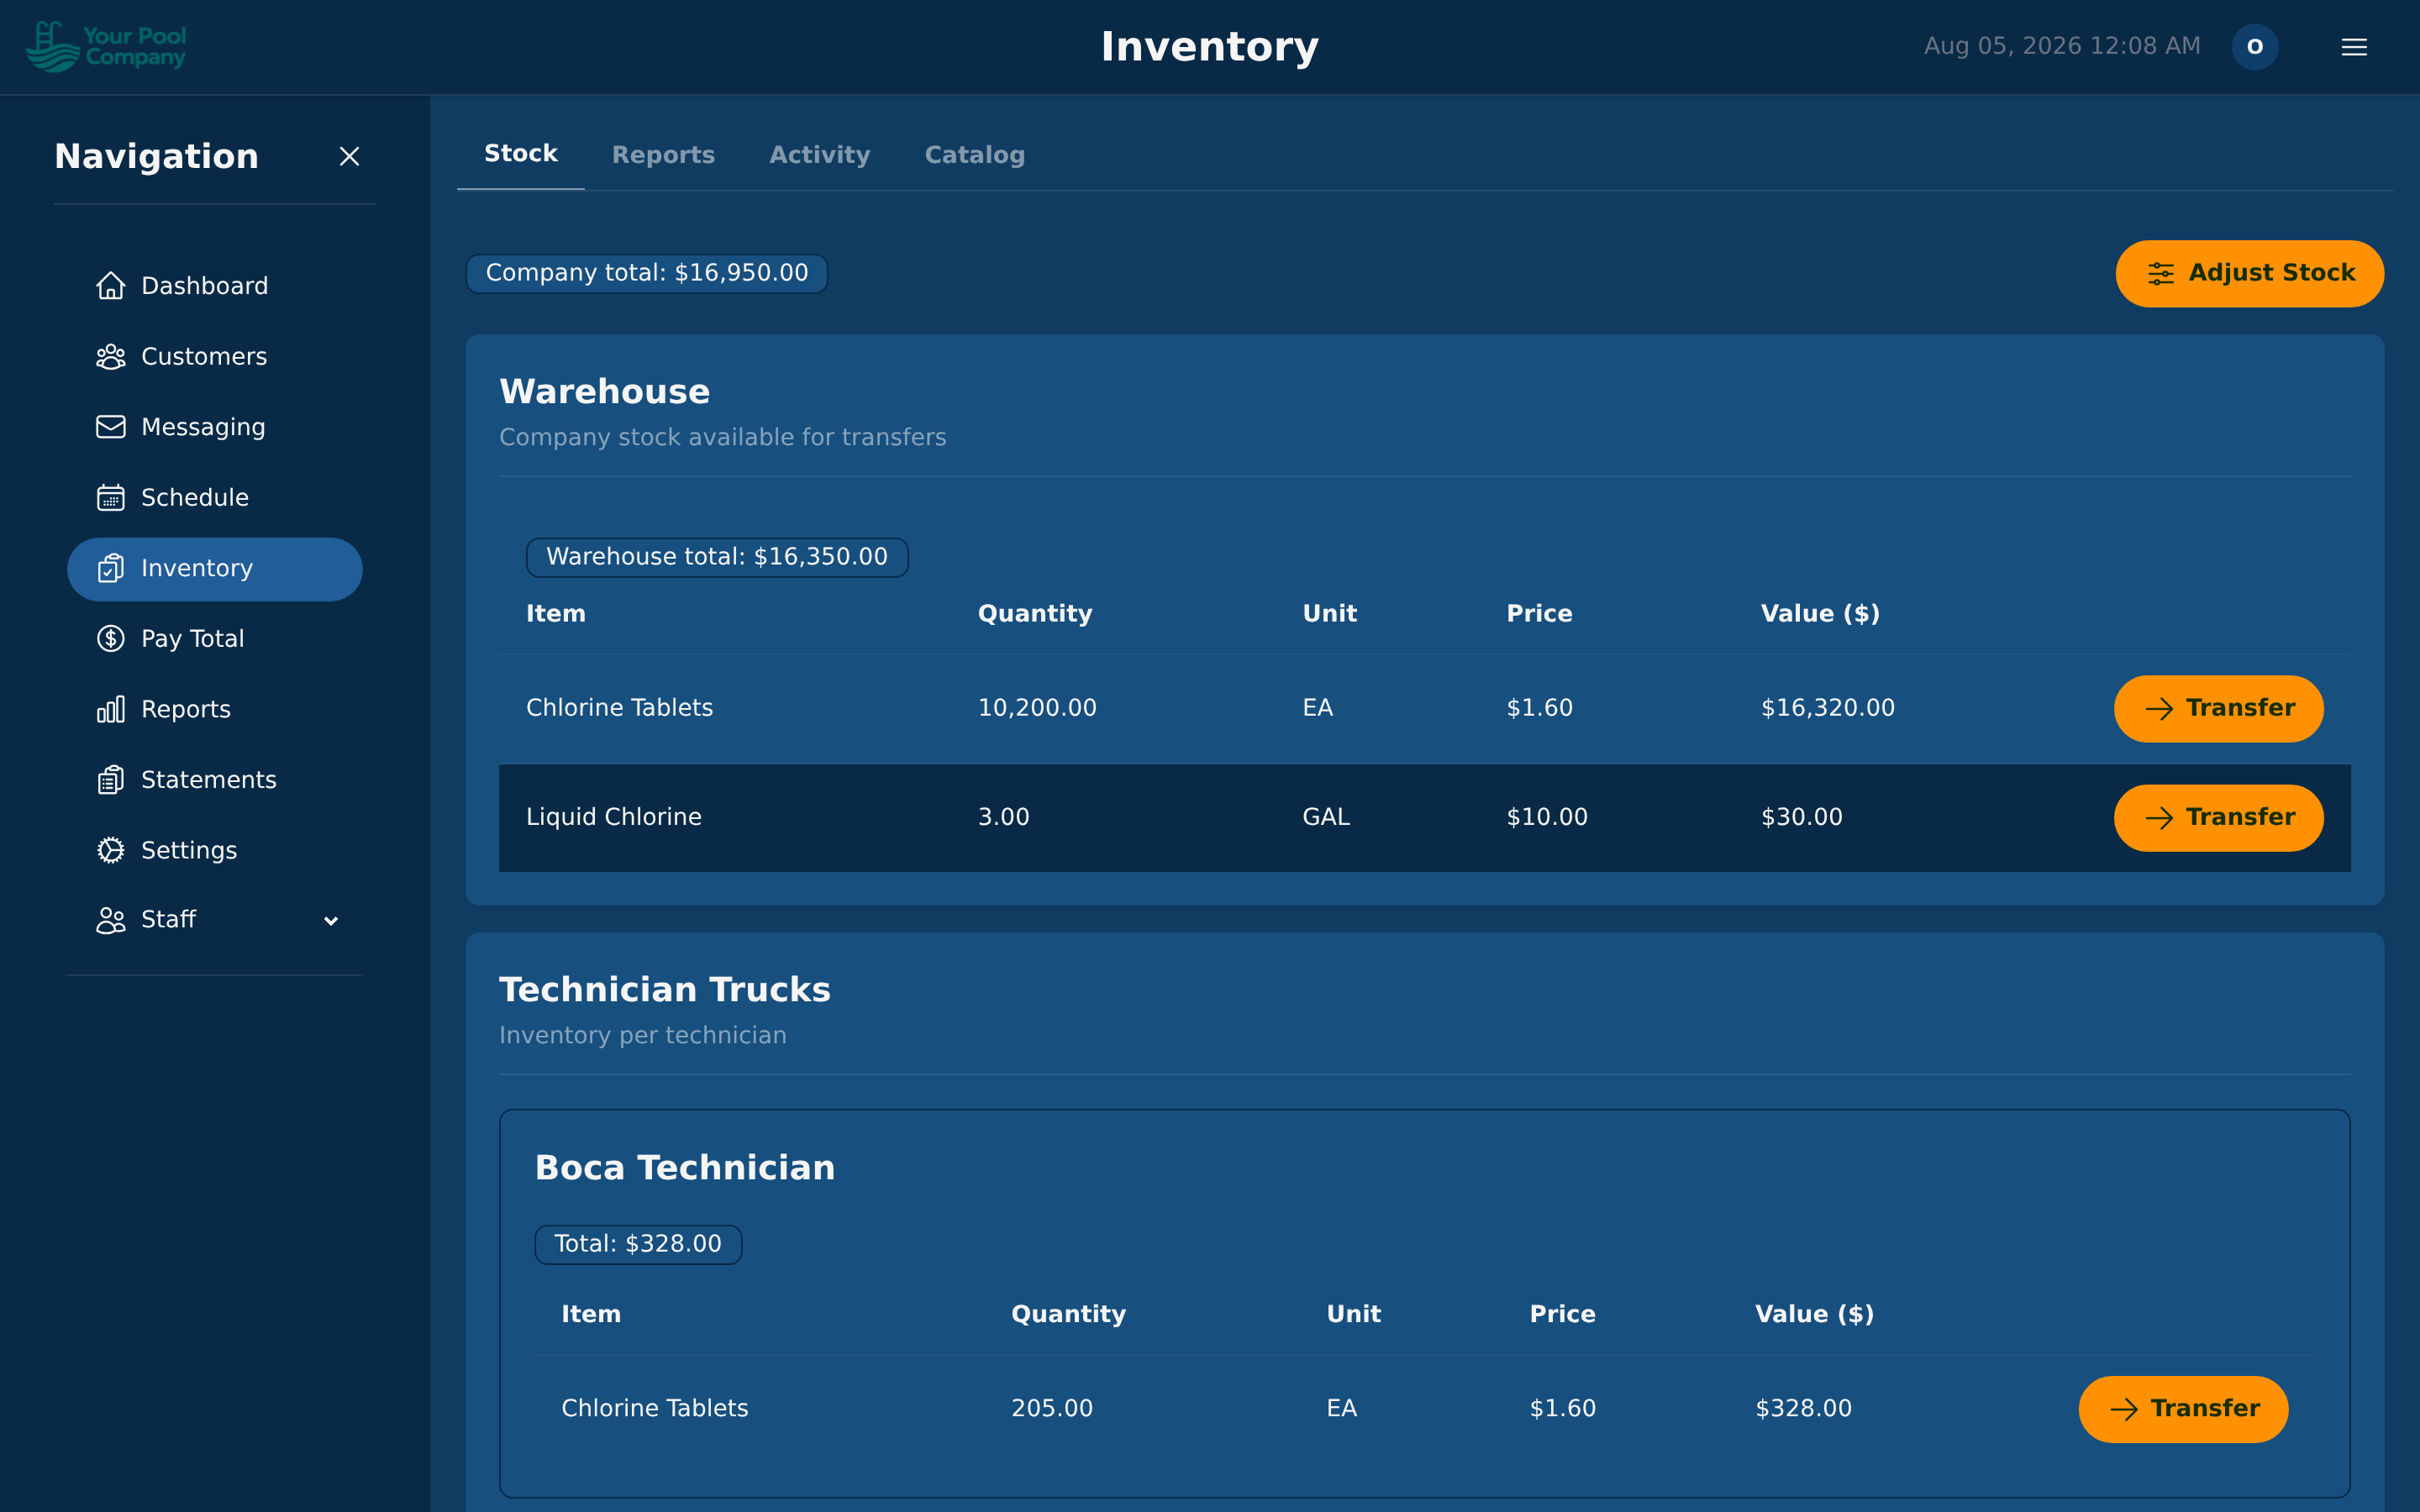
11.2 Inventory Locations & Truck Stock
The Stock tab shows current inventory levels tracked by location:
- Warehouse/Office — your main stock location.
- Truck Stock — each technician's truck is a separate inventory location.
This lets you see exactly what's on each truck and what's in the warehouse.
11.3 Stock Movements & Activity
Adding Stock (Receiving):
- Record purchases or deliveries by adding stock to a location.
- Enter the quantity and cost per unit.
Transferring Between Locations:
- Move inventory from warehouse to truck (or truck to truck).
Manual Adjustments:
- Use adjustments for breakage, spillage, miscounts, or returns.
All movements are recorded in the Activity tab with timestamps and user attribution.
11.4 Auto-Deduction on Service Completion
When a technician completes a service visit, inventory is automatically deducted from their truck stock based on:
- The Inventory Checklist attached to the Recurring Billing Item (default amounts).
- Any adjustment the technician makes on their phone (for example, they used more than usual).
This ensures your inventory counts stay accurate without manual entry.
11.5 Inventory Reports
The Reports tab within the Inventory page provides:
| Report | What It Shows |
|---|---|
| Chemical Usage | How much of each item was used over a period |
| Chemical Cost | What those items cost in total |
Use these reports to:
- Spot a technician getting through far more than everyone else — usually waste worth a conversation.
- Plan purchasing based on usage trends.
- Track the cost per pool, so you can see which work actually makes money.
12. The Mobile App
The EZ Pool Biller app is available for iPhone and Android. It walks the technician through each stop, one step at a time.
12.1 Installing & Logging In
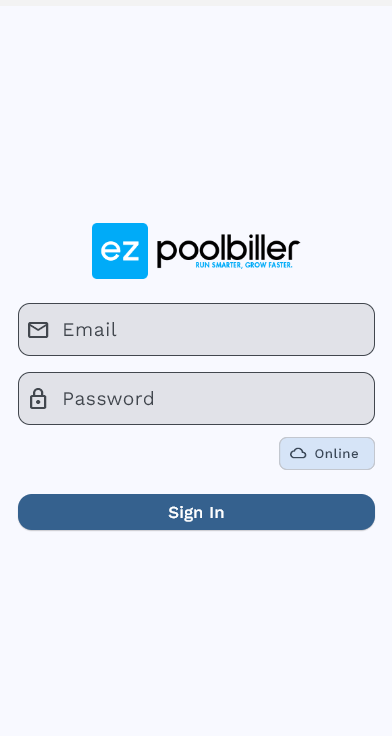
- Download the EZ Pool Biller app from the App Store (iPhone) or Google Play (Android).
- Open the app and enter the email and password provided by your manager (sent via email invite).
- On first login, accept the Terms of Service.
- The app will load your schedule.
12.2 Viewing the Daily Schedule
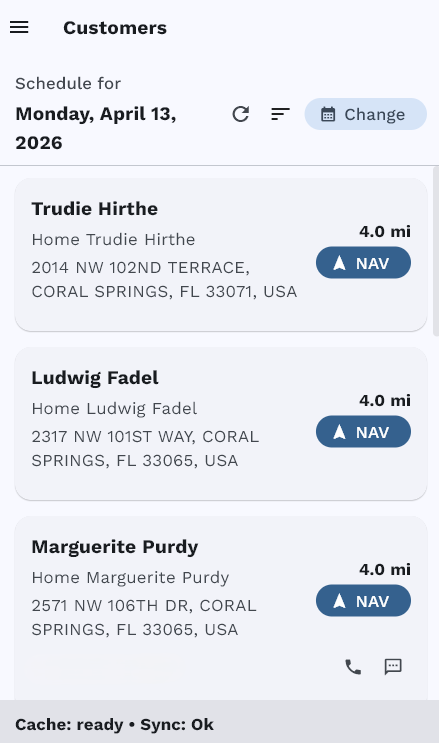
The home screen shows your daily schedule — a list of all service stops for the day in route order:
Each stop card shows:
- Customer name
- Address
- Service type (for example, Weekly Pool Cleaning)
- Gate code / service instructions
- Phone number (tap to call)
- Distance to the stop from your current location
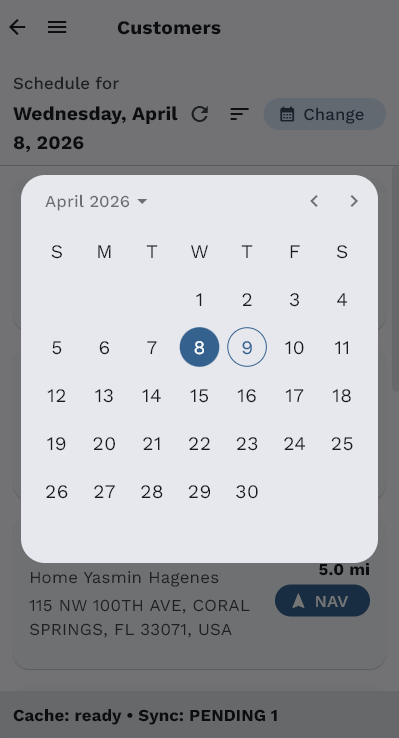
Use the calendar picker at the top to view past or future schedules. Changes made by the office (rescheduled stops, new assignments) appear in real time.
12.3 Starting & Completing a Service Visit
Starting a Visit:
- Arrive at the customer's location.
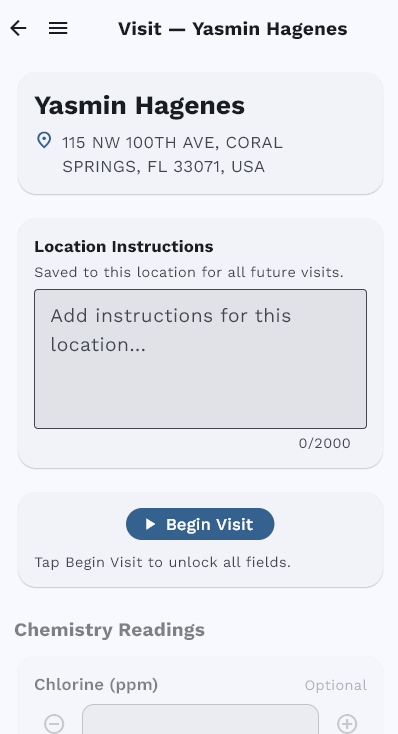
- Tap Begin Visit.
- The app records:
- Your GPS location (compared to the service address for verification).
- The timestamp.
- The technician name.
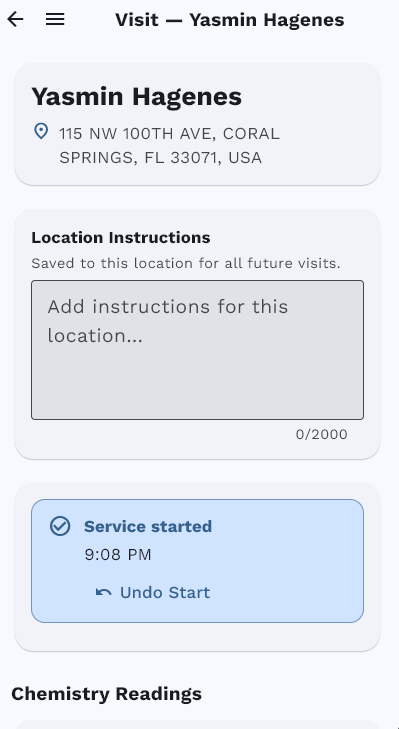
During the Visit:
- Record the Chemistry readings (12.4).
- Capture photos (12.5).
- Complete the checklist (12.6).
- Record any supplies used.
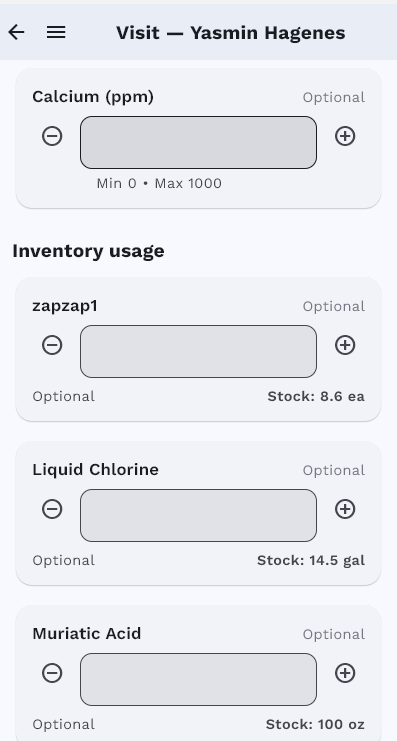
- Add optional service notes (e.g., "Filter needs replacement next visit").
Completing a Visit:
- Ensure all required checklist items are checked.
- Ensure the minimum number of photos has been captured (if configured).
- Tap Complete Visit.
- The app records your GPS location and timestamp again.
- The service is marked as complete in the system.
- If configured, a visit report is automatically emailed to the customer.
12.4 Chemistry readings
At each stop the technician records the Chemistry readings. This is what the standard checklist asks for:
| Asks for | Kind |
|---|---|
| Chlorine (ppm) | a number |
| pH | a number |
| Alkalinity (ppm) | a number |
| Stabilizer (ppm) | a number |
| Calcium (ppm) | a number |
| Algae Free | pick one |
| Services Completed | tick any that apply |
| Notes to Customer | notes |
Each reading has a sensible range — chlorine 0–30 ppm, pH 0–14, alkalinity and stabilizer in ppm — and the app rejects anything outside it, so a slipped decimal point gets caught at the pool rather than in the office.
Whatever the technician enters is saved to the customer's history and appears on their pool service report.
Watch out: these are the questions on the standard repeating service. A one-off job asks its own set — see Section 5.
12.5 Photo Capture
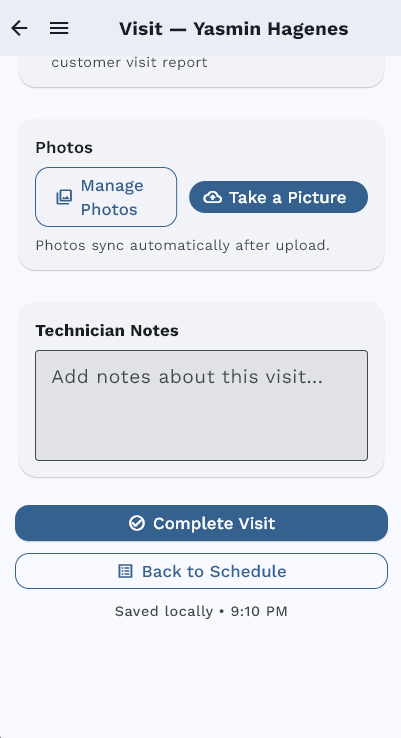
Photos provide proof of service and protect against disputes:
- Photos must be captured in real time using the camera — gallery uploads are not allowed.
- Each photo is automatically watermarked with:
- Date and time
- Technician name
- GPS coordinates
- Photos appear in the customer's visit report and are accessible from the admin portal.
- A minimum number of photos can be required before a visit can be completed (configurable per Recurring Billing Item).
12.6 Checklists in the Field
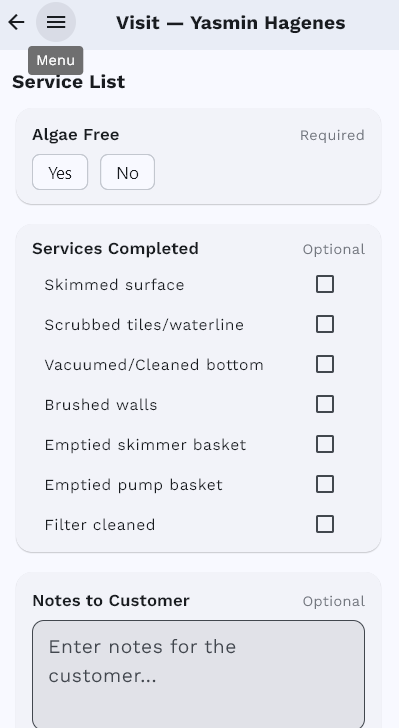
If the Recurring Billing Item has a checklist, it appears on the visit screen:
- Required items (marked with an asterisk) must be checked before the visit can be completed.
- Optional items can be skipped.
- This ensures every technician follows the same process consistently.
12.7 Offline Mode
The mobile app works offline. If a technician loses cell signal (common in rural areas or behind thick walls):
- The schedule is still visible.
- Visits can be started and completed.
- Photos, readings, and checklists are saved locally.
- When the connection returns, everything syncs automatically.
No data is lost — technicians can work uninterrupted.
13. Customer Portal
13.1 Enabling the Portal
The Customer Portal is enabled in Settings > Company under the Portal section. Once enabled, your customers can access a self-service portal branded with your company logo and colors.
13.2 How Customers Access the Portal
Customers don't need to remember a password. Access is via Magic Login Links:
- The customer receives an email (e.g., a statement, invoice, or visit report).
- The email contains a secure link that logs them in automatically.
- The link is cryptographically signed and time-limited for security.
Alternatively, customers can use the Claim flow to set up first-time access if they haven't received a magic link yet.
13.3 What Customers Can Do
The customer portal currently provides:
| In the portal | What the customer can do |
|---|---|
| Dashboard | See what they owe, anything overdue, recent activity, and the services they're signed up for |
| Billing history | Every charge, payment and credit, with a running balance |
| Invoices | Open and download their invoices |
| Statements | Open and download their monthly statements |
| Payments | Pay by card or PayPal |
| Payment methods | Add, change or remove a saved card — including swapping the card on a running service |
| Services | See what they're signed up for |
| Settings | Change their own details and how they'd like to hear from you |
Whether they can manage their own saved cards is up to you — see 13.1.
Customers also receive visit reports via email after each service (if enabled). These reports contain photos, the Chemistry readings, and technician notes, and can be viewed through a secure link in the email.
The portal reduces support calls by letting customers check their balance and billing history on their own — "How much do I owe?" "When was my last payment?"
13.4 Admin Impersonation (See What They See)
From any customer's profile, click View Portal to see the portal exactly as that customer sees it. This is invaluable for:
- Answering customer questions ("I don't see my invoice" → check their portal view).
- Verifying that billing information is displaying correctly.
- Walking a customer through the portal over the phone.
14. Messaging, SMS & Notifications
14.1 Email Notifications
EZ Pool Biller sends these emails on its own:
| When It's Sent | |
|---|---|
| Invoice | When a new invoice is created |
| Statement | When a monthly statement closes (if auto-email is enabled) |
| Payment Confirmation | When a payment is received |
| Payment Failed | When an autopay charge fails |
| Password Reset | When a customer or staff member requests a password reset |
| Subscription Paused | When a subscription is auto-paused for nonpayment |
| Subscription Resumed | When a subscription is auto-resumed after payment |
| Visit Report | After a service visit is completed (if enabled) |
| Portal Login | When a customer receives a magic login link |
Who receives them
Every email above goes to the customer's main address and their second address, if they have one — see Section 4. Anyone set up as a CC gets a copy too, limited to the message types you chose for them.
Nobody is emailed twice. If the same address appears in more than one place, it's only sent once.
If a customer's main address is missing or was never valid, the second address is used instead, and CC addresses still get their copies — so the message still lands somewhere.
14.2 The Messaging page
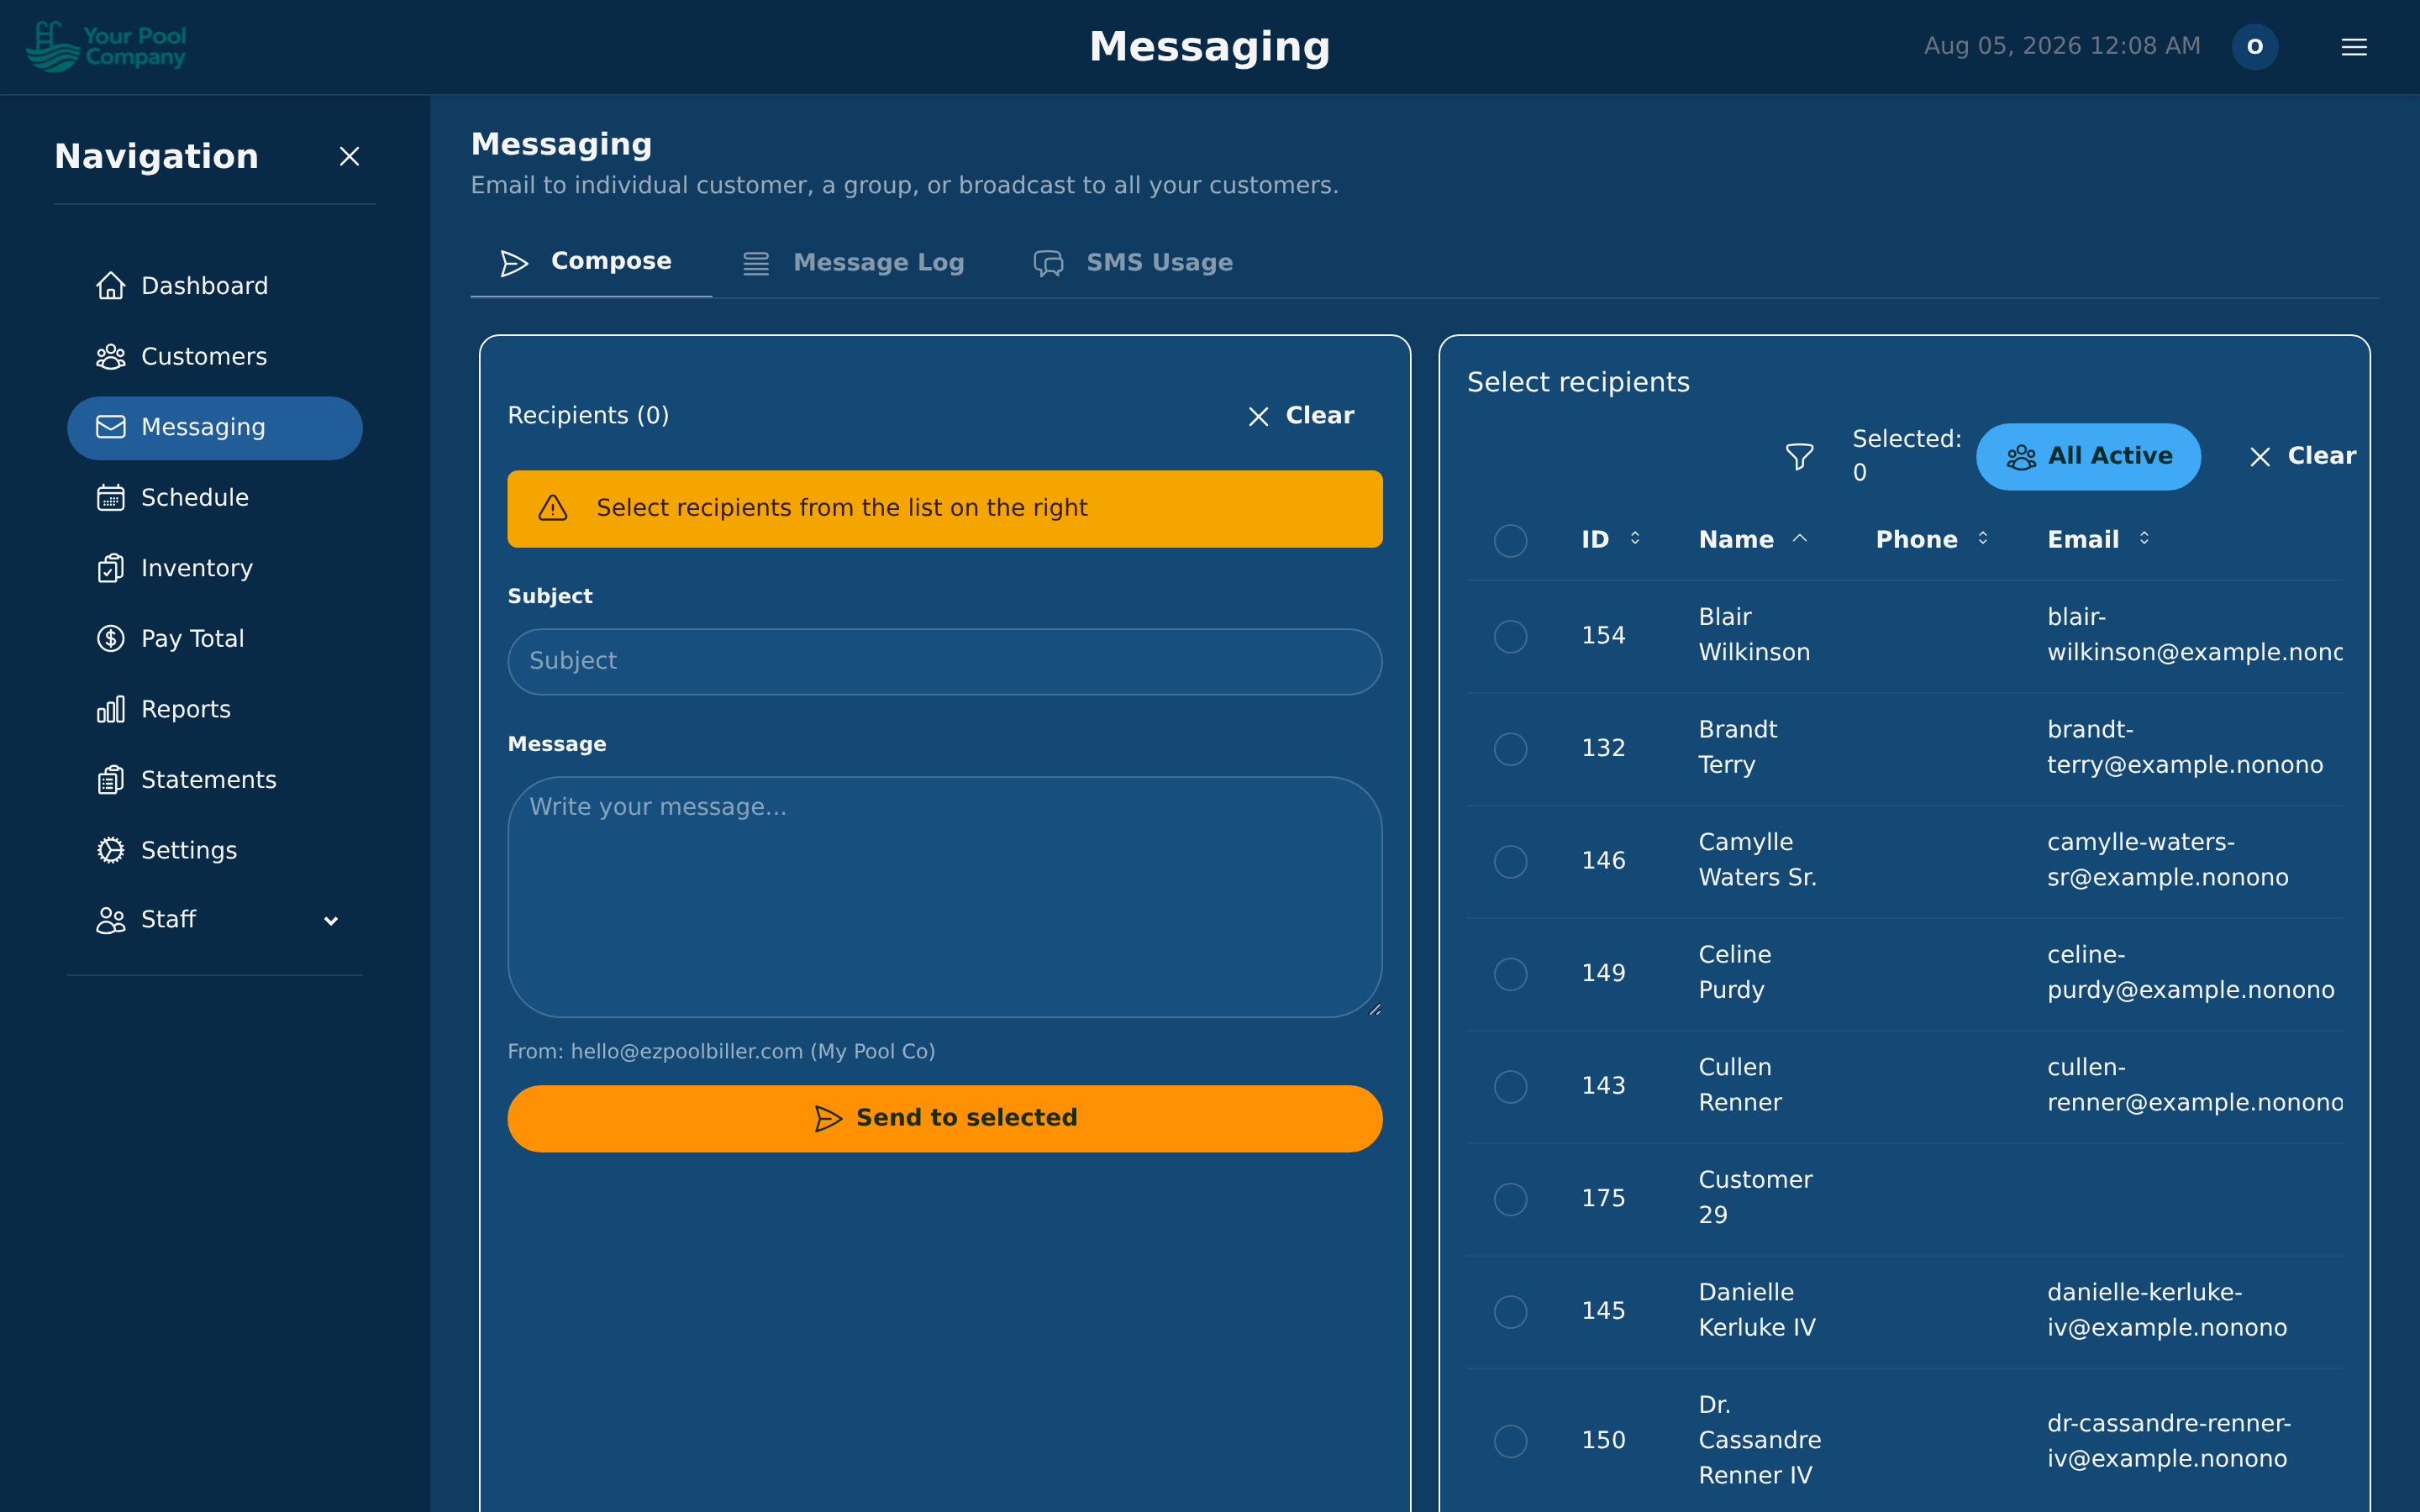
Messaging in the menu has three tabs:
| Tab | What it's for |
|---|---|
| Compose | Write and send an email or text, to one customer or a group |
| Message Log | Everything that's been sent, and whether it arrived |
| SMS Usage | How many texts you've sent and what they've cost |
14.3 Text messages
Once text messaging is switched on for your account you can:
- Text one customer from their page.
- Text a group from Compose.
- Send automatic reminders before a pool service.
Message Log shows what happened to each one — sent, delivered, or failed — so you can tell the difference between "they ignored it" and "it never arrived".
14.4 What your texts are costing you
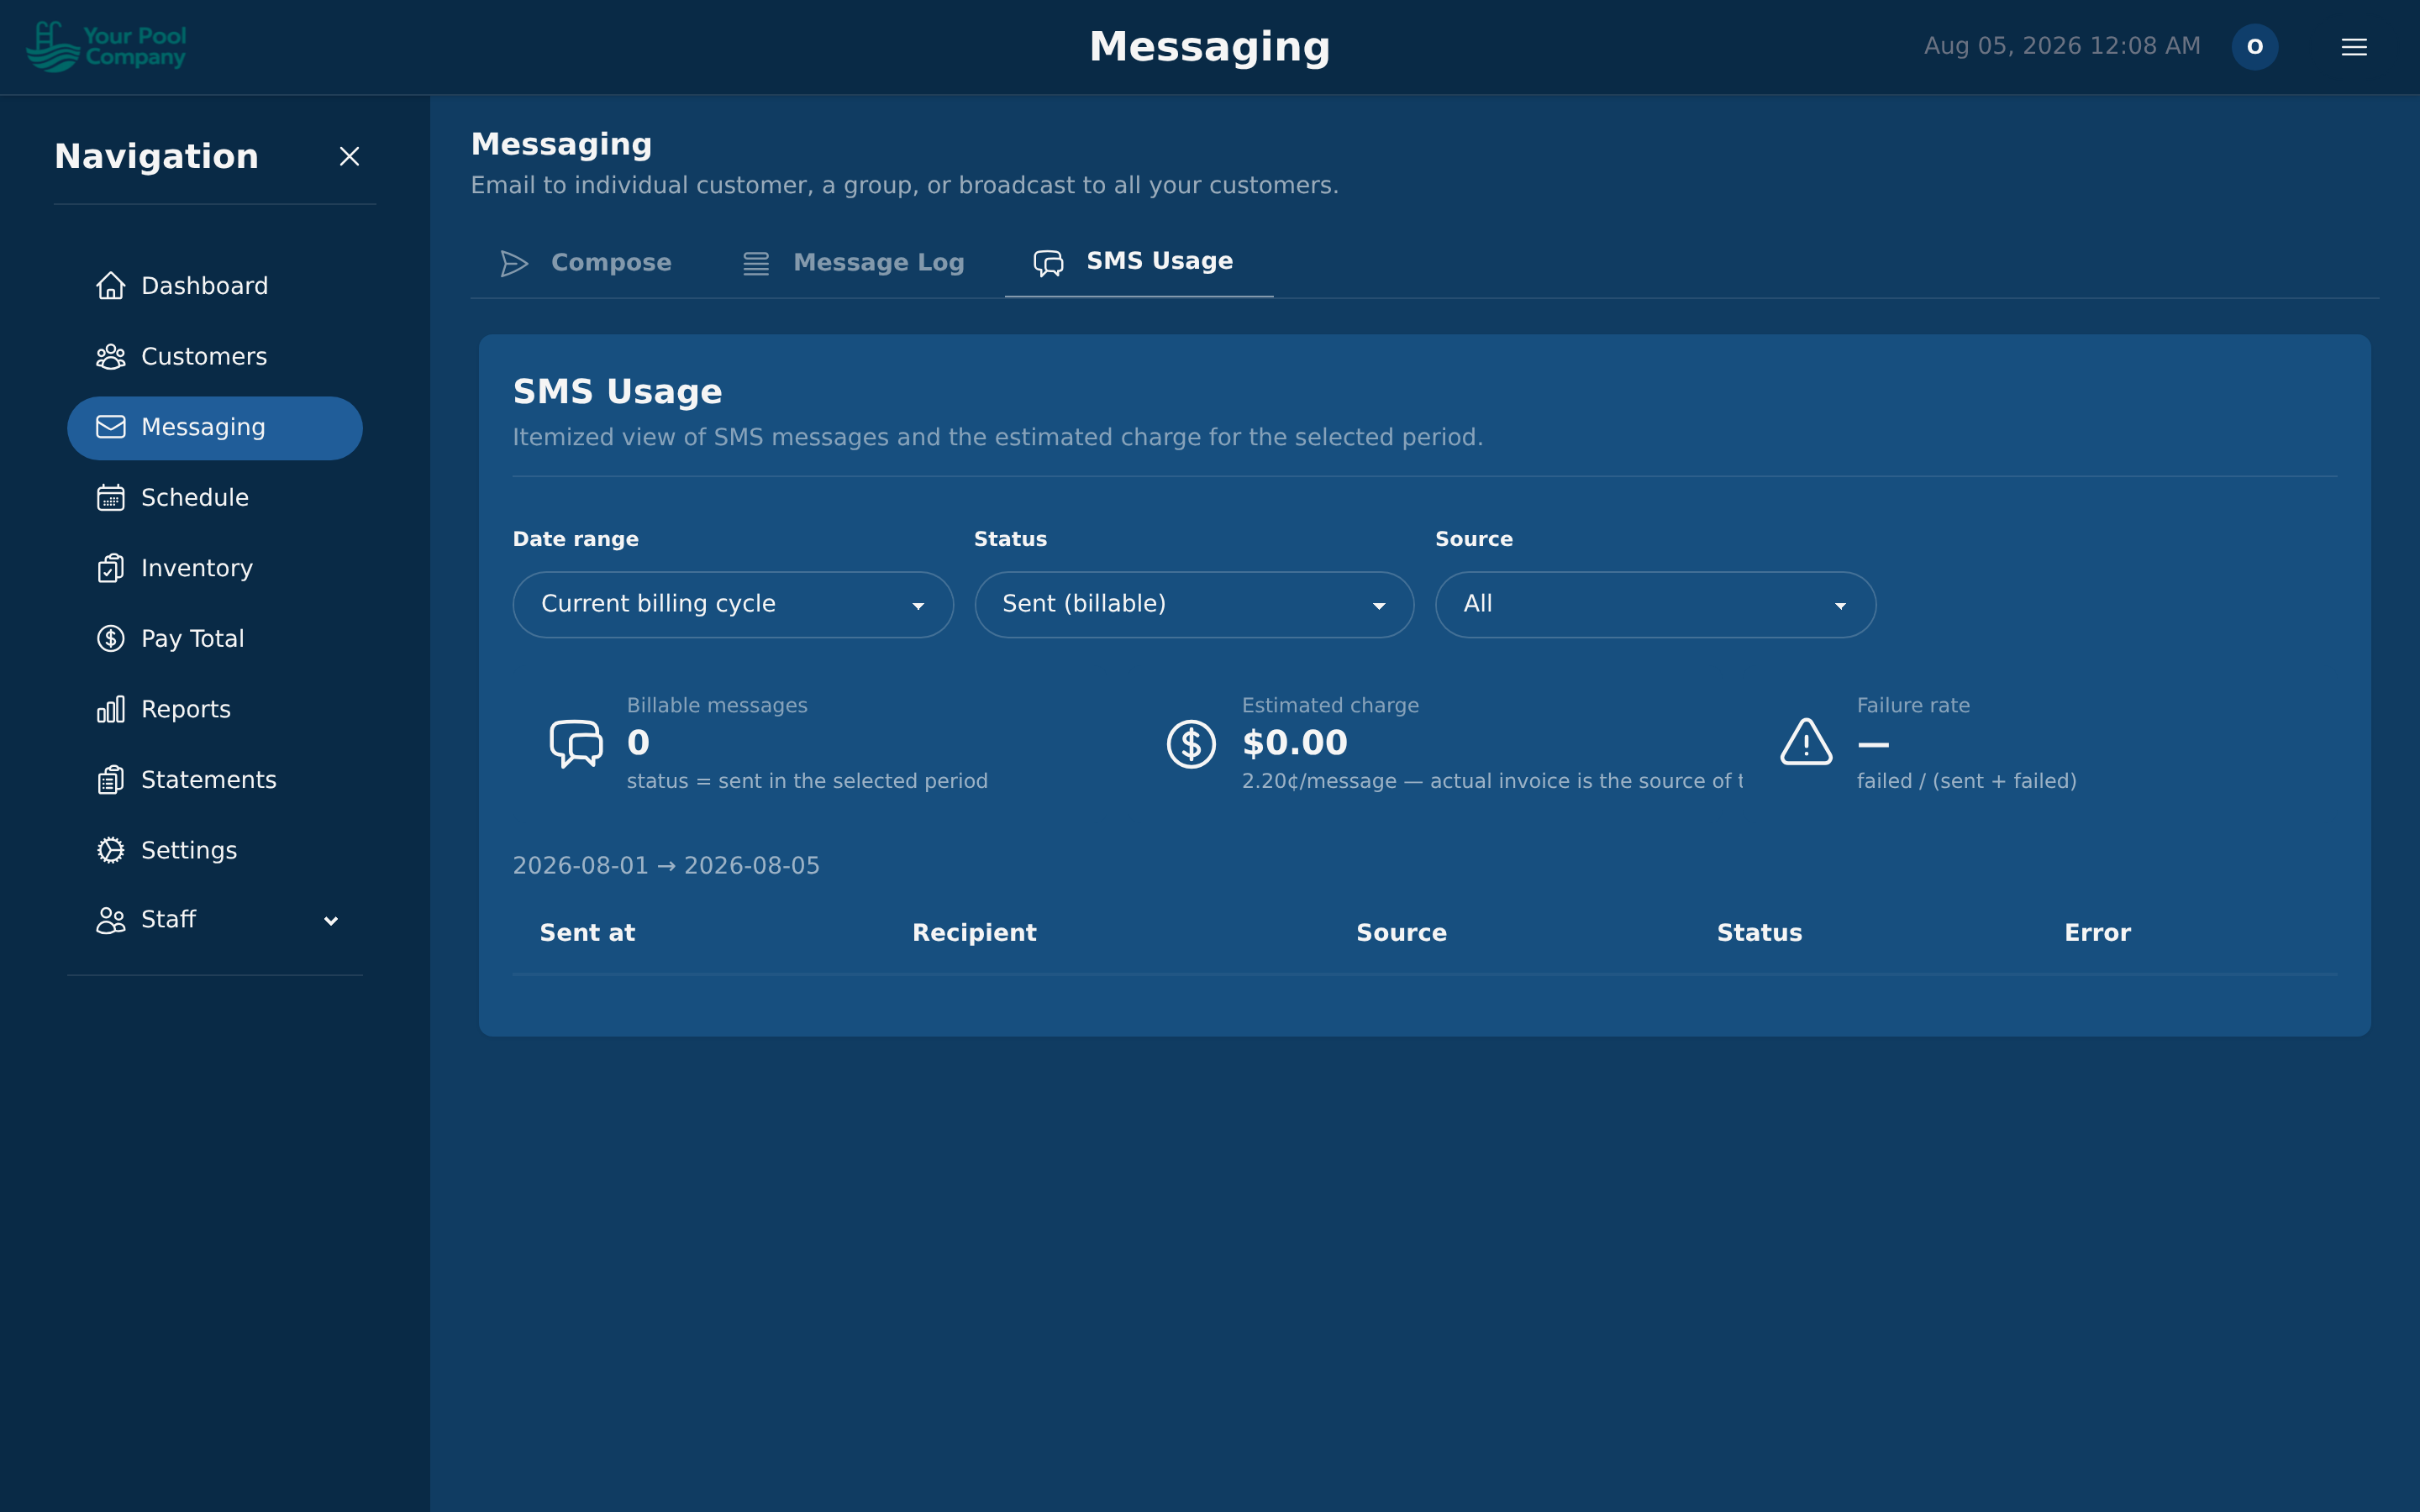
The SMS Usage tab shows how many texts you've sent over a period and what they cost. Worth a look before turning on reminders for every customer.
Watch out: text messaging is off on new and trial accounts until your account is verified. If the option isn't there, that's why — contact support to have it enabled.
14.5 Visit Reports
Visit reports are automated emails sent to customers after each service visit. They include:
- Date and time of service
- Technician name (optional)
- Service address (optional)
- The Chemistry readings
- Service checklist completion
- Photos taken during the visit (optional)
- Service notes from the technician
Customers can unsubscribe from visit reports via a link in the email. You can see and manage opt-out status from the customer's profile.
14.6 Statement Emails
When using Monthly Statement billing mode, statements can be automatically emailed to customers when the period closes. Configure this toggle in Settings > Company or directly from the Statements page.
Statement emails include:
- The statement period (e.g., March 1–31, 2026)
- Opening and closing balance
- A summary of charges, payments, and credits
- A link to the customer portal to view details or make a payment
- An attached PDF statement (optional)
15. Payroll
EZ Pool Biller includes a built-in payroll calculator. It computes technician earnings — you then use those totals to run actual payroll through your payroll provider (e.g., Gusto, ADP, QuickBooks Payroll).
15.1 Technician Pay Profiles
Each technician has a Pay Profile that defines how they're compensated:
| Pay type | How it works |
|---|---|
| Hourly | Paid for the hours worked |
| Per visit | Paid a set amount for each pool service finished |
A technician can be on both — an hourly base plus an amount per visit.
You can set a company-wide per-visit rate so you don't have to enter the same number for everyone, and override it for individual technicians who are paid differently.
Rates are kept with the dates they applied from, so a past period is always worked out at the rate in force at the time. Giving someone a raise doesn't change what they were owed last month.
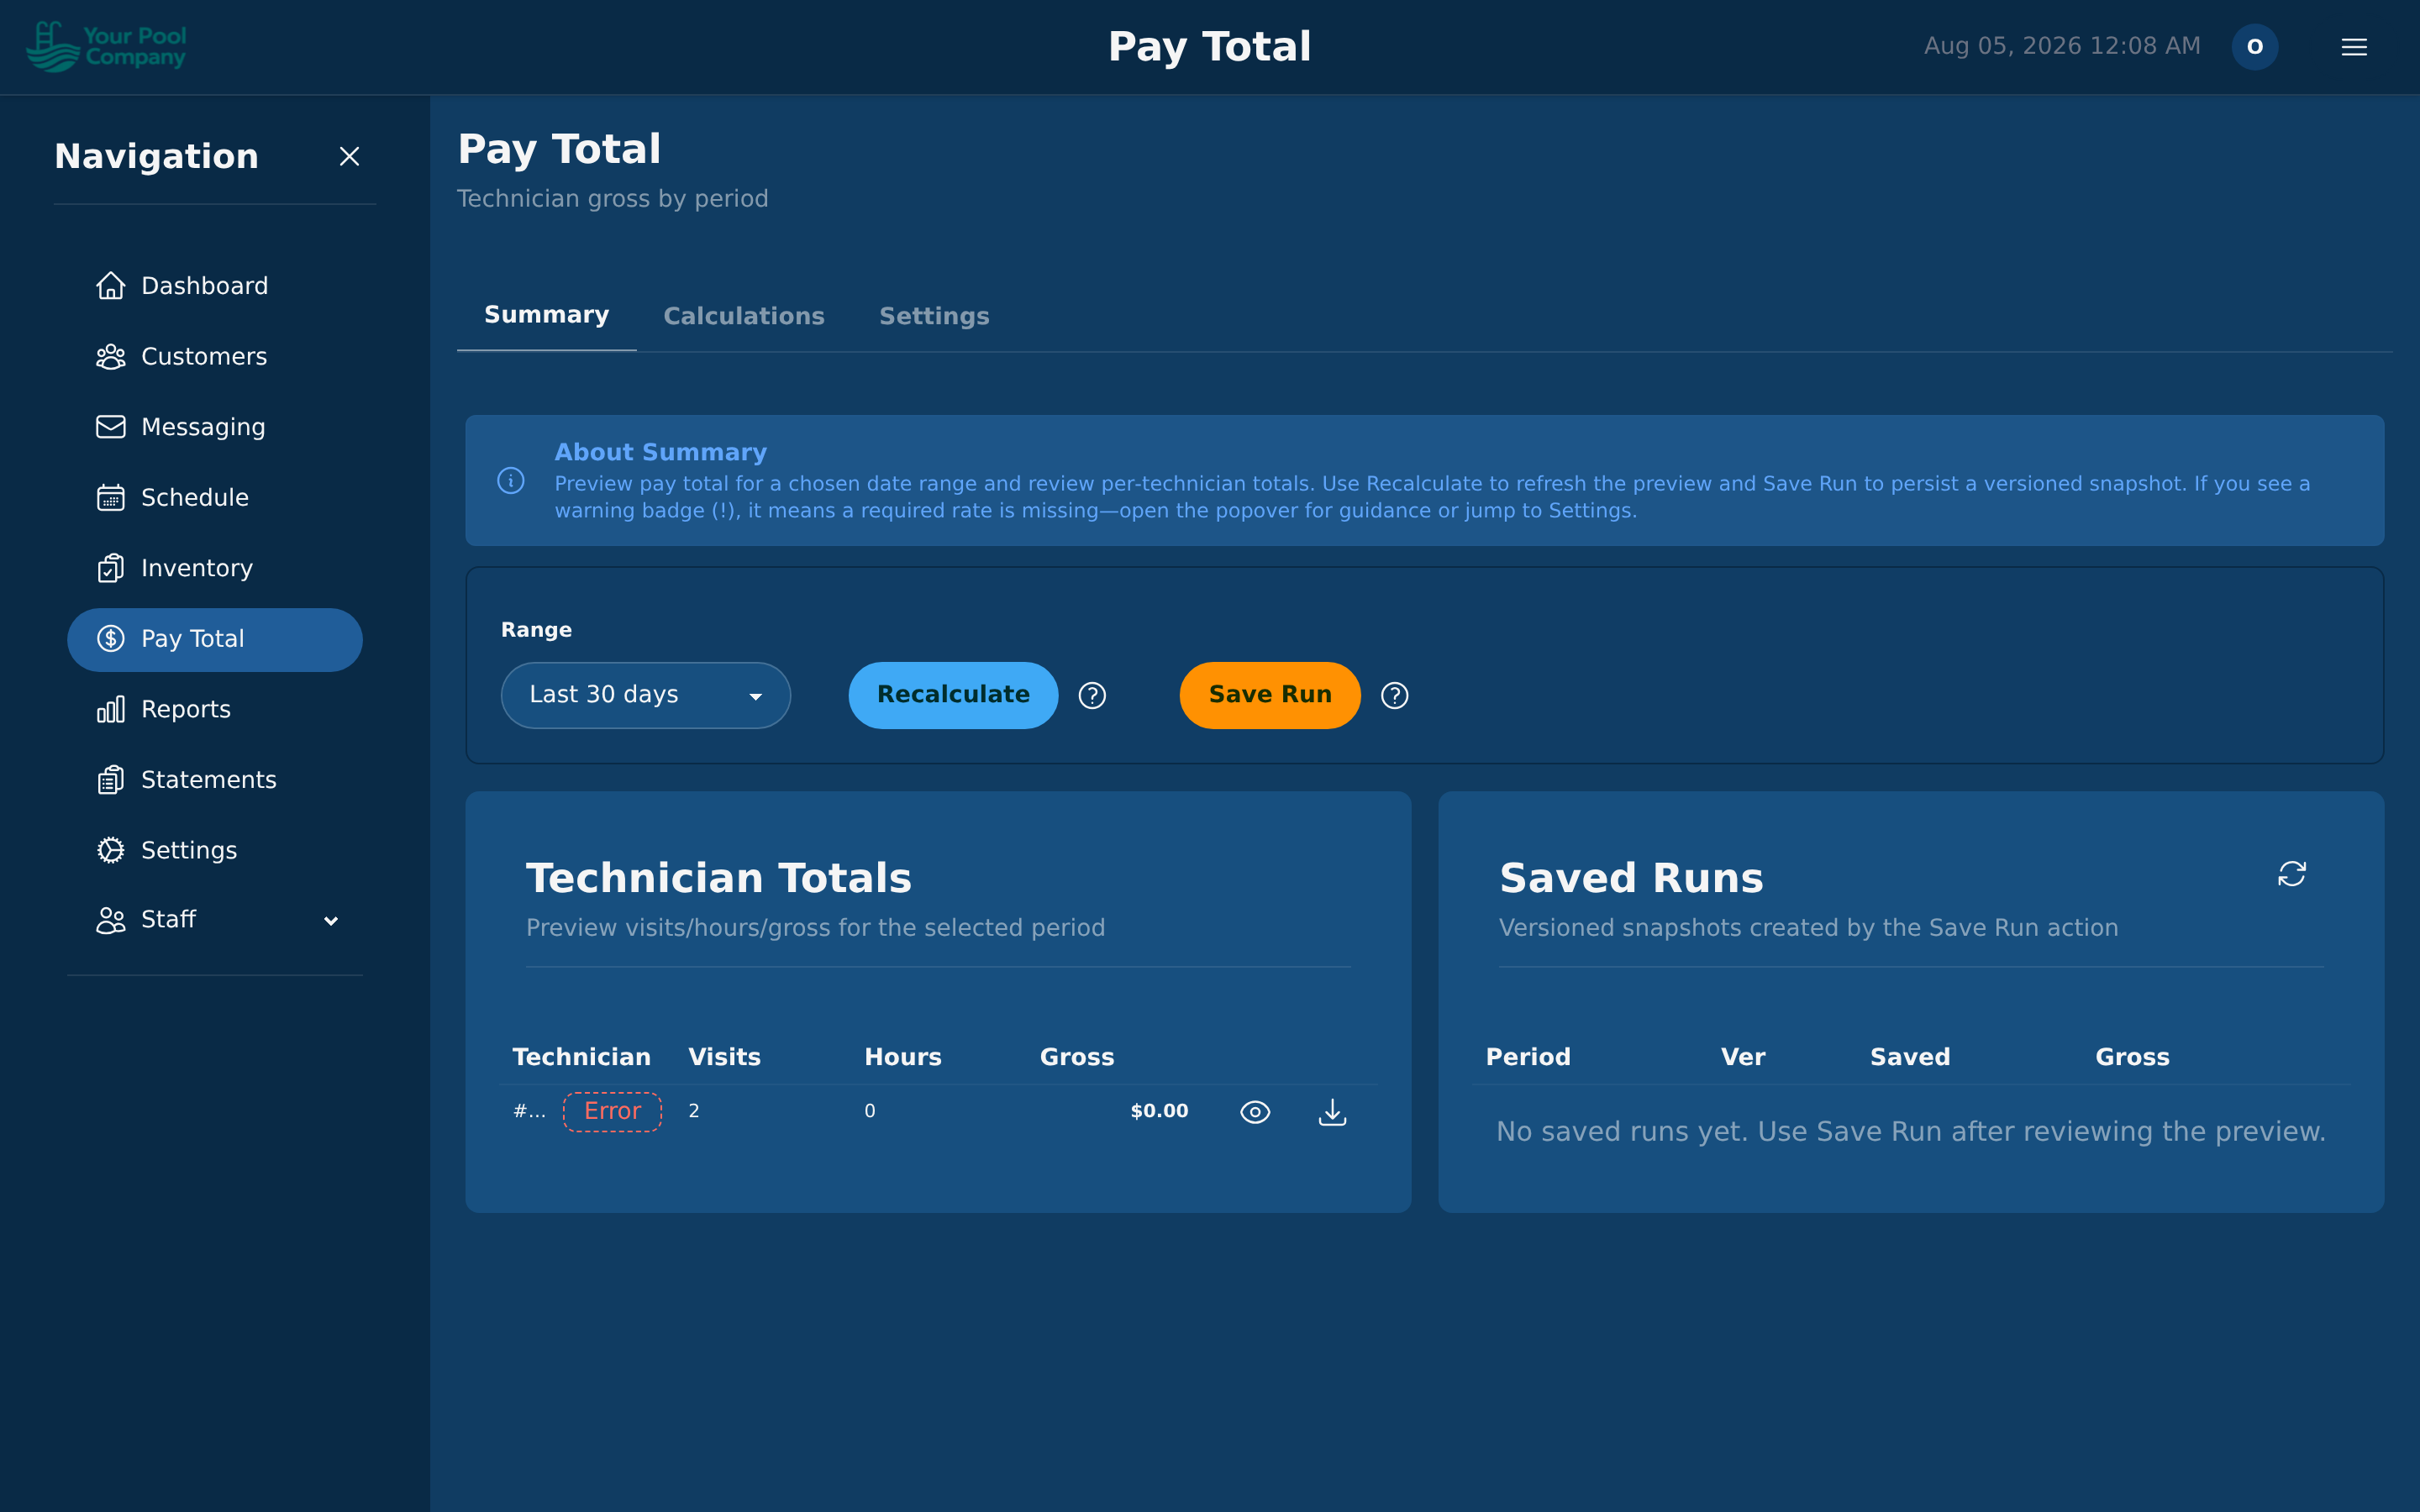
Watch out: if a technician is on per-visit pay and no rate has been set for them, their pay can't be worked out. EZ Pool Biller flags it rather than paying them zero — set the rate and run it again.
15.2 Running Payroll
- Navigate to Pay Total in the sidebar.
- Click Run Payroll.
- Select the pay period (weekly, biweekly, or monthly).
- The system calculates earnings for each technician based on:
- Completed services during the period
- Their pay profile rates
- Hours worked (if hourly)
- Review the calculated amounts.
- Approve and finalize the payroll run.
15.3 Pay Statements & PDF Export
After running payroll:
- Each technician gets a Pay Statement showing:
- Earnings breakdown by type (hourly, per-stop, per-service)
- Services completed
- Total earnings for the period
- Statements are available as PDF downloads.
- Technicians can view their own pay statements from the mobile app or web portal.
Use the calculated totals to process actual payroll through your external payroll provider.
16. Reports
In one sentence: The numbers on your business — what you're owed, what you've earned, what you've used, and what tax you've collected.
Who needs this: Owner, Office
You may not see this if: your role doesn't include reports. Each report is permission-gated separately, so you may see some tabs and not others.
Where to find it: Reports in the menu
Every report can be filtered by date range and by customer.
16.1 The tabs, in order
| Tab | What it tells you |
|---|---|
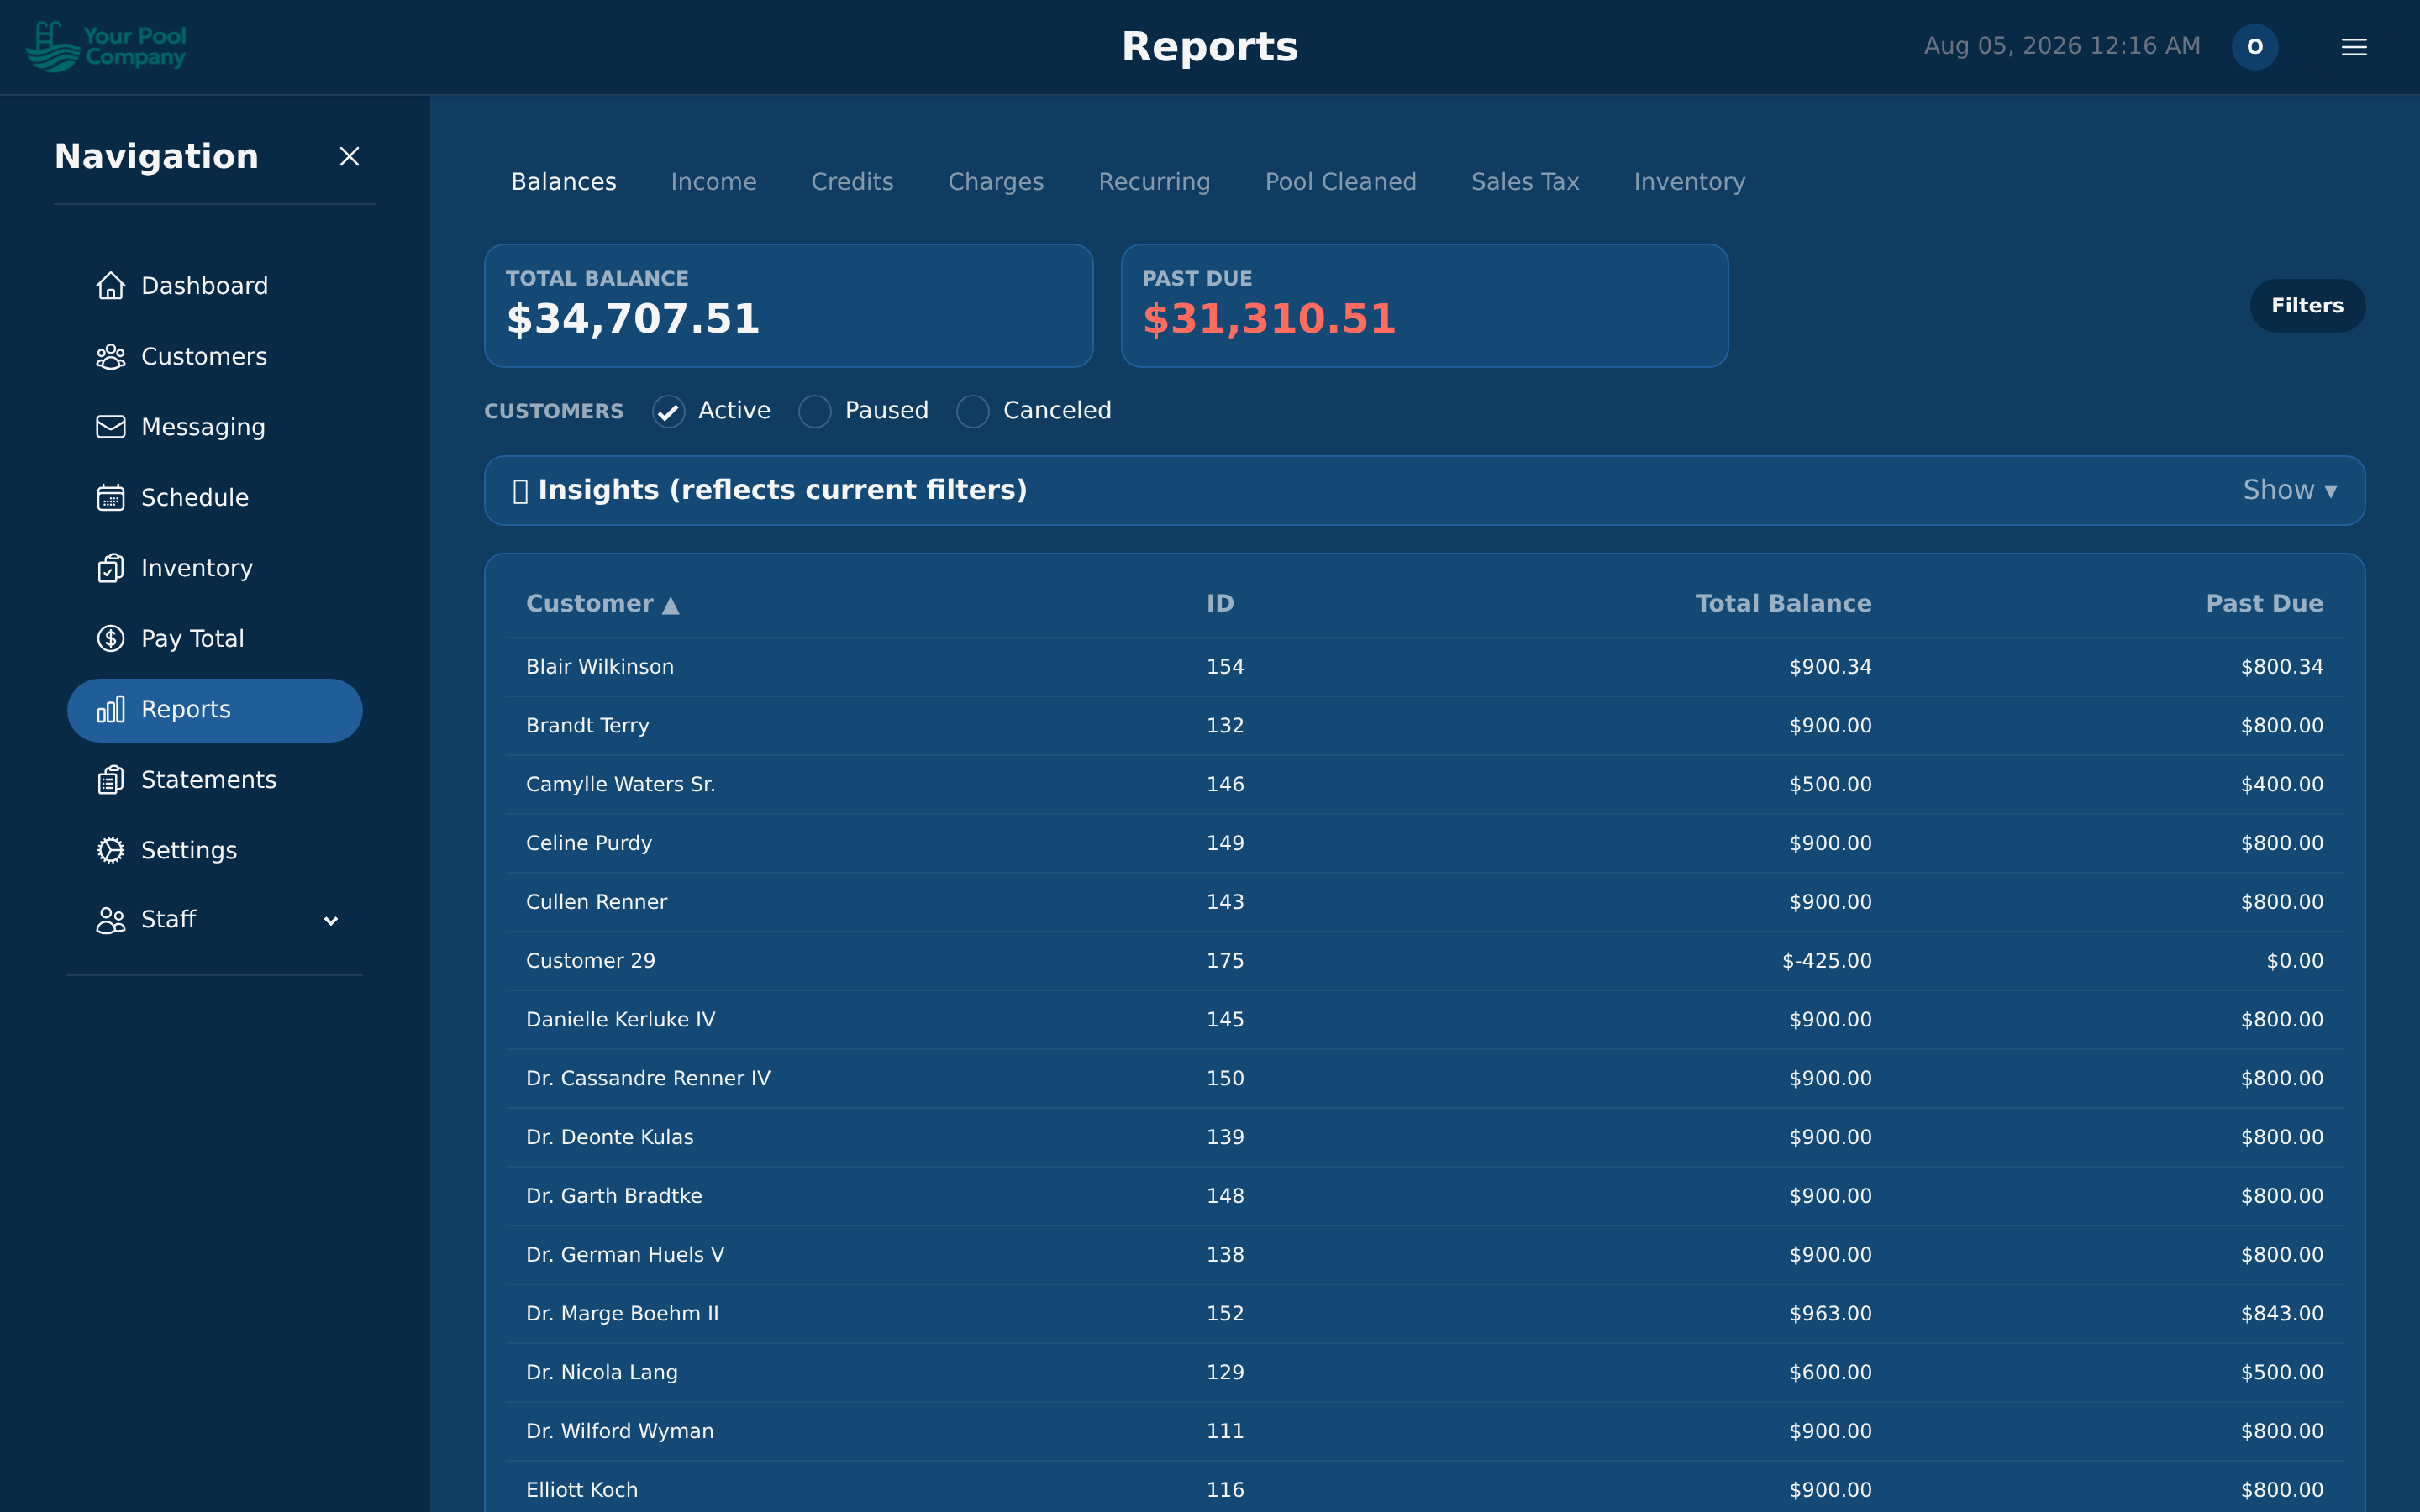
| Balances | Who owes you money, and how overdue it is |
| Income | Money actually received, by period |
| Credits | Every credit you've given out |
| Charges | Every charge posted, by period |
| Recurring | What your repeating services are worth per month, and whether that's growing |
| Pool Cleaned | How many pool services were finished, by technician, period, or service type |
| Sales Tax | Tax collected per period, for filing |
| Inventory | What you've used and what it cost — see 16.2 |
16.2 The Inventory tab
Three views inside one tab:
| View | What it tells you |
|---|---|
| Chemical Usage | How much of each item was used, by item, technician, or period |
| Chemical Cost | What that came to in money, per pool, per technician, or in total |
| Inventory Report | What your stock on hand is worth right now |
16.3 Sales tax
The Sales Tax report totals the tax you've collected in a period, so you can file the right amount without adding it up by hand.
Watch out: it reports what was collected, not what is owed on unpaid invoices. If you file on what you've billed rather than what you've banked, check which basis your state expects.
16.4 Reading the numbers
- Balances answers "who should I chase?"
- Income answers "what did we actually take?"
- Recurring answers "is the business growing?" — it's the one to watch month on month.
17. QuickBooks
Sync your EZ Pool Biller data with QuickBooks Online to keep your accounting up to date.
17.1 Connecting Your QuickBooks Account
- Go to Settings > Integrations > QuickBooks Connection.
- Click Connect to QuickBooks.
- You'll be redirected to Intuit's login page — sign in with your QuickBooks credentials.
- Give EZ Pool Biller permission to reach your QuickBooks data.
- You come back to EZ Pool Biller and see that the connection is on.
The connection uses official Intuit OAuth — your QuickBooks password is never stored in EZ Pool Biller.
17.2 What Gets Synced
Data flows one way — from EZ Pool Biller into QuickBooks:
| In EZ Pool Biller | In QuickBooks |
|---|---|
| Customers | Customers |
| Recurring Billing Items | Items/Services |
| Statements/Invoices | Invoices |
| Payments | Payments |
Sync Options:
- Auto-sync — entities are automatically exported to QuickBooks as they are created.
- Manual export — bulk export entities from the Export Dashboard.
17.3 Export Dashboard
The QuickBooks Export Dashboard shows:
- Exported — entities successfully synced to QB.
- Pending — entities queued for export.
- Skipped — entities intentionally excluded.
- Failed — entities that failed to export (with error details).
Click on any failed entity to see the error message and retry the export.
17.4 Troubleshooting Sync Errors
| Error | Solution |
|---|---|
| Token expired | Reconnect to QuickBooks (Settings > Integrations > QuickBooks Connection > Reconnect) |
| Duplicate customer | A customer with the same name/email already exists in QB. Match or merge them. |
| Invalid account | Ensure the default income account is configured in the QuickBooks settings |
| Rate limit | Wait a few minutes and retry — QuickBooks limits API calls per minute |
18. What Counts Toward Your Plan
In one sentence: Your plan is measured in locations used per month — this explains what makes a location count.
Who needs this: Owner
You may not see this if: you're not an owner or account admin.
Where to find it: Settings > Manage EZ Pool Biller Plan
18.1 The short version
You are billed on how many locations you actually used in a month — not how many customer records you happen to have stored. A customer sitting in your list with nothing happening does not count.
18.2 What makes a location count
A location counts for the month if any of these happen:
- A pool service is scheduled or completed at it.
- A one-off job is booked at it (see Section 8).
- Any money moves for the customer who owns it — a charge, a payment, a credit, or a refund.
Each location counts once in a month, no matter how many times it's serviced. A weekly customer costs the same as a monthly one.
18.3 What does not count
- Customers with no activity that month.
- Canceled or paused customers, while they stay that way.
- Extra contacts, notes, or files on a customer you're already counting.
18.4 Seeing your usage
Settings > Manage EZ Pool Biller Plan shows the current month's count and what you're on track for. Check it before adding a large batch of customers so there are no surprises.
Watch out: booking a one-off job for a brand-new customer counts that location for the month, even if the job is later canceled. Book it when you're reasonably sure it's happening.
19. Frequently Asked Questions
Q: Can I switch between Per-Service and Monthly Statement billing? A: Yes, but this is a company-wide setting that affects all customers. We recommend choosing one method at setup and sticking with it. Contact support if you need to change.
Q: What happens to a customer's data when I cancel their subscription? A: All historical data (services, payments, invoices, readings) is preserved permanently. The subscription is marked as canceled, but nothing is deleted. You can view the full history at any time.
Q: Can a customer have multiple subscriptions? A: Yes. A customer can have separate subscriptions for different locations or different service types. Each subscription has its own billing schedule.
Q: How do technicians get their schedule updates? A: Once you click Apply Draft to LIVE, the change reaches their phones straight away. Technicians see updates immediately without needing to refresh or re-login.
Q: Can I import my existing customers from another system? A: Yes. EZ Pool Biller can bring your data across from other pool care software. Contact support and they'll handle the import for you — typically completed within 1-2 business days at no charge.
Q: What if my technician's phone dies mid-route? A: Any data captured before the phone died is saved locally. When the phone powers back on and reconnects, it syncs automatically. No data is lost.
Q: Can customers pay with cash or check? A: Yes. You can record manual payments for cash, check, Venmo, wire transfer, or any other offline method. The payment is posted to their ledger and reduces their balance.
Q: How do I handle a customer who overpaid? A: The overpayment creates a negative balance (credit) on their account. This credit is automatically applied toward their next invoice. You can also issue a refund if the customer prefers.
Q: Can I use the system in Test Mode before going live? A: Absolutely. Keep your payment gateways in Test Mode while learning the system. Test everything — create customers, subscriptions, generate invoices, process test payments. Switch to Live Mode when you're confident.
Q: How do I handle seasonal customers who only want service part of the year? A: Use the Pause feature with a scheduled resume date. For example, pause the subscription on November 1 and set it to resume on March 1. The customer won't be charged during the paused period, and service automatically resumes in the spring.
Q: A customer has disappeared from my list. Did I delete them? A: Almost certainly not. The list shows Active and On-demand customers by default. If you canceled or paused them, change the status filter to see them again — see Section 4.
Q: Can two people get the same customer's emails? A: Yes, two ways. Give the customer a second email address if both addresses belong to them, or add a CC email if it's someone else like a property manager. Both are in Section 4.
Q: A charge says "Scheduled". Is the customer late paying it? A: No. Scheduled means the charge is agreed but not due yet. It isn't in their balance and isn't on their statement, so there's nothing to chase — see Section 10.
Q: I sold a one-off job to someone who now wants regular service. Start again? A: No — open them and click Convert to subscriber. See Section 8.
Q: Why can't a customer log in with their second email address? A: Because that address may be shared between several customers, so we can't tell which account they mean. They should sign in with their Account # and password — it's on their statement.
20. Glossary
In one sentence: Plain-English meanings for every word this manual and the app use.
Who needs this: Everyone
Where to find it: Here — no screen needed.
Words are listed the way you'll see them on screen.
Autopay — EZ Pool Biller charging a saved card automatically when a bill is due, so nobody has to remember.
Checklist — the list of steps and readings a technician fills in on their phone during a pool service. Different jobs have different checklists.
Chemistry readings — the numbers a technician records for a pool: chlorine, pH, alkalinity and so on. They appear on the customer's visit report.
CC email — someone else who gets copies of a customer's emails, such as a property manager or accountant. You choose which kinds they receive. Different from a second email address, which belongs to the customer themself.
Credit — money put onto a customer's account, reducing what they owe. The opposite of a charge.
Draft plan — a week's schedule you're still editing. Customers and technicians don't see it until you make it active.
Job — one piece of work at one place on one day. A job may be part of a repeating plan, or a one-off.
Late fee — an extra charge added automatically when a bill goes unpaid past its grace period.
Location — one address you service. A customer can own more than one. Locations are what your plan is measured in — see Section 18.
One-time service — a job you sell once, not on a repeating schedule. For example, Filter Cleaning or a Green-to-Clean Recovery.
On-demand customer — someone added for a single job rather than a repeating plan. See Section 8.
Package — several services bundled and sold together as one item.
Proration — charging part of a normal price because the customer started or stopped partway through a billing period.
Route — the order a technician drives their stops in for a day.
Service template — a saved service with its price, how long it takes, and its checklist, so you don't rebuild it for every customer.
Second email address — one extra address for the same customer, so two people both get everything. It receives email only; it cannot be used to log in to the portal.
Statement — one monthly bill listing everything a customer owed, paid, and was credited during the period.
Stop — one visit on a technician's route for the day.
Subscription — a repeating service a customer is signed up for, with a price and a frequency.
Technician — the person doing the work in the field, using the EZ Pool Biller app on their phone.
Visit report — the email a customer receives after a pool service, showing what was done.
21. Getting Help
In one sentence: How to reach a real person when something isn't working.
Who needs this: Everyone
Where to find it: ezpoolbiller.com/contact/
21.1 Ways to reach us
| How | Details |
|---|---|
| Phone | (888) 505-6030 |
| Contact form | ezpoolbiller.com/contact/ |
| Through the app, or reply from your account email |
Our support team includes pool care veterans who understand your business — not generic agents reading from a script. Billing question, routing problem, help setting up your services: ask.
21.2 Moving your data from other software
Switching from another system? We move your data across for free. Send us your export files and we'll bring over your customers, their services, and their history — usually within 1–2 working days.
Start that at ezpoolbiller.com/contact/.
21.3 Help getting set up
If you'd rather not work through the setup wizard alone, we'll walk you through it on the phone. Ask when you get in touch.
EZ Pool Biller is a product of Superior Point Inc. Built by pool care professionals, for pool care professionals.